
Investigation of Tokens, Authorization and Docker
To provide a foundation around the usage of tokens for authorization. We will use your Ubuntu instance for this work, and aim to provide an introduction to Docker. Make sure you have created your GitHub account, as we will use the account details later in the lab.
A JWT
A.1
The JSON Web Token can be used to grant access rights. It is signed using a secret passphrase. Using node.js, create the following program (you need to use npm install jwt-simple):
var args = process.argv;
var sec='fff';

var pay="{ foo: \'bar\'}";

//if (args.length>1) pay=args[2];
//if (args.length>2) sec=args[3];

console.log("Message:\t",pay)
console.log("Passphrase:\t",sec)

var jwt = require('jwt-simple');
var payload = pay  ;
var secret = sec;


// encode
var token = jwt.encode(payload, secret);
console.log("Token: ",token);
// decode
var decoded = jwt.decode(token, secret);
console.log("Decoded: ",decoded);
Repl.it: https://repl.it/@billbuchanan/jwt
A.2
Now try different messages, but keep the secret the same:
How do the JSON Web Tokens change?
If we now keep the message the same, but change the secret, how do the JSON Web Tokens change?
There are different ways to encode the token (HS256, HS384, HS512 and RS256). We can add the encoding with:
jwt.encode(payload, secret, 'HS512')
What do HS256, HS364, HS512 and RS256 represent?
What is the difference between creating the signature with HMAC and RSA?
Try each of the hashing methods (HSXXX), and observe how the JWT changes:
A.3
Now, match the following parameters to the correct signing secret. For the following the message is “{ isa: 14321}”, and the signing keys used are either "napier", "napier123", "qwerty" or "fox123":
eyJ0eXAiOiJKV1QiLCJhbGciOiJIUzI1NiJ9.InsgaXNhOiAxNDMyMX0i.czeOHowkTpZQ2qG5pZneOlnpdBGMCnTLXaPImNmSr9w
Secret:
eyJ0eXAiOiJKV1QiLCJhbGciOiJIUzI1NiJ9.InsgaXNhOiAxNDMyMX0i.WWR2-Wxw0Nm0Expix600cOltjnjhC7hCjOmHH2cPpJ4
Secret:
eyJ0eXAiOiJKV1QiLCJhbGciOiJIUzI1NiJ9.InsgaXNhOiAxNDMyMX0i.uSXNmESTf_NUk0QC8IJyPfsm_QMu00UP6eIvOA3Dag4
Secret:
Repl.it: https://repl.it/@billbuchanan/jwt2
A.4
The following JWT has been signed with the passphrase of “fox123”:
eyJ0eXAiOiJKV1QiLCJhbGciOiJIUzI1NiJ9.IntcImlzc1wiOiBcImZyZWRcIixcInN1YmplY3RcIjpcImxvZ2luXCIsXCJkZXBhcnRtZW50XCI6IFwic2FsZXNcIixcImlhdFwiOiBcIjE1MjUxOTMzNzdcIixcImV4cFwiOiBcIjE1MjUyMzY1NzdcIn0i.4QpsBQ5HDbAjzv3EaMp0UQdCG-MnEanW7g8q9AUvOLU
Can you read the message with the wrong passphrase?
Can you determine the message?
When was the token issued, and when was its expiry time?
Repl.it: https://repl.it/@billbuchanan/jwt3
A.5
The following JWT was signed with a three-character word [a-z]. Can you determine the secret phrase:
eyJ0eXAiOiJKV1QiLCJhbGciOiJIUzI1NiJ9.IntcImlzc1wiOiBcImZyZWRcIixcInN1YmplY3RcIjpcImxvZ2luXCIsXCJkZXBhcnRtZW50XCI6IFwic2FsZXNcIixcImlhdFwiOiBcIjE1MjUxOTMzNzdcIixcImV4cFwiOiBcIjE1MjUyMzY1NzdcIn0i.zyd0cy8p4xgpeoyOQ8G61xnA5Cmg5w095tNH9IWg9Wc
Don't look here, if you don't one an answer just now:
Repl.it: https://repl.it/@billbuchanan/jwt4
A.6
The following JWT has a secret phrase of “napier”:
eyJ0eXAiOiJKV1QiLCJhbGciOiJIUzI1NiJ9.IntcImlzc1wiOiBcImZyZWRcIixcInN1YmplY3RcIjpcImxvZ2luXCIsXCJkZXBhcnRtZW50XCI6IFwic2FsZXNcIixcImlhdFwiOiBcIjE1MjUxOTMzNzdcIixcImV4cFwiOiBcIjE1MjUyMzY1NzdcIn0i.G-cLzbqrTb_daMusbJTEEi_p-1cGC9_Q2ONtGGXe65Q
Did you decode it?
Now – one at a time – change one of the Base64 characters in the each of the fields (and which are separated by a ‘.’). What effect does it have on the ability to decode the token?
Repl.it: https://repl.it/@billbuchanan/jwt5
B Fernet Tokens
B.1 The Fernet token contains a timestamp, IV, cipher and HMAC signature. The cipher is generated by taking a password and the plaintext (Figure 1).
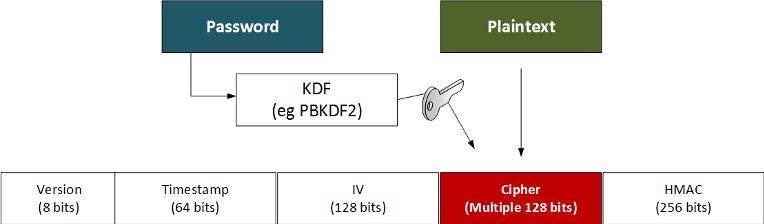
Figure 1: Fernet token
Enter the following program:
from cryptography.fernet import Fernet
from cryptography.hazmat.primitives import hashes
from cryptography.hazmat.backends import default_backend

import sys
import binascii
import base64

password="hello"
val="hello world"


def get_key(password):
    digest = hashes.Hash(hashes.SHA256(), backend=default_backend())
    digest.update(password)
    return base64.urlsafe_b64encode(digest.finalize())

if (len(sys.argv)>1):
	val=sys.argv[1]

if (len(sys.argv)>2):
	password=str(sys.argv[2])

if (len(password)>1):
	key = get_key(password)
else:
	key = Fernet.generate_key()


print "Key: "+binascii.hexlify(bytearray(key))


cipher_suite = Fernet(key)
cipher_text = cipher_suite.encrypt(val)
cipher=binascii.hexlify(bytearray(cipher_text))
print "Cipher: "+cipher

print "\nVersion:\t"+cipher[0:2]
print "Time stamp:\t"+cipher[2:18]
print "IV:\t\t"+cipher[18:50]
print "HMAC:\t\t"+cipher[-64:]

plain_text = cipher_suite.decrypt(cipher_text)
print "\nPlain text: "+plain_text
For a message of “hello” and a password of “qwerty”, prove that you can decrypt the token.
Can you decrypt the token?
Generate several tokens, and outline the values which change on the token?
Repl.it (Python 3.8): https://repl.it/@billbuchanan/fer01
B.2
The following Fernet token uses a password of “napier”.
Cipher: 6741414141414263706c6c645f707a5f2d6158394c3173623566354d366a6a636d575f5436307a737233764d5446484c634f622d6150794447486d55416a7839685a47496a477870367830455066657344725f376b676457584d38565747586e41773d3d

Version:	67
Time stamp:	4141414141426370
IV:		6c6c645f707a5f2d6158394c31736235
HMAC:		6a477870367830455066657344725f376b676457584d38565747586e41773d3d
Can you determine the message:
Repl.it: https://repl.it/@billbuchanan/fer02 [Ans: 'help me!!!']
C OAuth 2.0
OAuth 2.0 allows a user to gain an OAuth 2.0 token and then be granted rights onto other systems. One application is in federated ID login. In this case we will log into a system using a GitHub authorization. In this case GitHub will authorize our details, and redirect to a given page.
C.1
First go to your GitHub account, and register your OAuth 2.0 application. Give it a name of (MyGit) and redirect to a Web site (such as https://asecuritysite.com). Figure 2 gives an overview of this. You will then generate a Client ID code and a Client Secret (Figure 3). Take a copy of these codes, as you will need it in the next part.
C.2
We will now create a Flask program. In the following is an OAuth 2 method to create a federated ID login [1]. Enter the code:
from requests_oauthlib import OAuth2Session
from flask import Flask, request, redirect, session, url_for
from flask.json import jsonify
import os

app = Flask(__name__)


# This information is obtained upon registration of a new GitHub OAuth
# application here: https://github.com/settings/applications/new
client_id = "<your client key>"
client_secret = "<your client secret>"
authorization_base_url = 'https://github.com/login/oauth/authorize'
token_url = 'https://github.com/login/oauth/access_token'


@app.route("/")
def demo():
    """Step 1: User Authorization.

    Redirect the user/resource owner to the OAuth provider (i.e. Github)
    using an URL with a few key OAuth parameters.
    """
    github = OAuth2Session(client_id)
    authorization_url, state = github.authorization_url(authorization_base_url)

    # State is used to prevent CSRF, keep this for later.
    session['oauth_state'] = state
    return redirect(authorization_url)


# Step 2: User authorization, this happens on the provider.

@app.route("/callback", methods=["GET"])
def callback():
    """ Step 3: Retrieving an access token.

    The user has been redirected back from the provider to your registered
    callback URL. With this redirection comes an authorization code included
    in the redirect URL. We will use that to obtain an access token.
    """

    github = OAuth2Session(client_id, state=session['oauth_state'])
    token = github.fetch_token(token_url, client_secret=client_secret,
                               authorization_response=request.url)

    # At this point you can fetch protected resources but lets save
    # the token and show how this is done from a persisted token
    # in /profile.
    session['oauth_token'] = token

    return redirect(url_for('.profile'))


@app.route("/profile", methods=["GET"])
def profile():
    """Fetching a protected resource using an OAuth 2 token.
    """
    github = OAuth2Session(client_id, token=session['oauth_token'])
    return jsonify(github.get('https://api.github.com/user').json())


if __name__ == "__main__":
    # This allows us to use a plain HTTP callback
    os.environ['OAUTHLIB_INSECURE_TRANSPORT'] = "1"

    app.secret_key = os.urandom(24)
    app.run(debug=True)
C.3
Now add your Client ID and Client secret to the code, and run it:
napier@napier-virtual-machine:~/esecurity/unit10_services/src$ python c02.py
 * Serving Flask app "c01" (lazy loading)
 * Environment: production
   WARNING: Do not use the development server in a production environment.
   Use a production WSGI server instead.
 * Debug mode: on
 * Running on http://127.0.0.1:5000/ (Press CTRL+C to quit)
 * Restarting with stat
 * Debugger is active!
 * Debugger PIN: 118-069-597
C.4
Now open up a browser, and connect to http://127.0.0.1. Next you should be faced with the GitHub login (Figure 4).
Are you able to login? What happened?
Quit from the browser, and now go back to http://127.0.0.1:500. What happens?
Now, clear the cache of the browser, and go back to http://127.0.0.1:500. What happens?
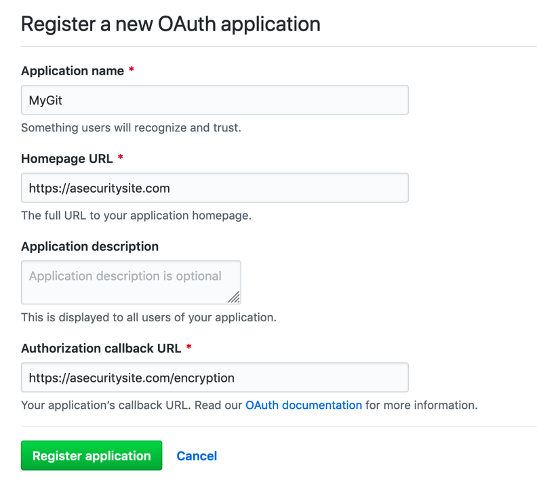
Figure 2: Registering an OAuth application
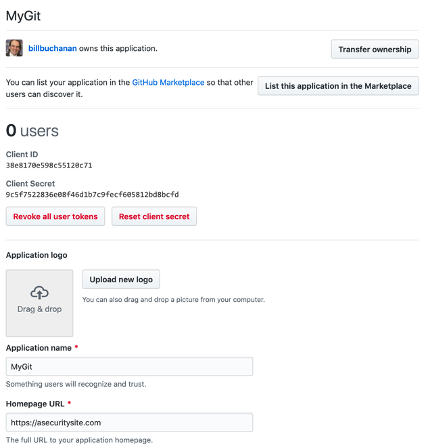
Figure 3: Generating Client ID and Client Secret
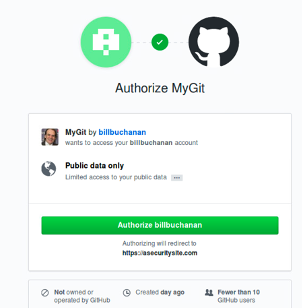
Figure 4: GitHub authorization
D Introduction to Docker
D.1
Docker is used to create a light-weight infrastructure for services. First we will install some of the pre-requisites:
sudo apt install apt-transport-https ca-certificates curl software-properties-common
curl -fsSL https://download.docker.com/linux/ubuntu/gpg | sudo apt-key add -
sudo add-apt-repository "deb [arch=amd64] https://download.docker.com/linux/ubuntu bionic stable"
sudo apt update
apt-cache policy docker-ce
sudo apt install docker-ce
Now we will create a Docker instance for an SSH server.
mkdir docker_sshd
cd docker_sshd
Now create a file name “Dockerfile”, and add the following:
FROM ubuntu:16.04

RUN apt-get update && apt-get install -y openssh-server
RUN mkdir /var/run/sshd
RUN echo 'root:THEPASSWORDYOUCREATED' | chpasswd
RUN sed -i 's/PermitRootLogin prohibit-password/PermitRootLogin yes/' /etc/ssh/sshd_config

# SSH login fix. Otherwise user is kicked off after login
RUN sed 's@session\s*required\s*pam_loginuid.so@session optional pam_loginuid.so@g' -i /etc/pam.d/sshd

ENV NOTVISIBLE "in users profile"
RUN echo "export VISIBLE=now" >> /etc/profile

EXPOSE 22
CMD ["/usr/sbin/sshd", "-D"]
Now build the docker file:
napier@napier-virtual-machine:~/Docker_sshd$  docker build -t docker_sshd .

Step 10/10 : CMD ["/usr/sbin/sshd", "-D"]
 ---> Running in 982e91d7a665
Removing intermediate container 982e91d7a665
 ---> e90cde8a95d3
Successfully built e90cde8a95d3
Successfully tagged docker_sshd:latest
We can view the images that we have created with the “docker image ls” command:
napier@napier-virtual-machine:~/Docker_sshd$ docker image ls
REPOSITORY          TAG                 IMAGE ID            CREATED             SIZE
docker_sshd         latest              e90cde8a95d3        4 minutes ago       196MB
friendlyhello       latest              290382d66d7b        19 minutes ago      131MB
python              2.7-slim            48e3247f2a19        5 days ago          120MB
ethereum/solc       stable              1b65904c442c        2 weeks ago         6.48MB
hello-world         latest              fce289e99eb9        3 months ago        1.84kB
ubuntu              16.04               b0ef3016420a        3 months ago
Which instances are installed?
Now log into your SSH server, and use the password defined in the Dockerfile. Create a new folder on your SSH server, and then create a file and add something to it:
napier@napier-virtual-machine:~/Docker_sshd$ docker run -d -P --name test_sshd docker_sshd
2e1ee60deb3f44f2c4a6af5ebd0e32f9882ba4e03042f0eb30285f74e49ced39
napier@napier-virtual-machine:~/Docker_sshd$ docker port test_sshd 22
0.0.0.0:32769
napier@napier-virtual-machine:~/Docker_sshd$ ssh root@localhost -p 32769
The authenticity of host '[localhost]:32769 ([127.0.0.1]:32769)' can't be established.
ECDSA key fingerprint is SHA256:WvbGw6gNNJzLksG87PWQ3yg+YvHBQc9PLFJl3wPOWnM.
Are you sure you want to continue connecting (yes/no)? yes
Warning: Permanently added '[localhost]:32769' (ECDSA) to the list of known hosts.
root@localhost's password: <PASSWORD>
Welcome to Ubuntu 16.04.5 LTS (GNU/Linux 4.4.0-142-generic x86_64)

 * Documentation:  https://help.ubuntu.com
 * Management:     https://landscape.canonical.com
 * Support:        https://ubuntu.com/advantage

The programs included with the Ubuntu system are free software;
the exact distribution terms for each program are described in the
individual files in /usr/share/doc/*/copyright.

Ubuntu comes with ABSOLUTELY NO WARRANTY, to the extent permitted by
applicable law.

root@2e1ee60deb3f:~# ls
root@2e1ee60deb3f:~# mkdir test
root@2e1ee60deb3f:~#
There are many options we can use with docker run:
--rm	Remove container when it exits.
-d	Runs docker container in the background so there is no output (also --detach)
--ip 10.10.10.10	Assign an IP address of 10.10.10.10.
-p 22:3000 	Map port 22 to port 3000 (also --publish).
--name my_c	Give the container a unique name.
Now list the running containers:
napier@napier-virtual-machine:~/docker_sshd$ docker ps
CONTAINER ID   IMAGE        COMMAND              CREATED     STATUS            PORTS                                                    NAMES
f0e1674e5c7a   docker_sshd  "/usr/sbin/sshd -D"      3 minutes ago       Up 3 minutes        0.0.0.0:32770->22/tcp                                    test_sshd
What information can you gain about your container from this listing?
What was the port number that we used to log into the SSH server?
By running “netstat” can you see the running port?
Now we will stop the container, and then remove it:
napier@napier-virtual-machine:~/Docker_sshd$ docker container stop test_sshd
test_sshd
Can you now run the SSH container with Port 8888?
Did it run?
Finally, we will get rid of the docker container:
napier@napier-virtual-machine:~/Docker_sshd$ docker container rm test_sshd

napier@napier-virtual-machine:~/Docker_sshd$ docker image rm docker_sshd
Can you prove that the container does not exist?
Can you prove that the image does not exist?
E Docker Setup for yml
E.1
With Docker we can define a .yml file in order to create our instance. In the example we will use the code at [2] in order to setup OPA (Open Policy Authorization) for Web access rights. First create a folder named “docker_opa”, and then create a file named “docker-compose.yml” in this folder. The contents will be:
version: '2'
services:
  opa:
    image: openpolicyagent/opa:0.10.5
    ports:
      - 8181:8181
    # WARNING: OPA is NOT running with an authorization policy configured. This
    # means that clients can read and write policies in OPA. If you are
    # deploying OPA in an insecure environment, be sure to configure
    # authentication and authorization on the daemon. See the Security page for
    # details: https://www.openpolicyagent.org/docs/security.html.
    command:
      - "run"
      - "--server"
      - "--log-level=debug"
  api_server:
    image: openpolicyagent/demo-restful-api:0.2
    ports:
      - 5000:5000
    environment:
      - OPA_ADDR=http://opa:8181
      - POLICY_PATH=/v1/data/httpapi/authz
Next create the policy in the file “example.rego” (and which uses the Rego policy language), and add the following:
package httpapi.authz

# bob is alice's manager, and betty is charlie's.
subordinates = {"alice": [], "charlie": [], "bob": ["alice"], "betty": ["charlie"]}

# HTTP API request
import input

default allow = false

# Allow users to get their own salaries.
allow {
  input.method = "GET"
  input.path = ["finance", "salary", username]
  input.user = username
}

# Allow managers to get their subordinates' salaries.
allow {
  input.method = "GET"
  input.path = ["finance", "salary", username]
  subordinates[input.user][_] = username
}
Now run docker-compose to run the Docker container:
napier@napier-virtual-machine:~$ docker-compose -f docker-compose.yml up
In another terminal, we can then update a policy on the container with:
napier@napier-virtual-machine:~$ curl -X PUT --data-binary @example.rego localhost:8181/v1/policies/example
Now check the policies:
napier@napier-virtual-machine:~$ curl --user alice:password localhost:5000/finance/salary/alice
Success: user alice is authorized
napier@napier-virtual-machine:~$ curl --user bob:password localhost:5000/finance/salary/alice
Success: user bob is authorized
napier@napier-virtual-machine:~$ curl --user bob:password localhost:5000/finance/salary/charlie
Error: user bob is not authorized to GET url /finance/salary/Charlie
Can you explain the operation of the policy, and, in this case, that Alice is authorized, but Bob is not?
Can you stop your container, and then run it on Port 8181?
F Creating an NFT
For normal crypto tokens (ERC-20) we use FT (Fungible Tokens) and where there is a finite number of these, and each of these is the same. For example, we could release one million ERC-20 tokens and then trade with them. They will all have the same value, and I cannot mint any more. With NFTs (ERC-721), we can mint any number of cryptography tokens, and each will have an owner. Each of these can have its own value, or be pinned to a physical asset or identity. For example, as a tutor, I could assign each of my students to an NFT, and where we link the NFT to the student. Overall, we create these with a smart contract, and where there is an "owner" of the creation of the tokens. It is this account that will create the tokens as required, and then allocate them to new owners. First open Remix (remix.)
pragma solidity ^0.8.0;

import "@openzeppelin/contracts/token/ERC721/extensions/ERC721URIStorage.sol";
import "@openzeppelin/contracts/utils/Counters.sol";

contract BillToken is ERC721URIStorage{
    using Counters for Counters.Counter;
    Counters.Counter private _tokenIds;
    mapping(string => uint8) hashes;

    constructor() ERC721("Bill Token", "BTK") {}

    function awardItem(address recipient, string memory hash, string memory metadata) public returns (uint256){
        require(hashes[hash] != 1);
        hashes[hash] = 1;
        _tokenIds.increment();
        uint256 newItemId = _tokenIds.current();
        _mint(recipient, newItemId);
        _setTokenURI(newItemId, metadata);

        return newItemId;
    }
}
Now follow the tutorial here
References
[1] https://requests-oauthlib.readthedocs.io/en/latest/examples/real_world_example.html#real-example
[2] https://www.openpolicyagent.org/docs/http-api-authorization.html