
Lab 8: Blockchain and Cryptocurrencies
Aim: To provide a foundation for understanding Bitcoin and Blockchain.
A Ethereum
We will be using the Sepolia test network. If you have to set up your wallet, the details are:
- Network name: Sepolia
- RPC Url: https://rpc.sepolia.org or https://sepolia.infura.io/
- Chain ID: 11155111
- Symbol: SepoliaEth
- Explorer: https://sepolia.etherscan.io
You need to mine for some Ether. We can do this on one of these faucets:
- https://sepoliafaucet.net
- https://coinbase.com/faucets/ethereum-sepolia-faucet
- https://grabteeth.xyz
- https://sepolia-faucet.pk910.de/ (PoW powered)
- https://faucet-sepolia.rockx.com/
- https://faucet.quicknode.com/ethereum/sepolia
- https://sepoliafaucet.com/ (Alchemy's free faucet)
Setting up your Ethereum wallet on Sepolia
The Sepolia network allows a user to test an Ethereum application and using free Ether. Initially, set up your MetaMask wallet. A document to outline how you set this up is here. Once you have set it up, answer the following:
- What is your public ID (just define the first four hex values)?
- Find out someone else's public ID, and send them 0.001 Ether. If you are doing the lab on your own, send it to Bill (ID: 0xbB15B38e4ef6aF154b89A2E57E03Cd5cbD752233 []).
- Can you see the transaction on the Ethereum network? An example of a wallet is here.
- Can you see your transaction on the Sepolia Ethereum network for the person you send it to?
- What was the transaction fee for the transfer? If you were using the main Ethereum network, how much would the transaction cost in Dollars?
- Ask someone to send you 0.001 Ether. Did you receive it? If you are doing the lab on your own, ask your lab tutor to send you 0.001 Ether.
A demo of this part of the lab is here.
Creating a Smart Contract in Ethereum
So, let’s write a bit of code that does some simple maths. In the following we will implement sqrt(), sqr(), mul(), sub(), and add(). First, we open up https://remix.ethereum.org/. and enter the following Solidy contract:
pragma solidity ^0.8.0;
contract mymath {function sqrt(uint x) public view returns (uint y) {
    uint z = (x + 1) / 2;
    y = x;
    while (z < y) {
        y = z;
        z = (x / z + z) / 2;
    }
}
function sqr(uint a) public view returns (uint) {
    uint c = a * a;
    return c;
  }
function mul(uint a, uint b) public view returns (uint) {
    uint c = a * b;
    return c;
  }
function sub(uint a, uint b) public view returns (uint) {
    return a - b;
  }
function add(uint a, uint b) public view returns (uint) {
    uint c = a + b;
    return c;
}}
In this case, the "public" part makes sure we can see the output of the function, and the "view" part allows it to be stateless (and where we just have to receiver the value without the smart contact remember the state). On Ethereum we normally use the Solidity language to create a smart contract and then compile it into the byte code required for the ledger. First, can we start by entering the Solidity code into Remix [here]:
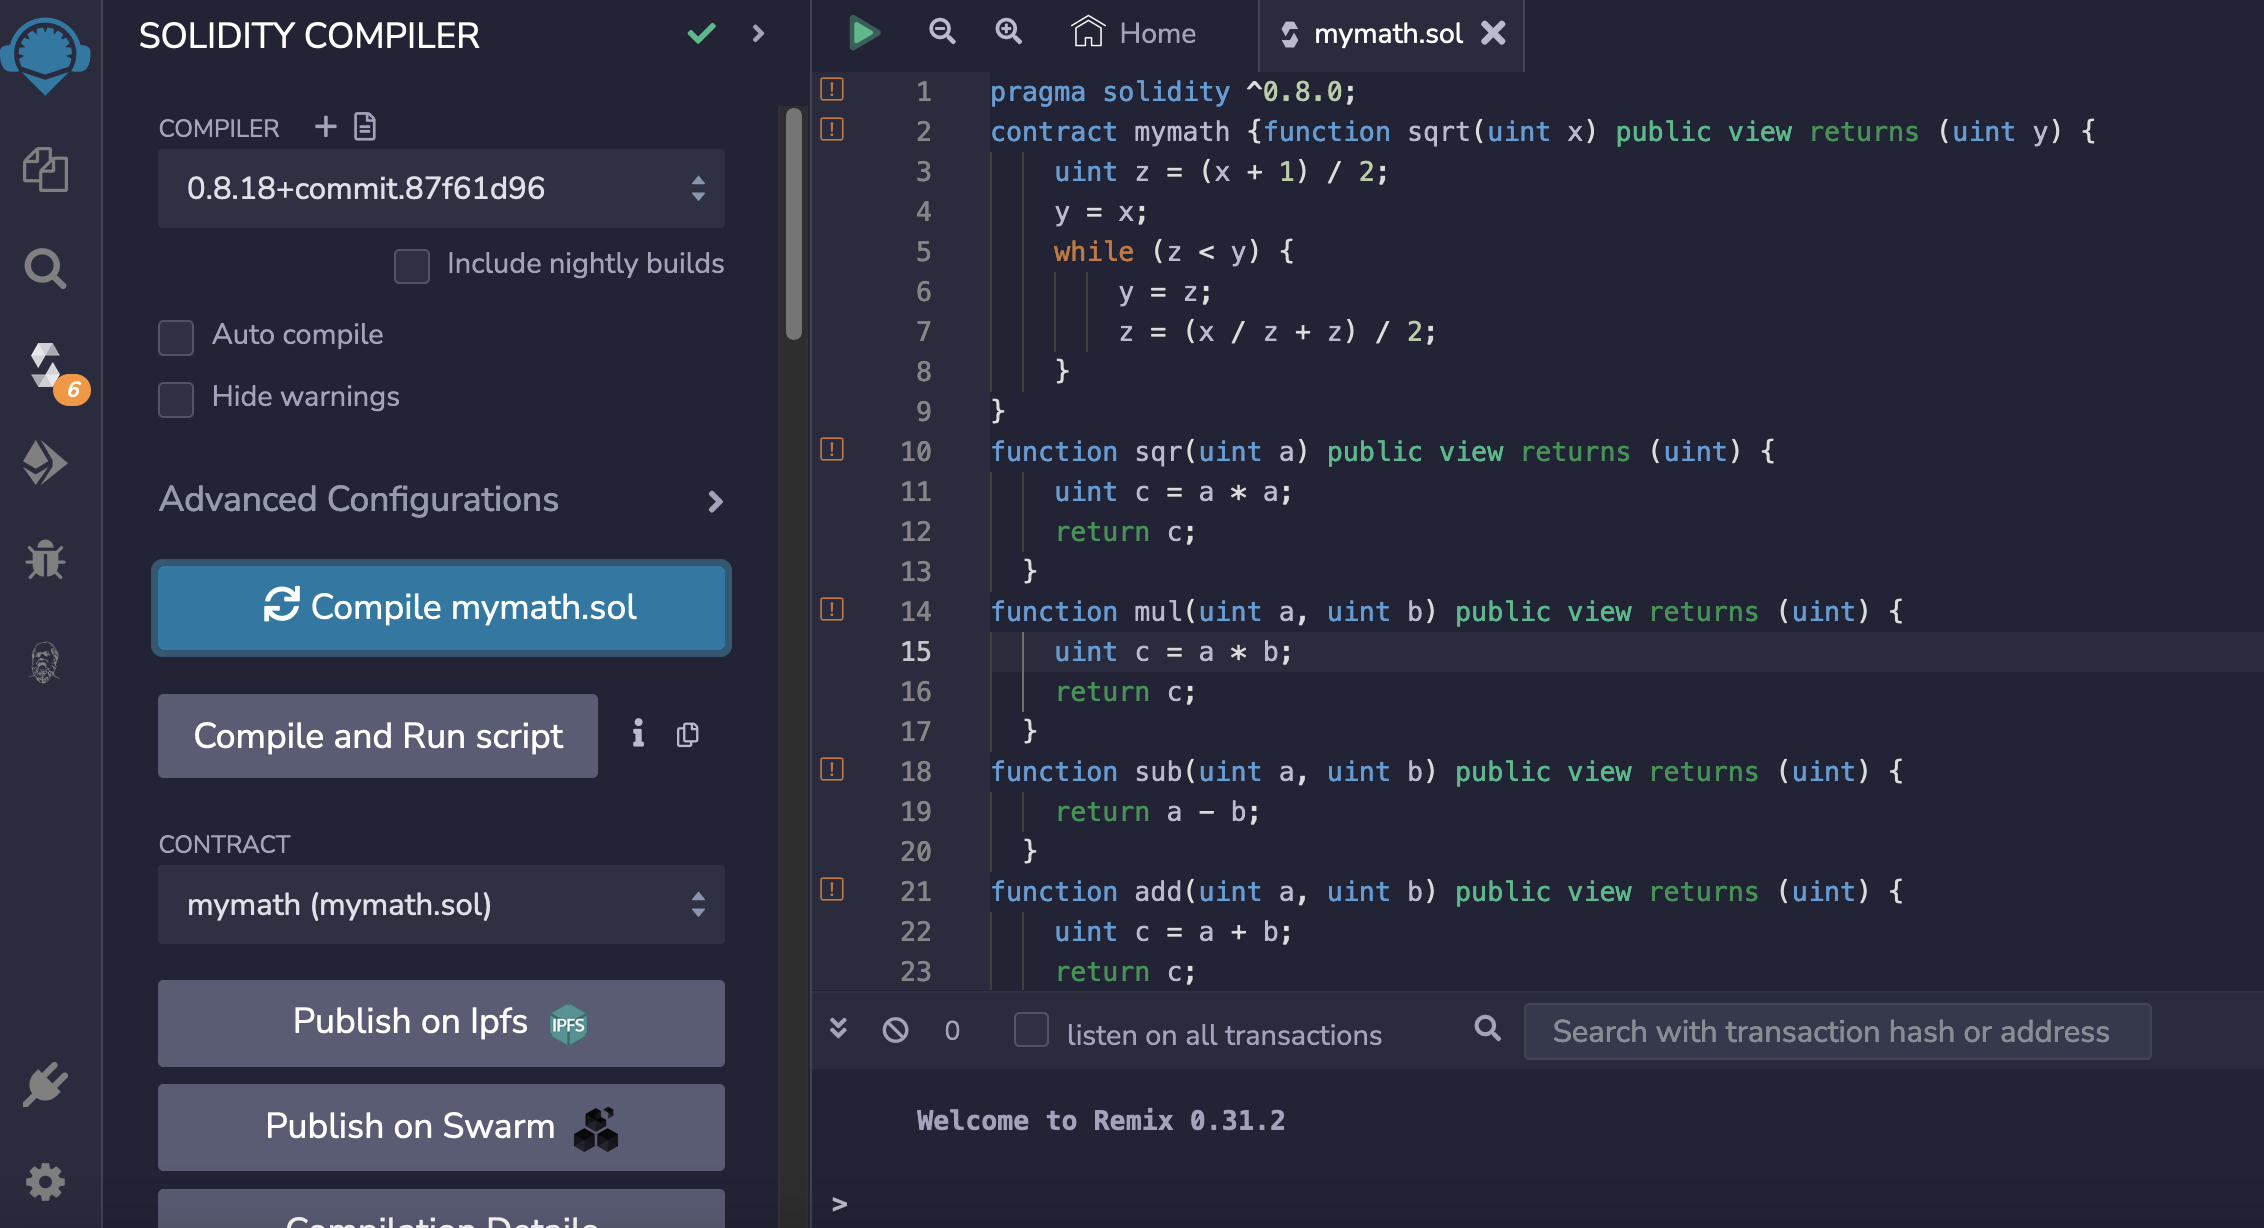
Once entered, we can then compile it with the Solidity compiler. It is important to take a note of the compiler version at this stage, as we will need this later:

Once compiled we can then deploy the smart contract to a test network (Sepolia). For this , we need to connect our Metamask wallet:
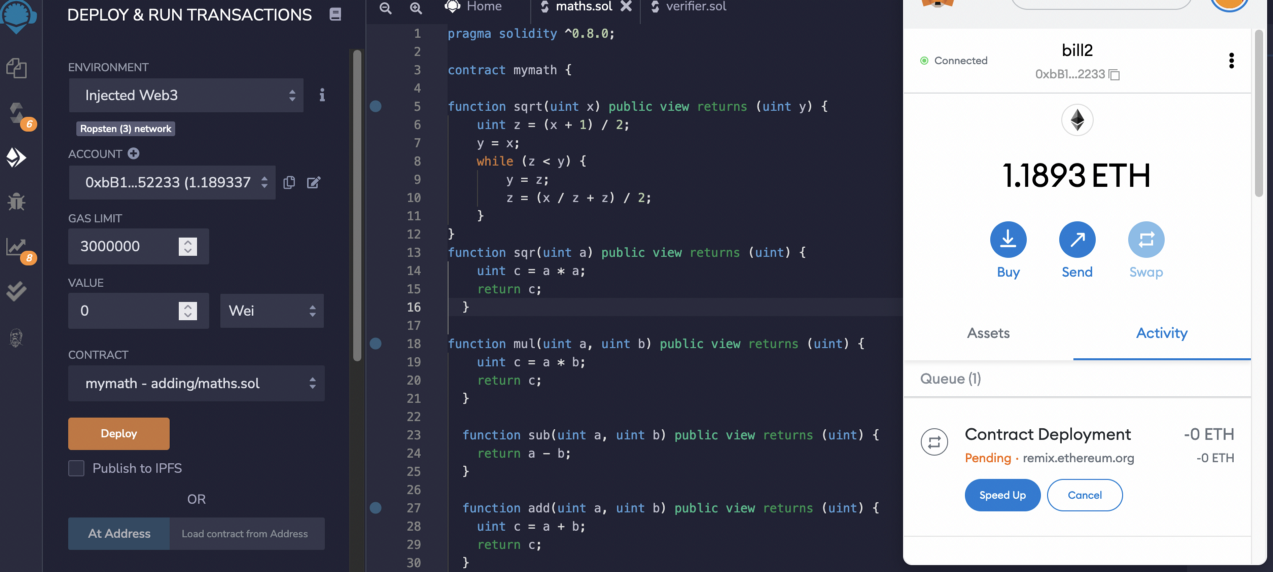
Once it has been deployed, we can see our wallet identifies the deployed contract:
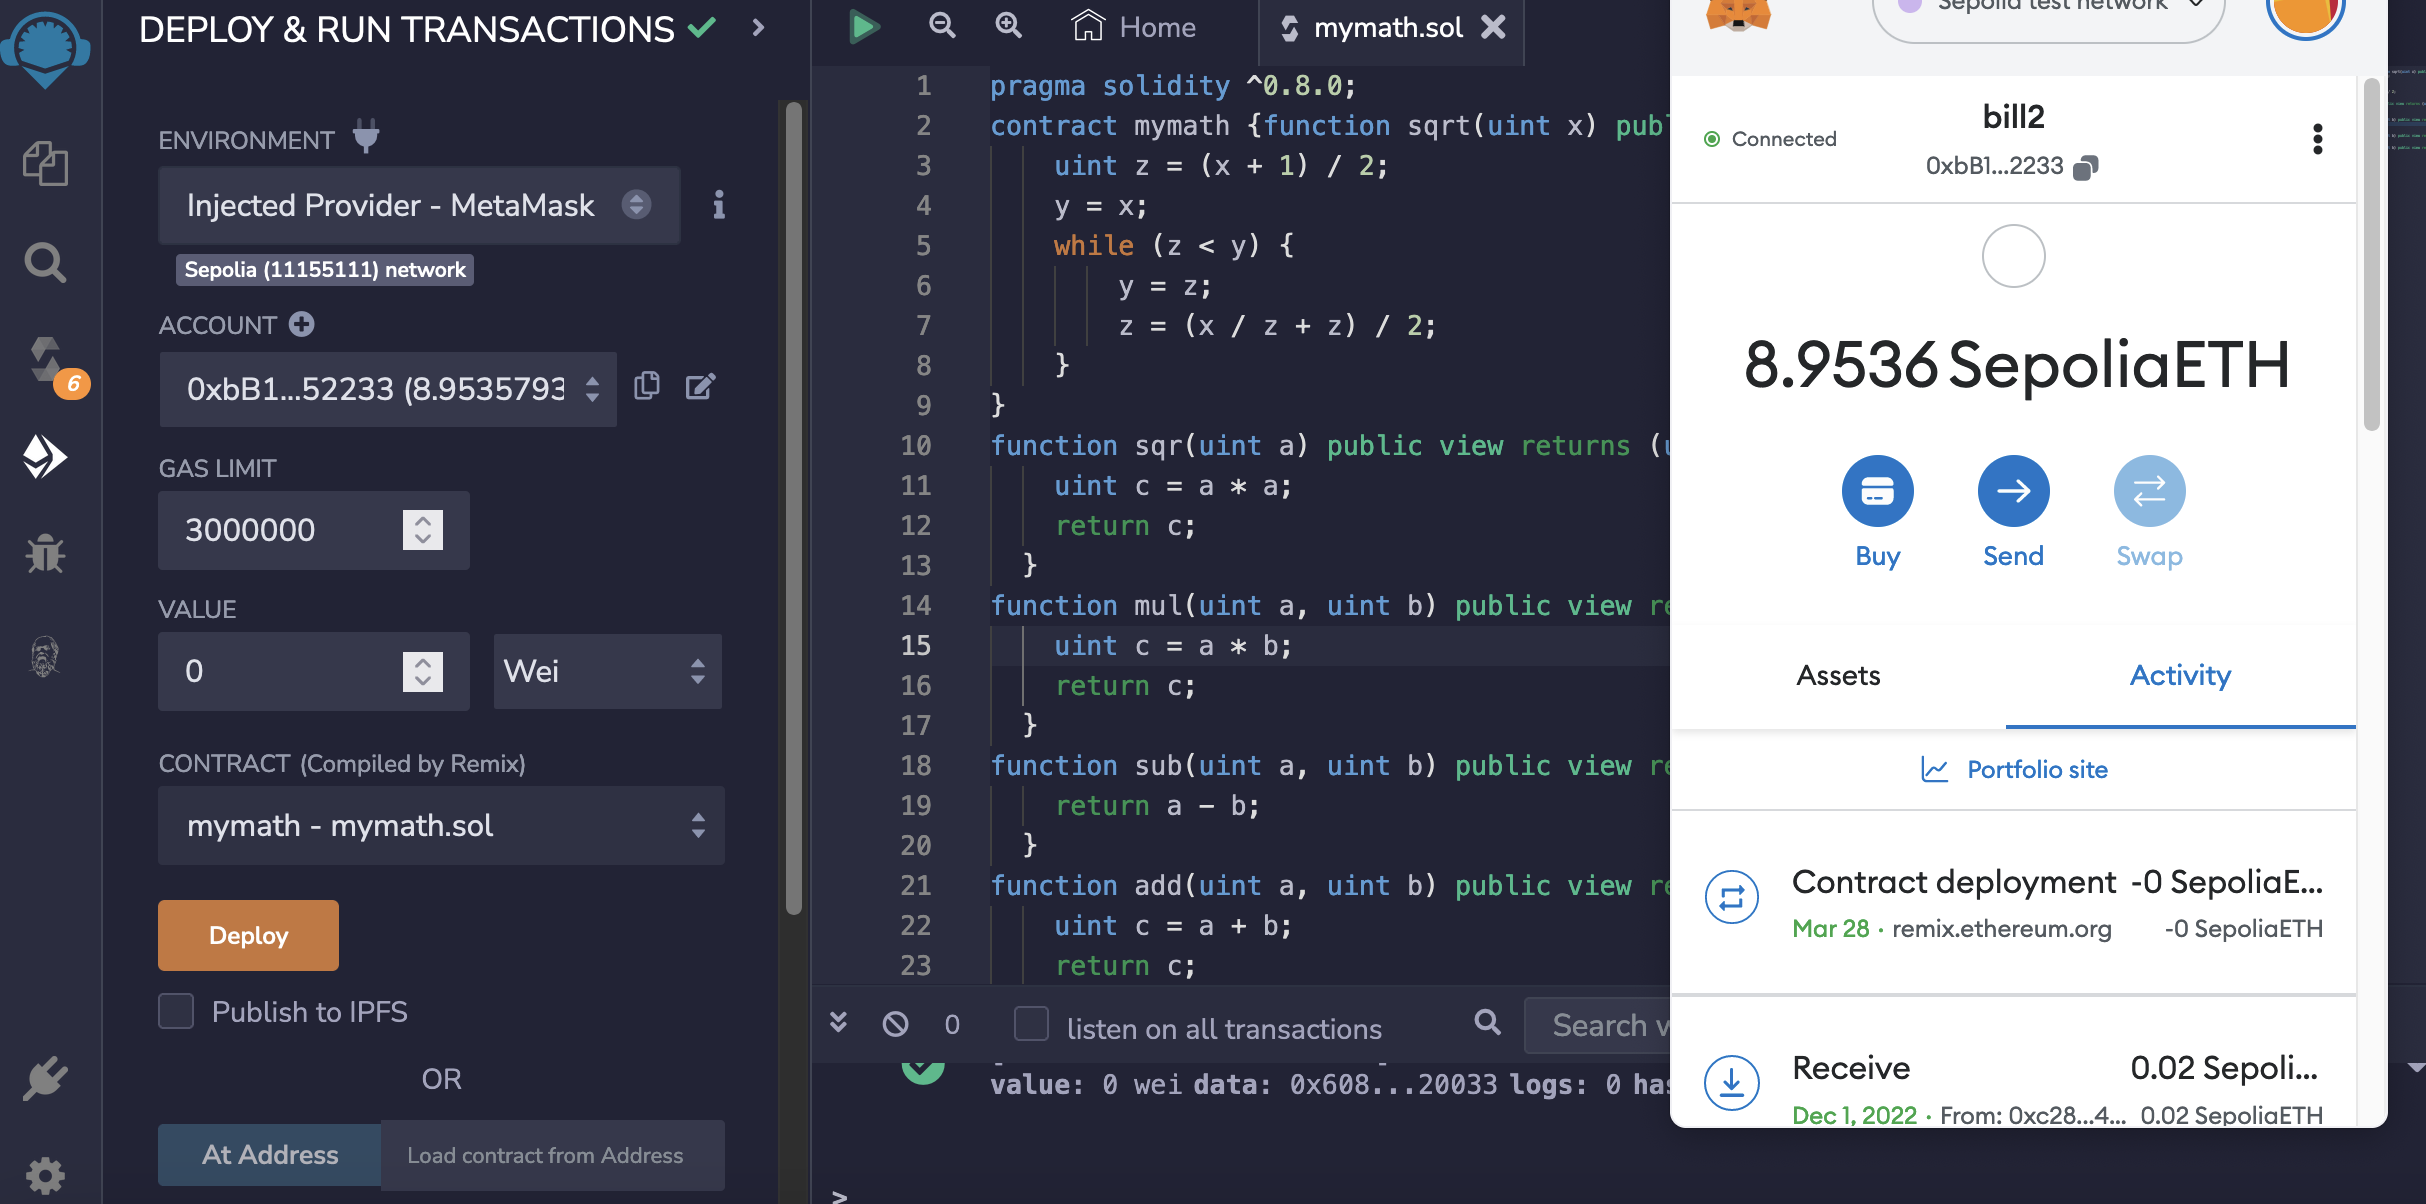
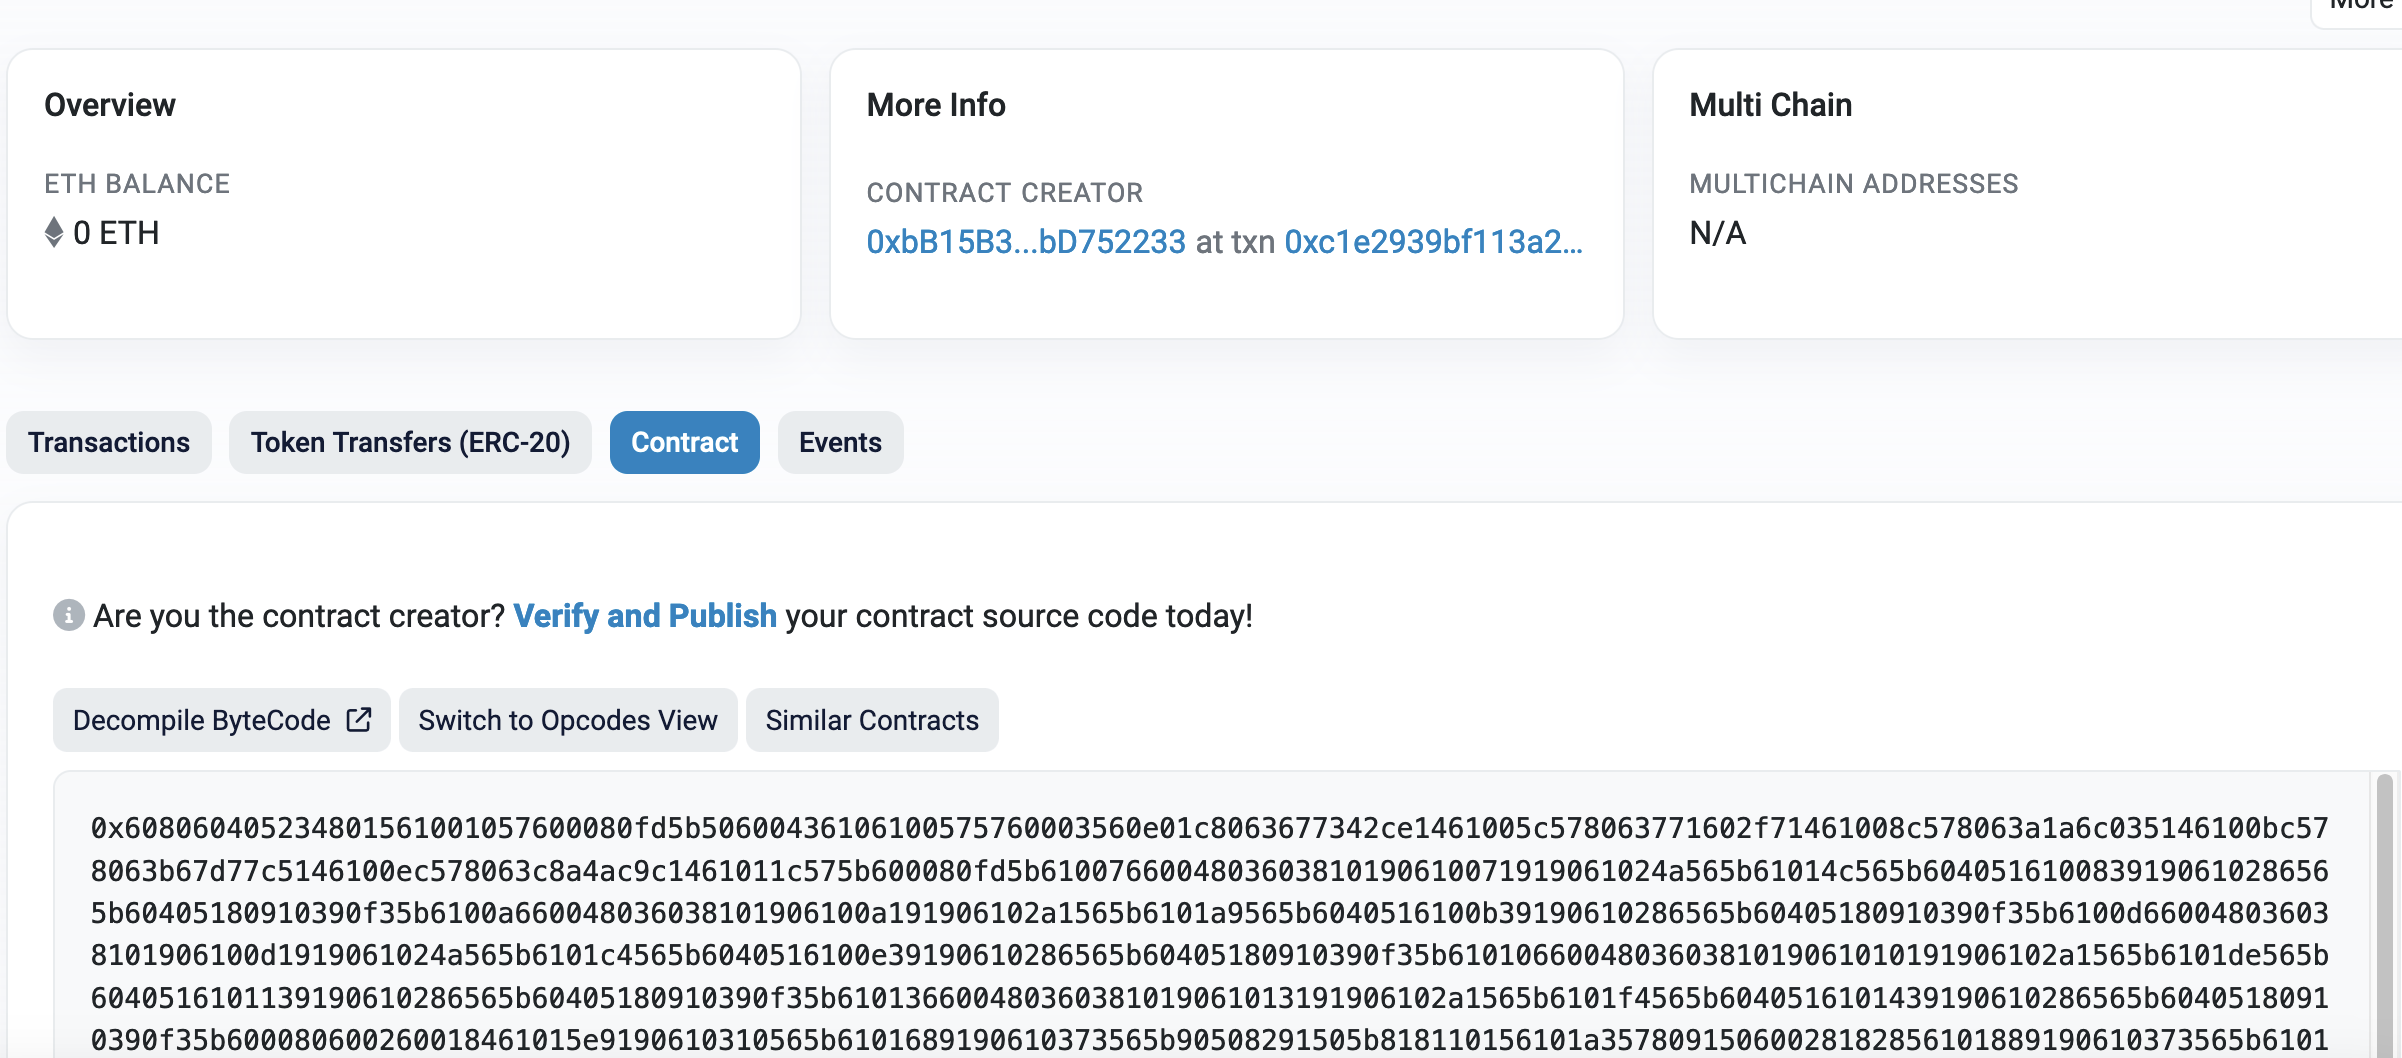
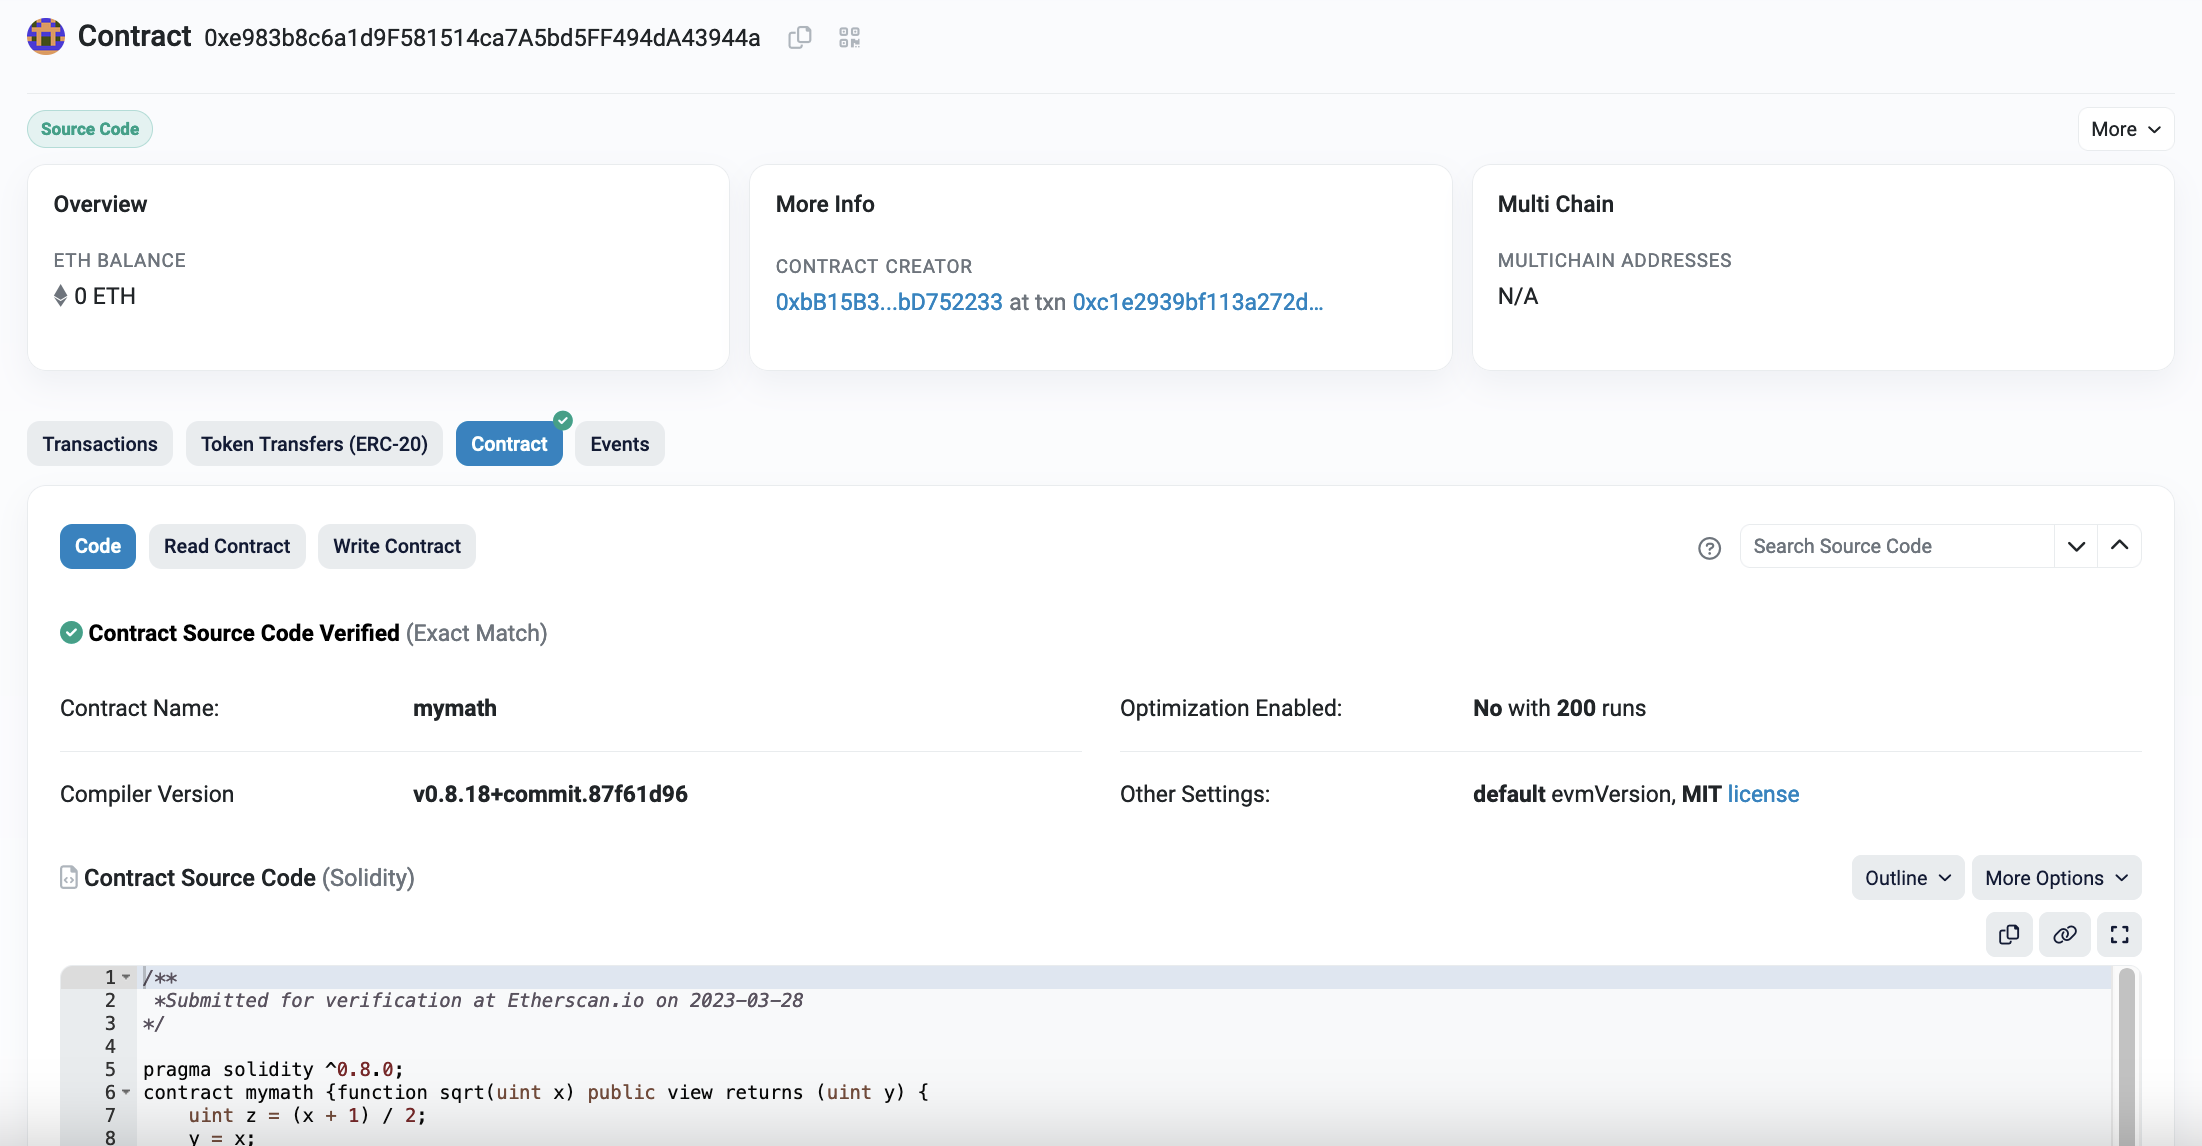
And clicking through gives us the address of the contract, and then viewing it on the explorer, we can see the transaction:
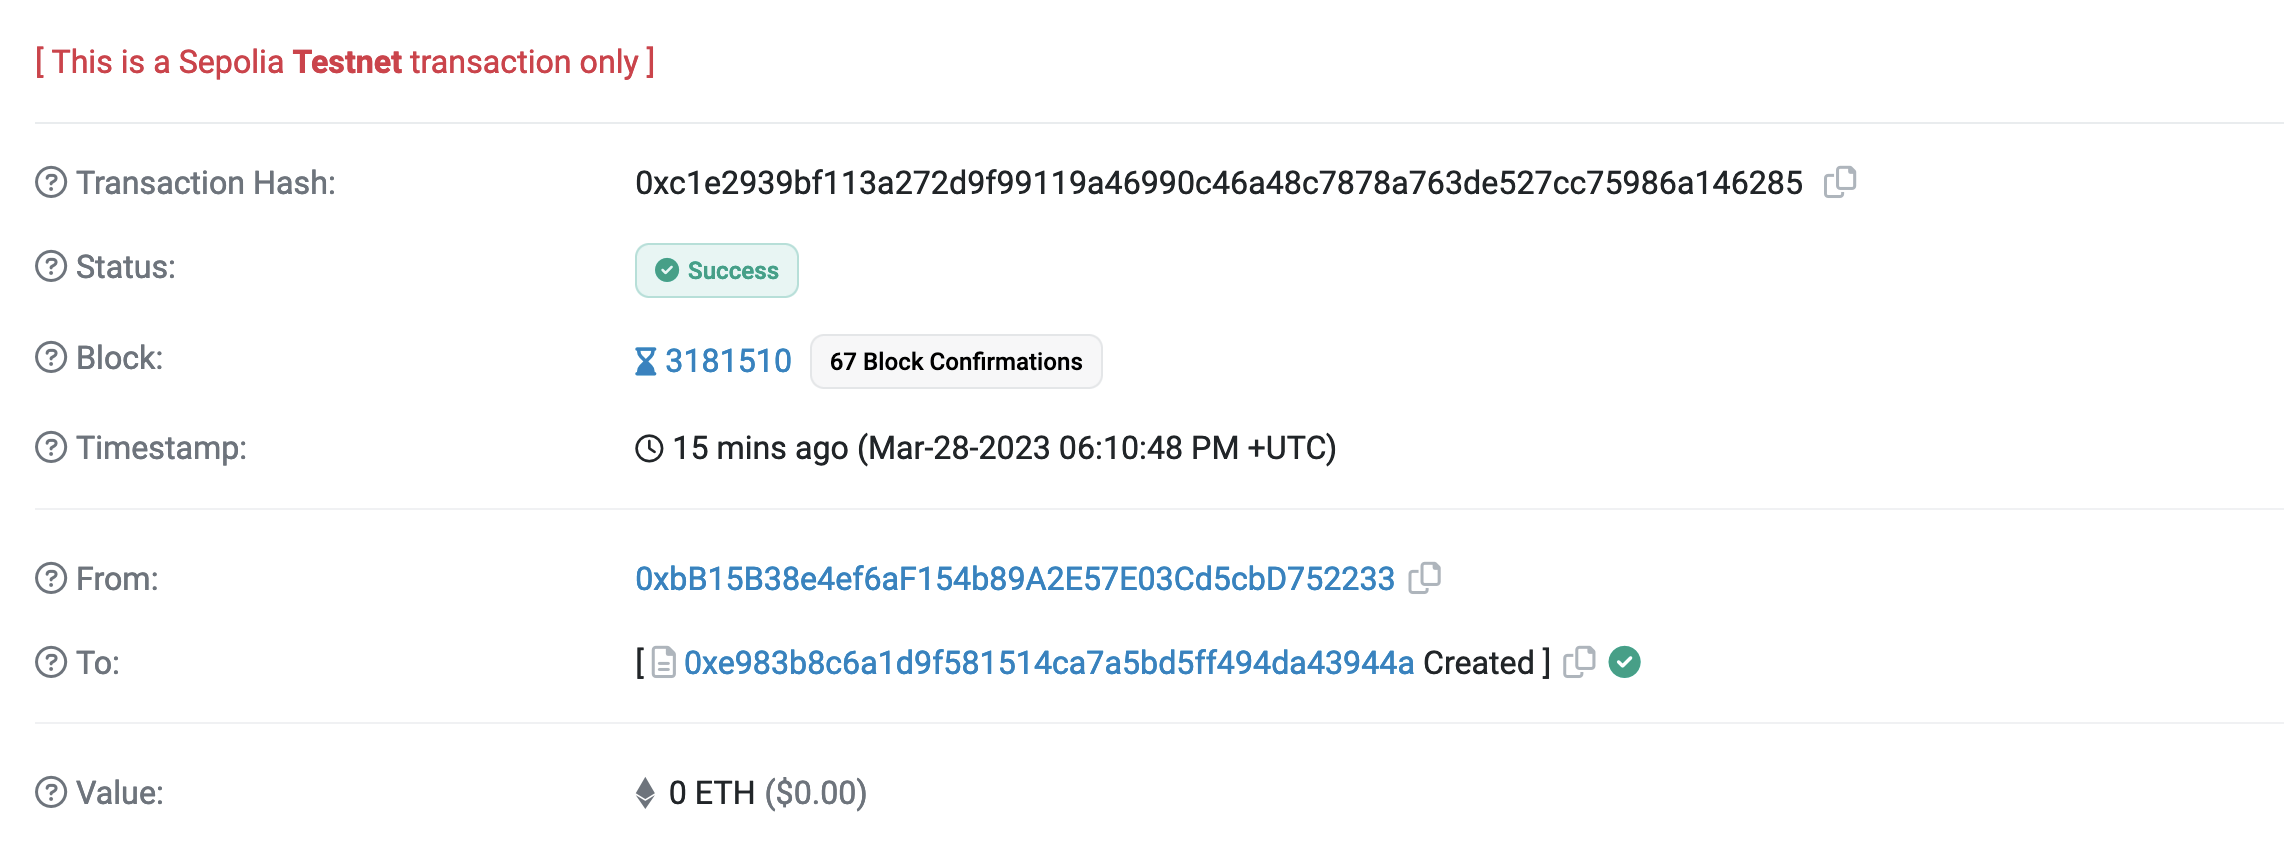
The address in the screenshot above is “0xe983b8c6a1d9f581514ca7a5bd5ff494da43944a”, so you can click on your own address and view the smart contract in Etherscan.
 )
)
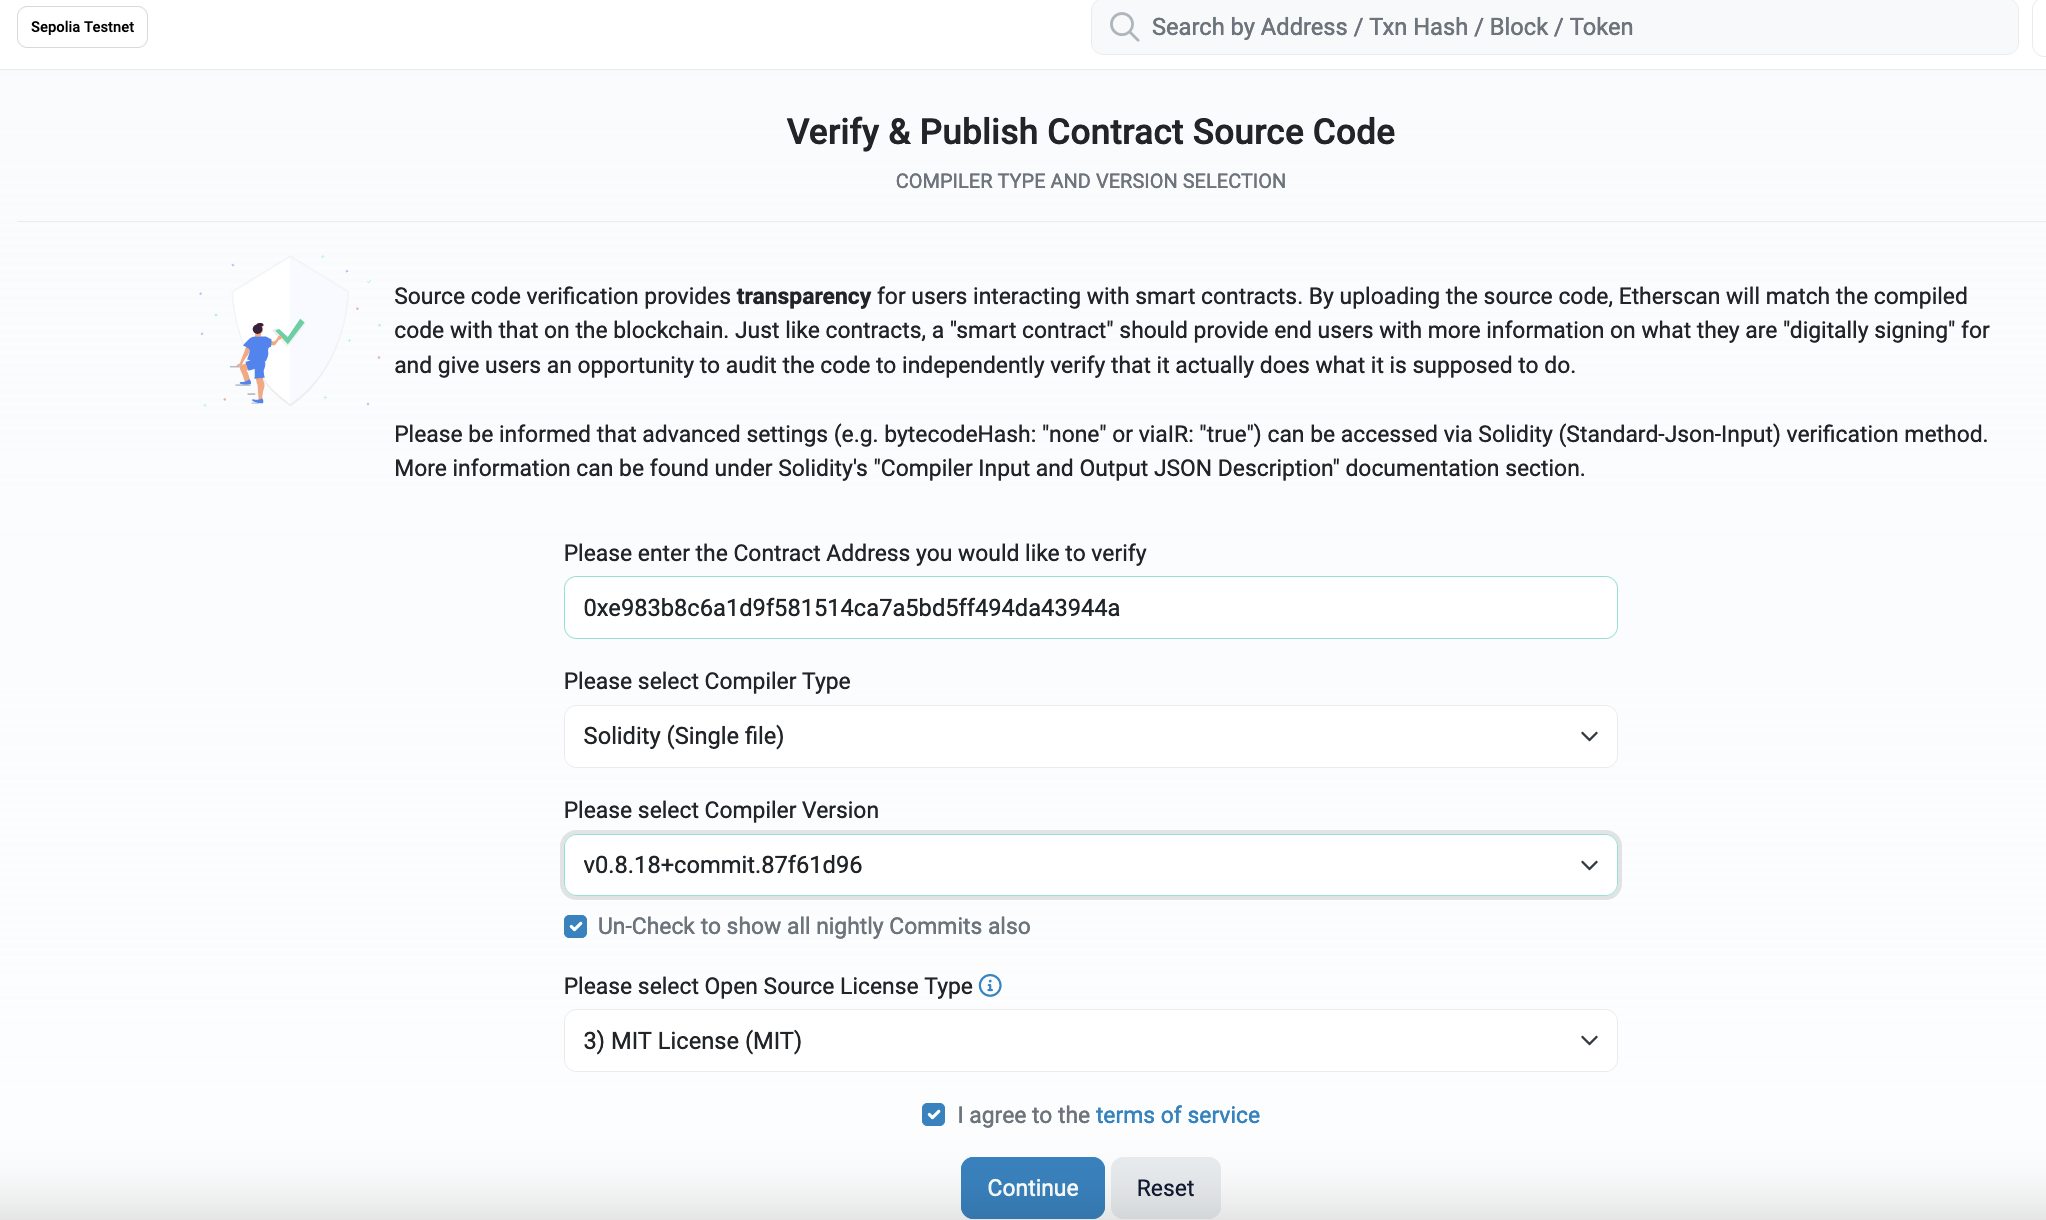
The address of the contract is "0xe983b8c6a1d9f581514ca7a5bd5ff494da43944a", so you can visit it from from: here. We now need to verify and publish the contact, with click on “Verify and Publish”:
After this, we can define the Compiler Version and the licence
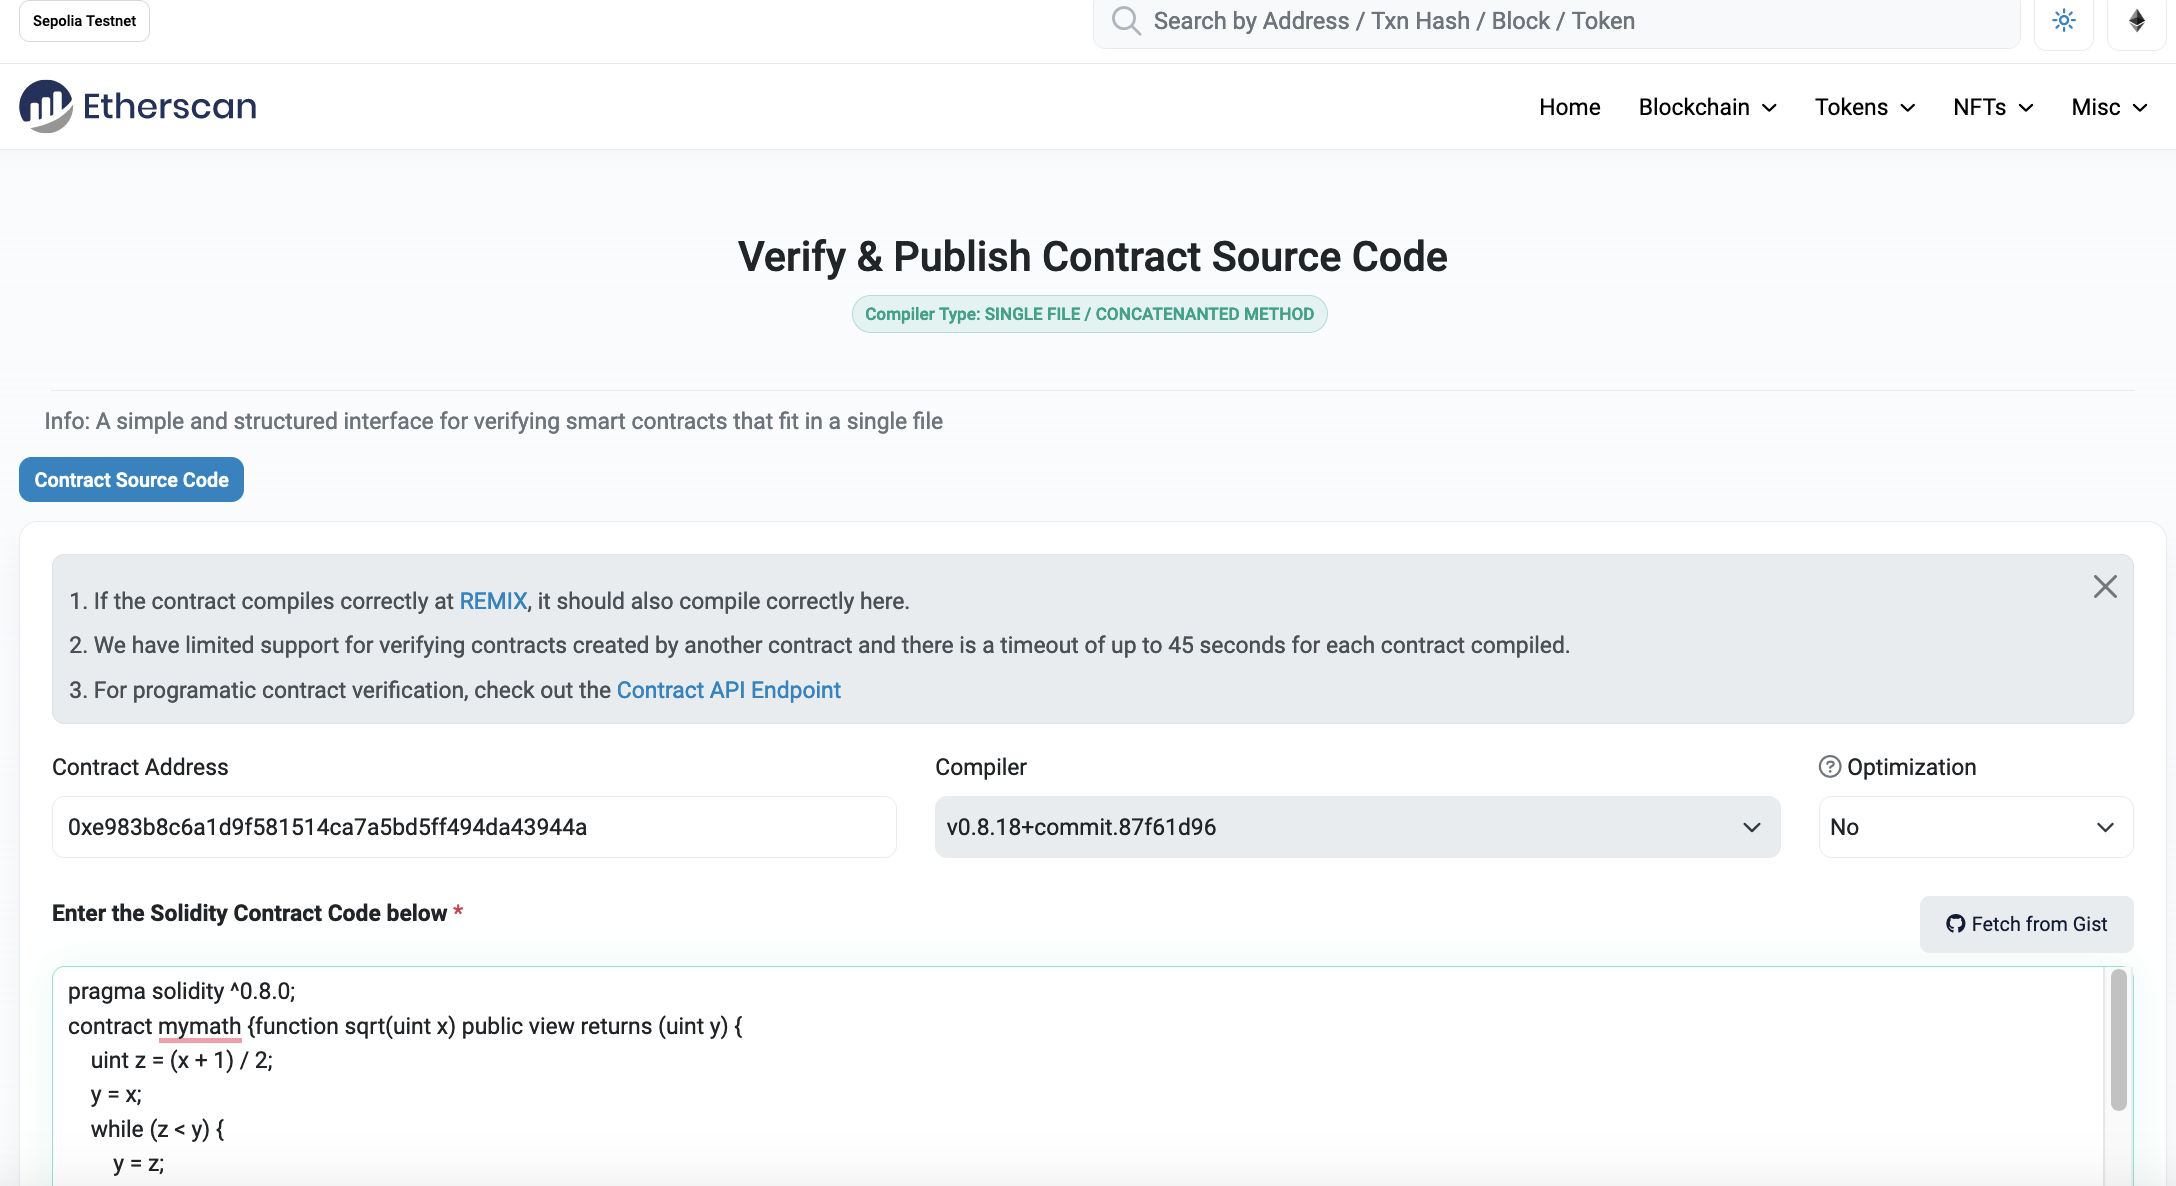
We then need to add your code for it to be checked:
It takes around 30 seconds, but, eventually, we should have our code accepted:
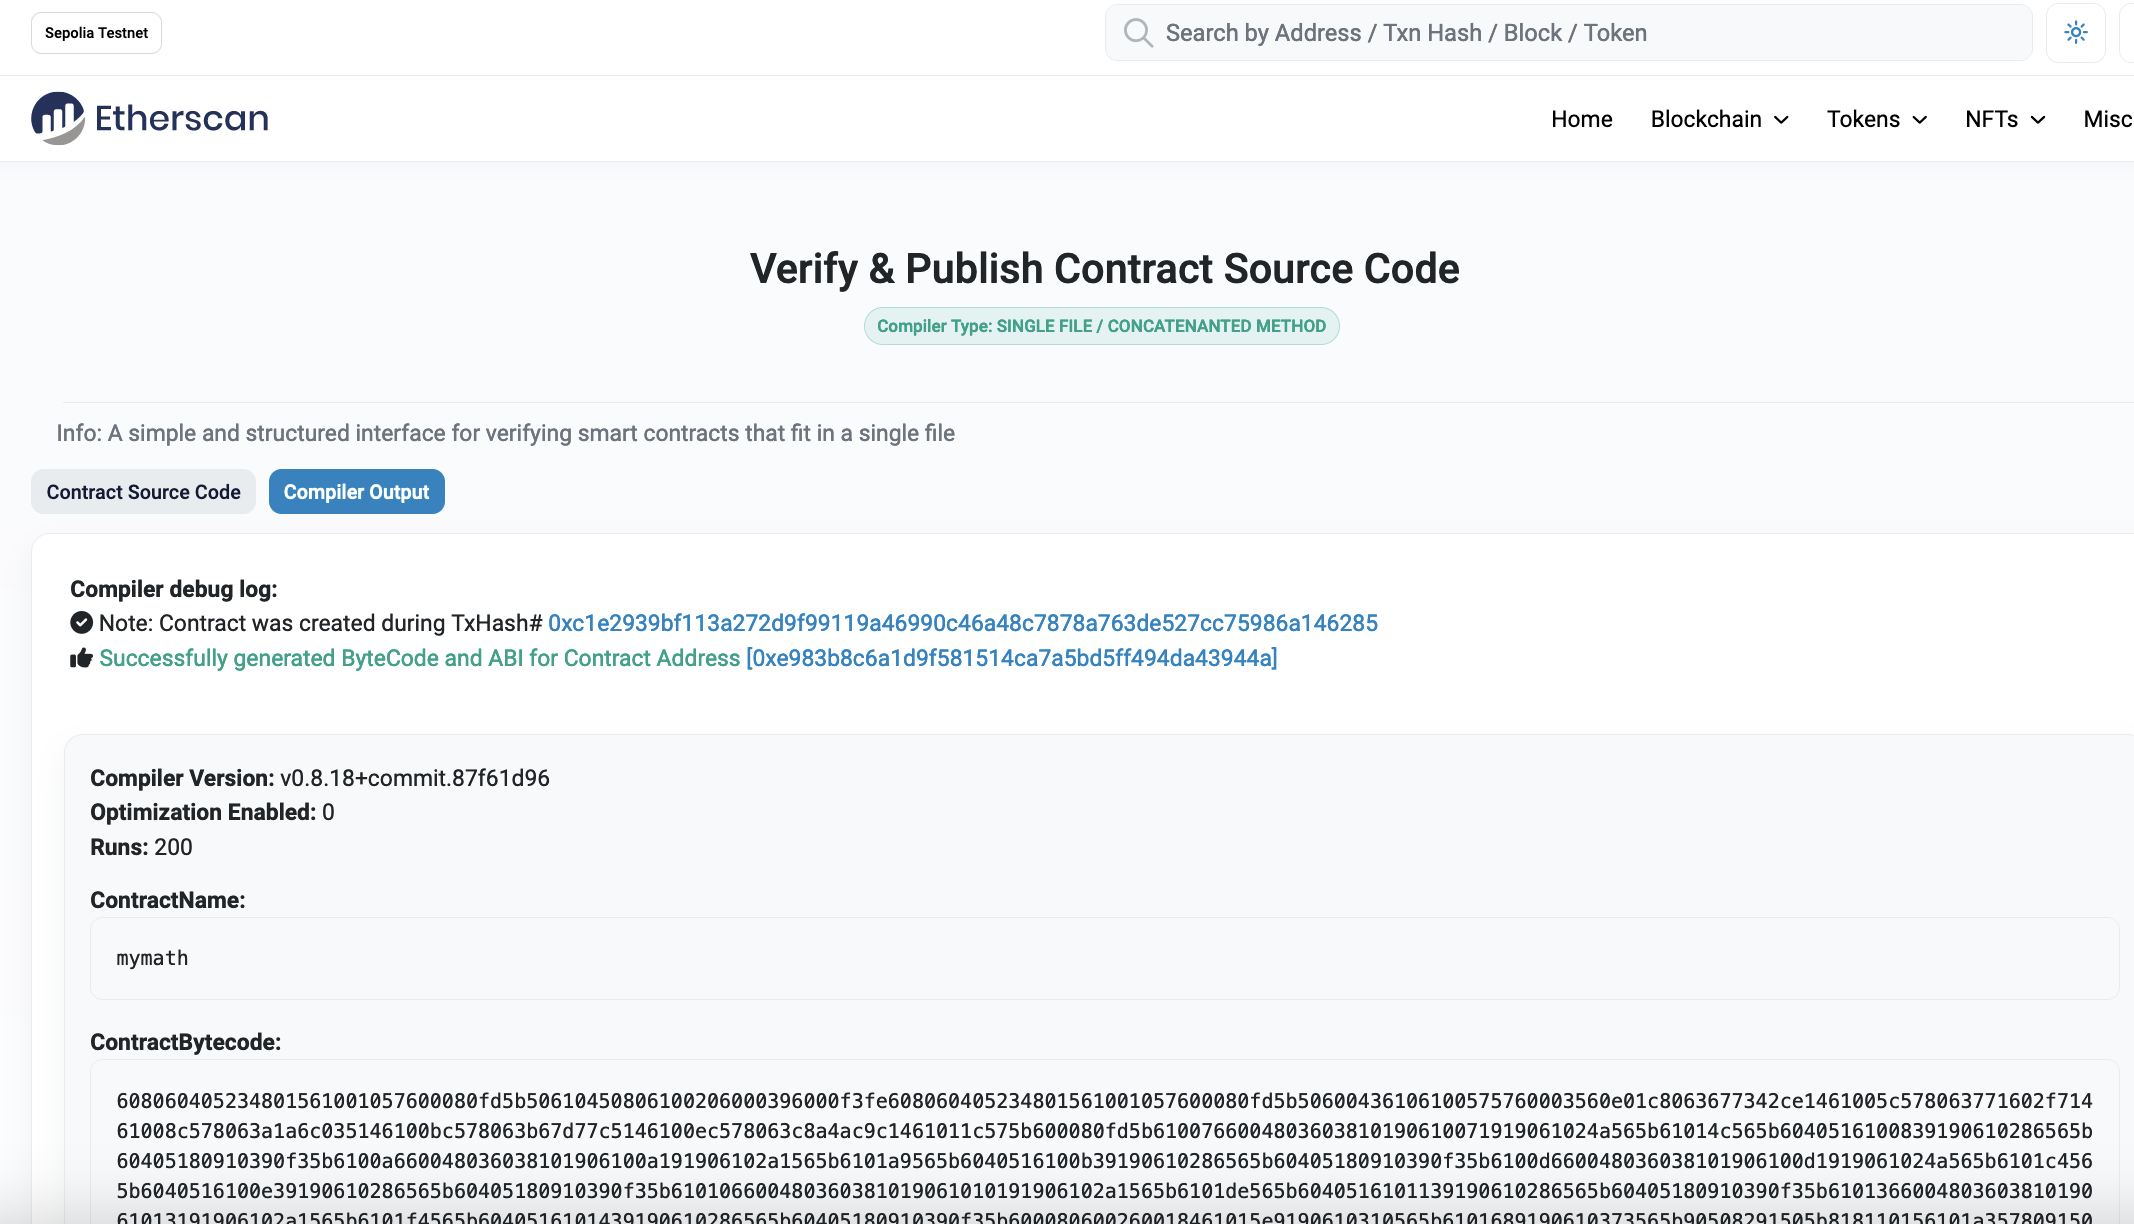
We now have the contract published to the Sepolia test network:
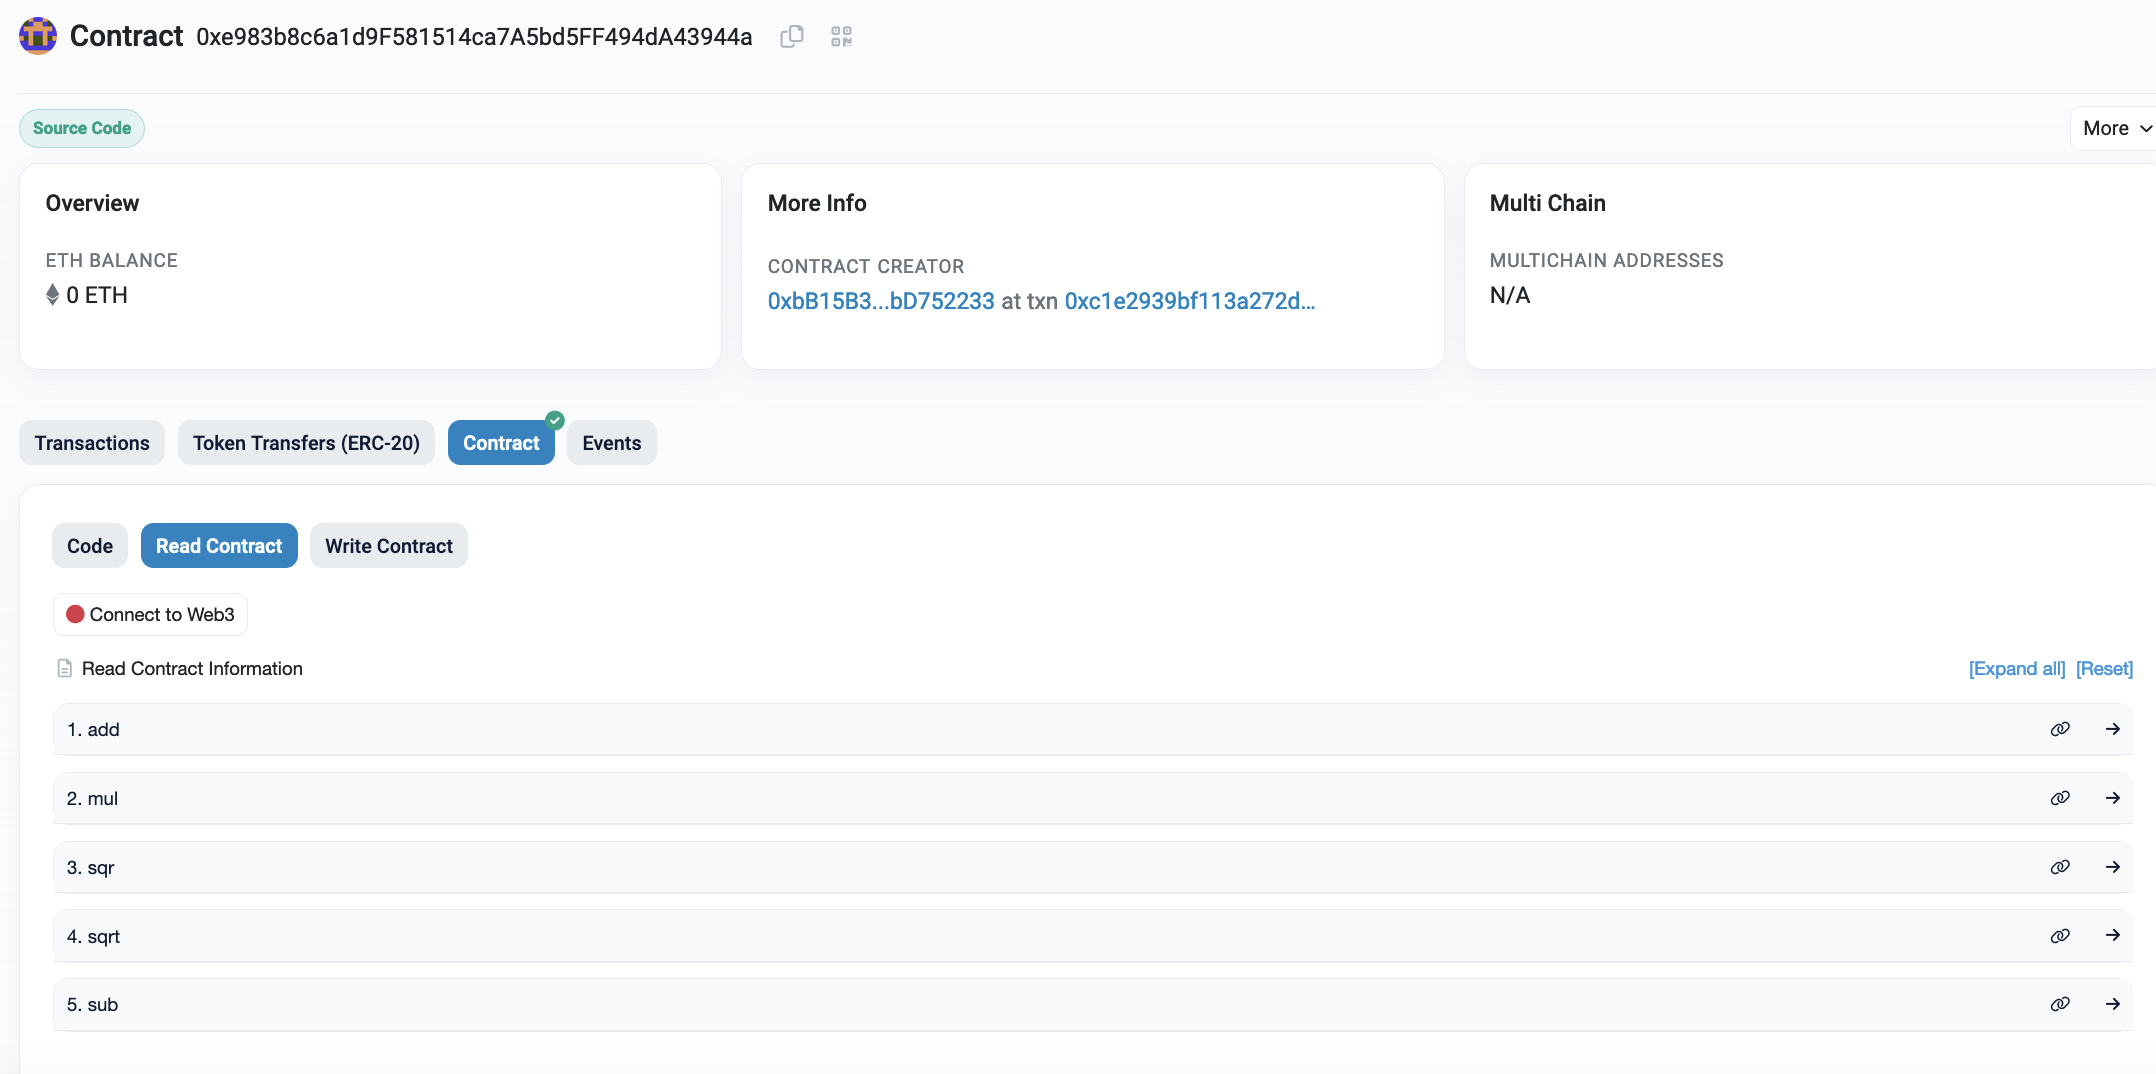
Next, by selected the Contract tab, and can view the read parameters. The exposed functions are add(), mul(), sqr(), sqrt() and sub():
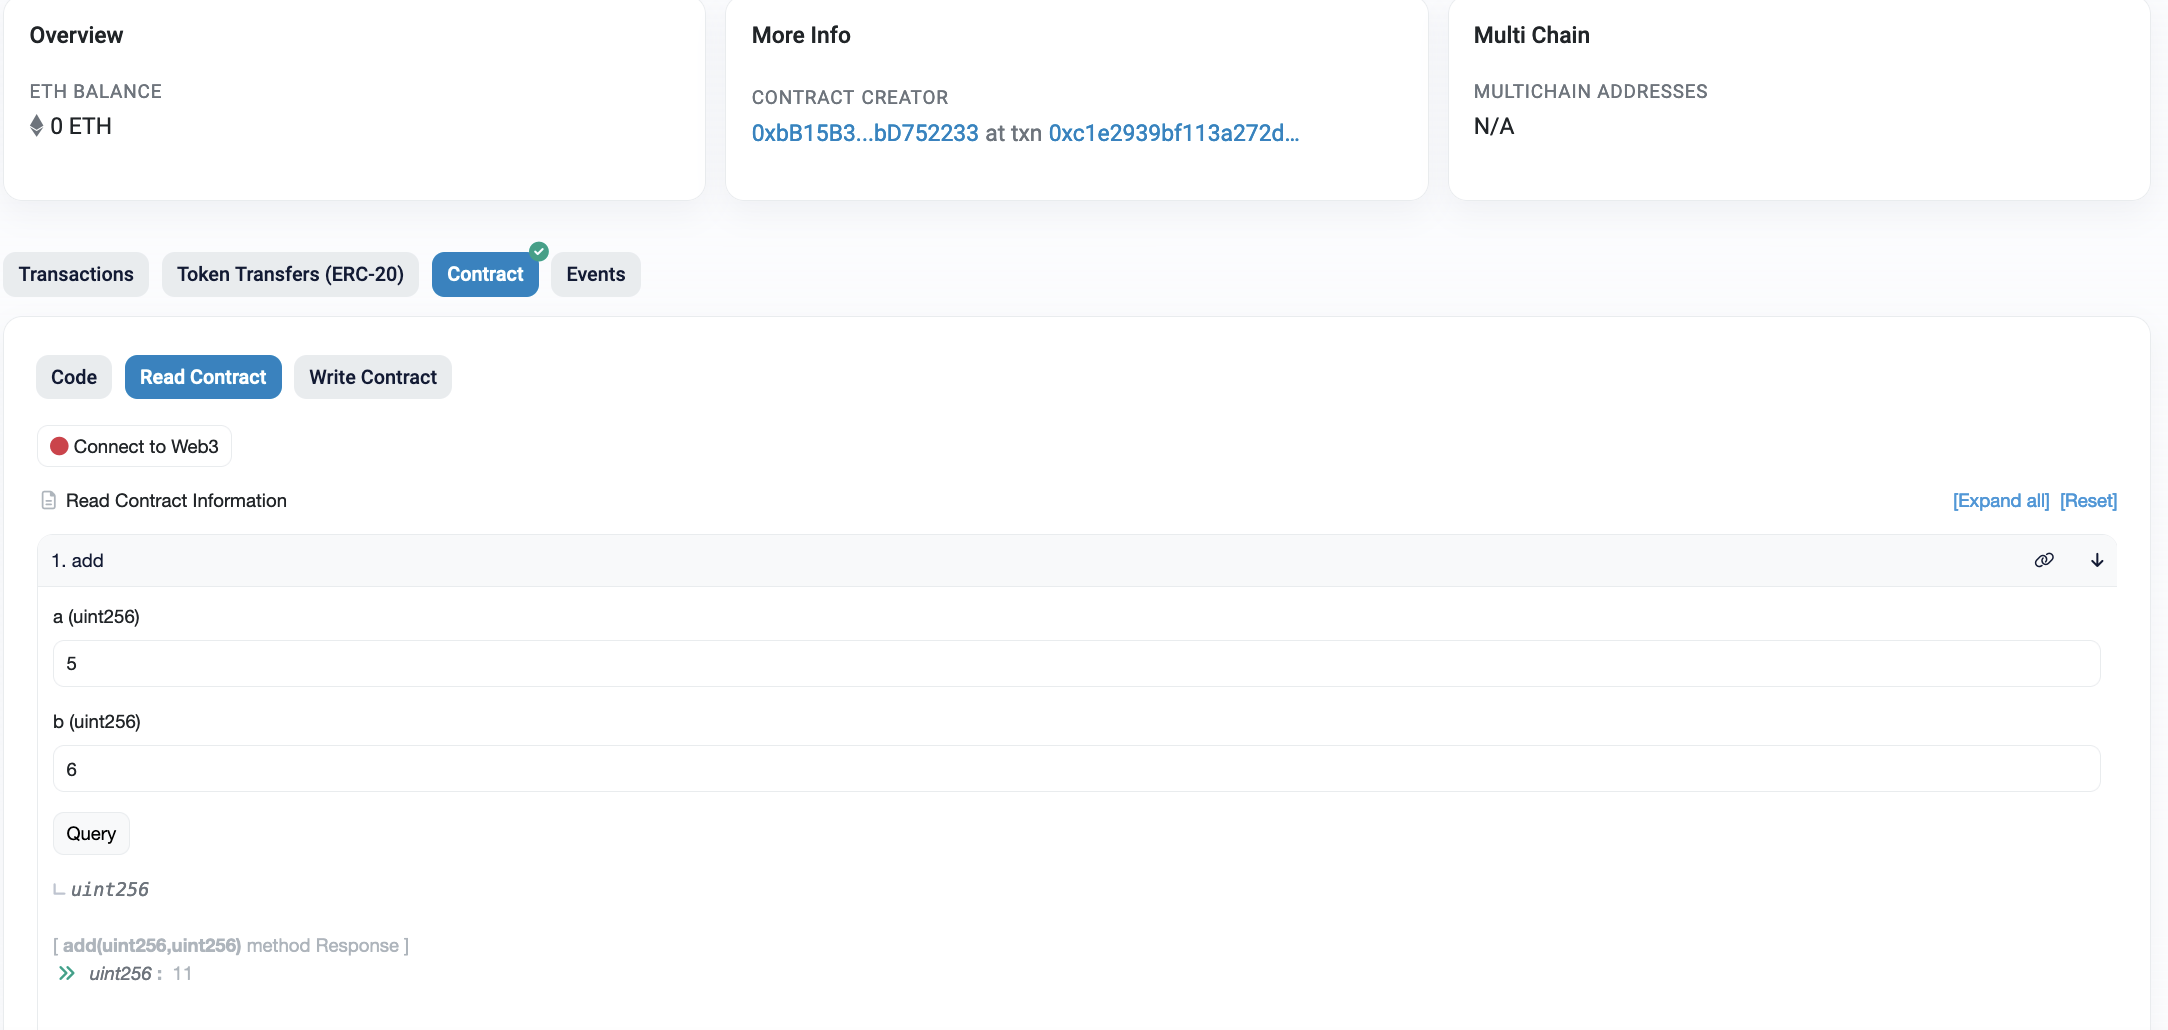
To test, we can just enter the variables for a given function, and get a result here:
Note: You can get Ether for our wallet here.
Creating ERC-20 tokens
Within the Ethereum blockchain, we can record transactions and run smart contracts. These things allow us to run DApps (decentralized applications) and which can support the running of the infrastructure in return for some payment (Ether). A DApp can also create tokens for new currencies, shares in a company or to prove the ownership of an asset. ERC-20 is a standard format for a Fungible Token that supports the sharing, transfer, and storage of tokens. These tokens are supported by the whole of the Ethereum infrastructure and can be easily traded. They support a number of mandatory functions:
- totalSupply. This function is the total number of ERC-20 tokens that have been created.
- balanceOf. This function identifies the number of tokens that a given address has in its account.
- transfer. This function supports the transfer of tokens to a defined user address.
- transferFrom. This function supports a user to transfer tokens to another user.
- approve. This function checks that a transaction is valid, based on the supply of token.
- allowance. This function checks if a user has enough funds in their account for a transaction.
There are also a number of options:
- Token Name. This is the name that the token will be defined as.
- Symbol. This is the symbol that the token will use.
- Decimal. This is the number of decimal places to be used for any transactions.
Now we you create your own token. If you are Bob Smith, then call your token "BobSmithToken", and your currency will be "BobSmith".
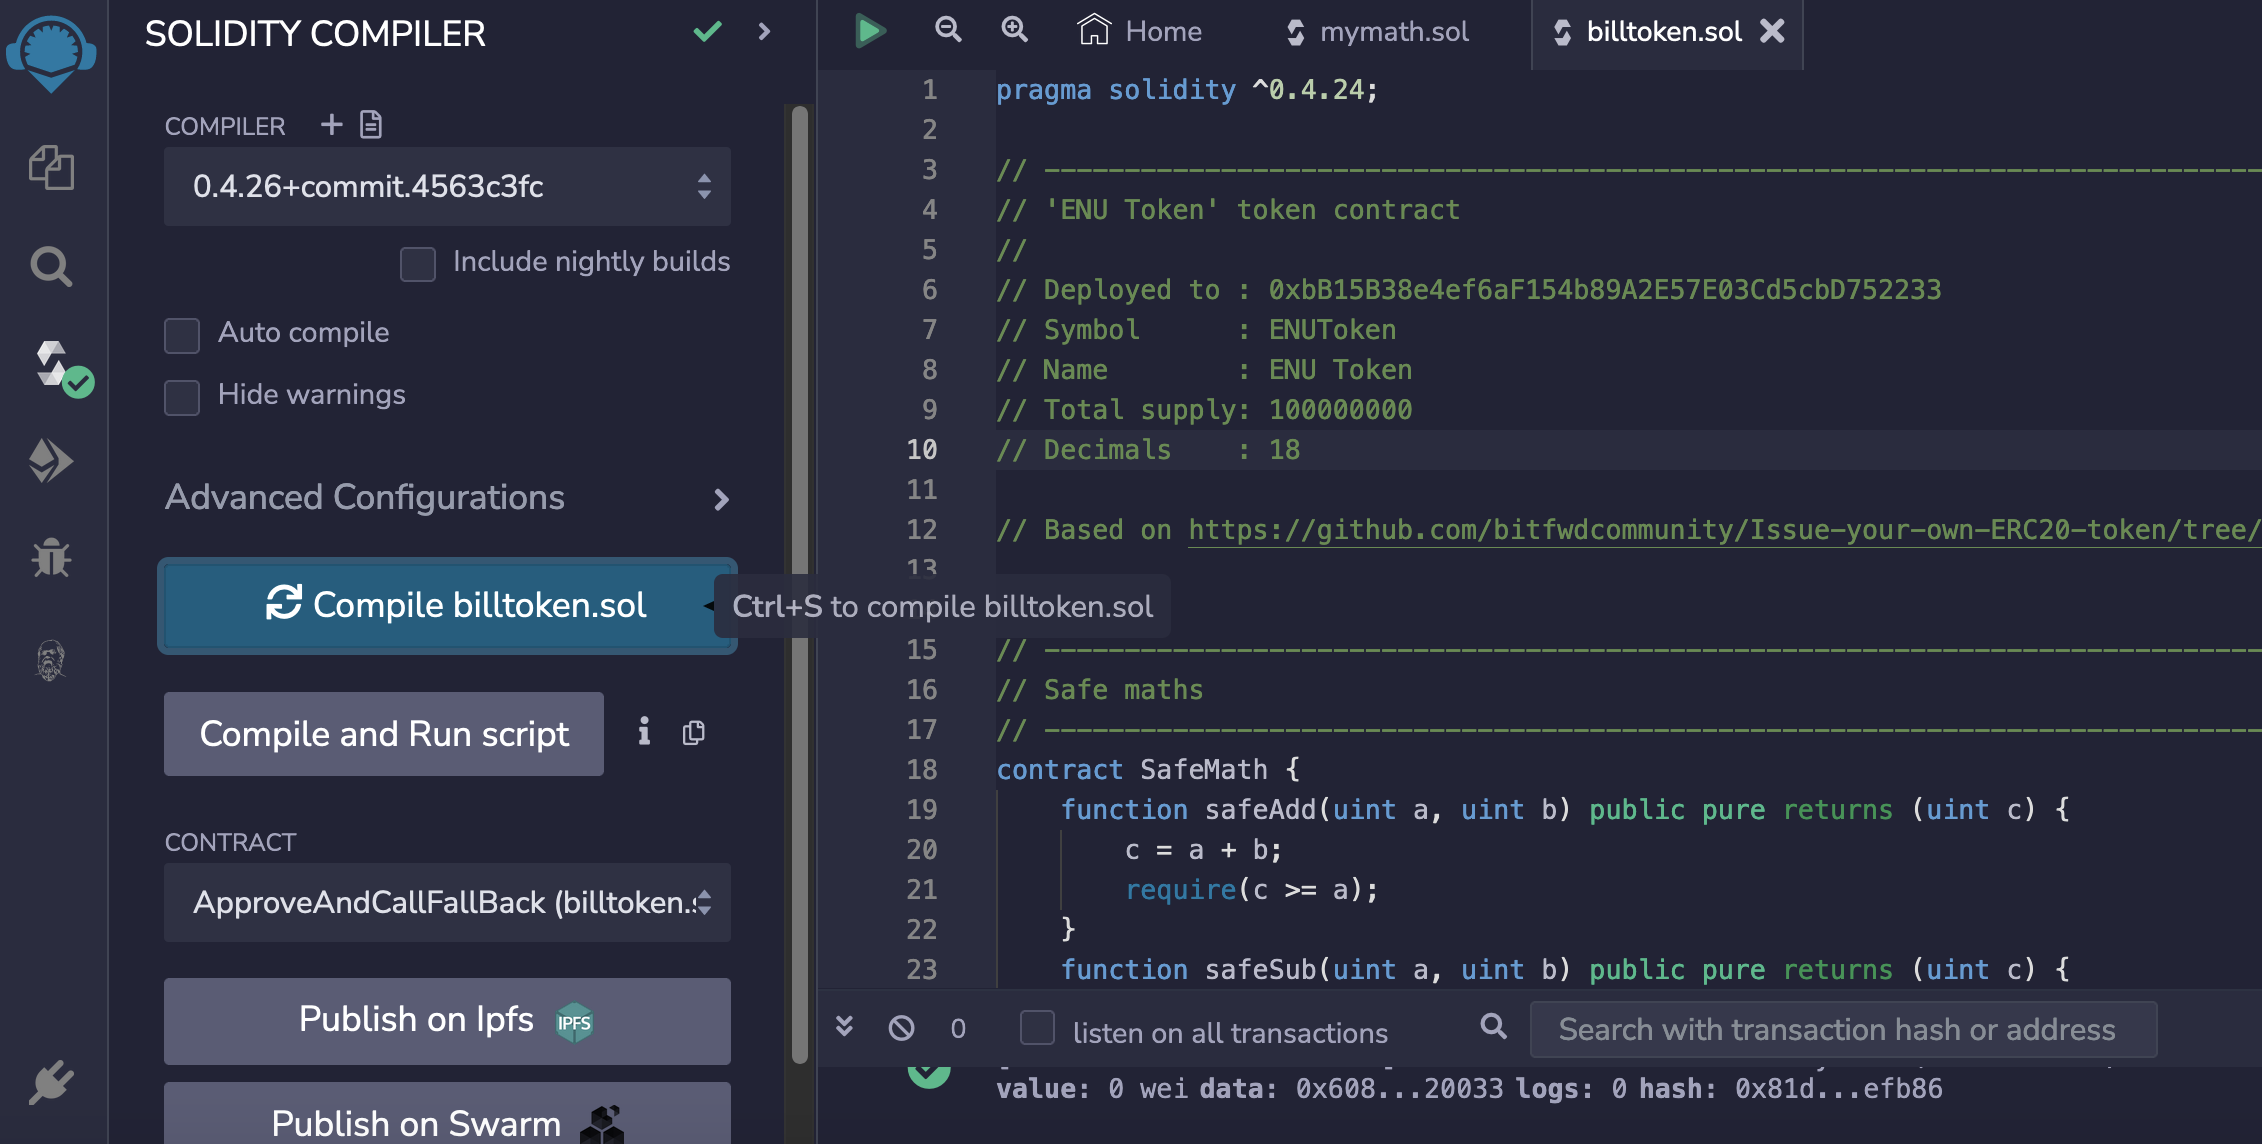
So, let's create a token named "ENUToken" (change the name to your name), and use the tutorial sample from here. First, we open up https://remix.ethereum.org/, and enter the following Solidy contract:
pragma solidity ^0.4.24;

// ----------------------------------------------------------------------------
// 'ENU Token' token contract
//
// Deployed to : 0xbB15B38e4ef6aF154b89A2E57E03Cd5cbD752233
// Symbol      : ENUToken
// Name        : ENU Token
// Total supply: 100000000
// Decimals    : 18

// Based on https://github.com/bitfwdcommunity/Issue-your-own-ERC20-token/tree/master/contracts


// ----------------------------------------------------------------------------
// Safe maths
// ----------------------------------------------------------------------------
contract SafeMath {
    function safeAdd(uint a, uint b) public pure returns (uint c) {
        c = a + b;
        require(c >= a);
    }
    function safeSub(uint a, uint b) public pure returns (uint c) {
        require(b <= a);
        c = a - b;
    }
    function safeMul(uint a, uint b) public pure returns (uint c) {
        c = a * b;
        require(a == 0 || c / a == b);
    }
    function safeDiv(uint a, uint b) public pure returns (uint c) {
        require(b > 0);
        c = a / b;
    }
}


// ----------------------------------------------------------------------------
// ERC Token Standard #20 Interface
// https://github.com/ethereum/EIPs/blob/master/EIPS/eip-20-token-standard.md
// ----------------------------------------------------------------------------
contract ERC20Interface {
    function totalSupply() public constant returns (uint);
    function balanceOf(address tokenOwner) public constant returns (uint balance);
    function allowance(address tokenOwner, address spender) public constant returns (uint remaining);
    function transfer(address to, uint tokens) public returns (bool success);
    function approve(address spender, uint tokens) public returns (bool success);
    function transferFrom(address from, address to, uint tokens) public returns (bool success);

    event Transfer(address indexed from, address indexed to, uint tokens);
    event Approval(address indexed tokenOwner, address indexed spender, uint tokens);
}


// ----------------------------------------------------------------------------
// Contract function to receive approval and execute function in one call
//
// Borrowed from MiniMeToken
// ----------------------------------------------------------------------------
contract ApproveAndCallFallBack {
    function receiveApproval(address from, uint256 tokens, address token, bytes data) public;
}


// ----------------------------------------------------------------------------
// Owned contract
// ----------------------------------------------------------------------------
contract Owned {
    address public owner;
    address public newOwner;

    event OwnershipTransferred(address indexed _from, address indexed _to);

    constructor() public {
        owner = msg.sender;
    }

    modifier onlyOwner {
        require(msg.sender == owner);
        _;
    }

    function transferOwnership(address _newOwner) public onlyOwner {
        newOwner = _newOwner;
    }
    function acceptOwnership() public {
        require(msg.sender == newOwner);
        emit OwnershipTransferred(owner, newOwner);
        owner = newOwner;
        newOwner = address(0);
    }
}


// ----------------------------------------------------------------------------
// ERC20 Token, with the addition of symbol, name and decimals and assisted
// token transfers
// ----------------------------------------------------------------------------
contract BillToken is ERC20Interface, Owned, SafeMath {
    string public symbol;
    string public  name;
    uint8 public decimals;
    uint public _totalSupply;

    mapping(address => uint) balances;
    mapping(address => mapping(address => uint)) allowed;


    // ------------------------------------------------------------------------
    // Constructor
    // ------------------------------------------------------------------------
    constructor() public {
        symbol = "ENUToken";
        name = "ENU Token";
        decimals = 18;
        _totalSupply = 100000000000000000000000000;
        balances[0xbB15B38e4ef6aF154b89A2E57E03Cd5cbD752233] = _totalSupply;
        emit Transfer(address(0), 0xbB15B38e4ef6aF154b89A2E57E03Cd5cbD752233, _totalSupply);
    }


    // ------------------------------------------------------------------------
    // Total supply
    // ------------------------------------------------------------------------
    function totalSupply() public constant returns (uint) {
        return _totalSupply  - balances[address(0)];
    }


    // ------------------------------------------------------------------------
    // Get the token balance for account tokenOwner
    // ------------------------------------------------------------------------
    function balanceOf(address tokenOwner) public constant returns (uint balance) {
        return balances[tokenOwner];
    }


    // ------------------------------------------------------------------------
    // Transfer the balance from token owner's account to to account
    // - Owner's account must have sufficient balance to transfer
    // - 0 value transfers are allowed
    // ------------------------------------------------------------------------
    function transfer(address to, uint tokens) public returns (bool success) {
        balances[msg.sender] = safeSub(balances[msg.sender], tokens);
        balances[to] = safeAdd(balances[to], tokens);
        emit Transfer(msg.sender, to, tokens);
        return true;
    }


    // ------------------------------------------------------------------------
    // Token owner can approve for spender to transferFrom(...) tokens
    // from the token owner's account
    //
    // https://github.com/ethereum/EIPs/blob/master/EIPS/eip-20-token-standard.md
    // recommends that there are no checks for the approval double-spend attack
    // as this should be implemented in user interfaces
    // ------------------------------------------------------------------------
    function approve(address spender, uint tokens) public returns (bool success) {
        allowed[msg.sender][spender] = tokens;
        emit Approval(msg.sender, spender, tokens);
        return true;
    }


    // ------------------------------------------------------------------------
    // Transfer tokens from the from account to the to account
    //
    // The calling account must already have sufficient tokens approve(...)-d
    // for spending from the from account and
    // - From account must have sufficient balance to transfer
    // - Spender must have sufficient allowance to transfer
    // - 0 value transfers are allowed
    // ------------------------------------------------------------------------
    function transferFrom(address from, address to, uint tokens) public returns (bool success) {
        balances[from] = safeSub(balances[from], tokens);
        allowed[from][msg.sender] = safeSub(allowed[from][msg.sender], tokens);
        balances[to] = safeAdd(balances[to], tokens);
        emit Transfer(from, to, tokens);
        return true;
    }


    // ------------------------------------------------------------------------
    // Returns the amount of tokens approved by the owner that can be
    // transferred to the spender's account
    // ------------------------------------------------------------------------
    function allowance(address tokenOwner, address spender) public constant returns (uint remaining) {
        return allowed[tokenOwner][spender];
    }


    // ------------------------------------------------------------------------
    // Token owner can approve for spender to transferFrom(...) tokens
    // from the token owner's account. The spender contract function
    // receiveApproval(...) is then executed
    // ------------------------------------------------------------------------
    function approveAndCall(address spender, uint tokens, bytes data) public returns (bool success) {
        allowed[msg.sender][spender] = tokens;
        emit Approval(msg.sender, spender, tokens);
        ApproveAndCallFallBack(spender).receiveApproval(msg.sender, tokens, this, data);
        return true;
    }


    // ------------------------------------------------------------------------
    // Don't accept ETH
    // ------------------------------------------------------------------------
    function () public payable {
        revert();
    }


    // ------------------------------------------------------------------------
    // Owner can transfer out any accidentally sent ERC20 tokens
    // ------------------------------------------------------------------------
    function transferAnyERC20Token(address tokenAddress, uint tokens) public onlyOwner returns (bool success) {
        return ERC20Interface(tokenAddress).transfer(owner, tokens);
    }
}
When you create your own contract, make sure you change the public constructor() with: the symbol, the name, and the wallet ID. You are the owner of the token, so you need to enter the public ID of your wallet for two hex values given next:
    constructor() public {
    symbol = "ENUToken";
    name = "ENU Token";
    decimals = 18;
    _totalSupply = 100000000000000000000000000;
    balances[0xbB15B38e4ef6aF154b89A2E57E03Cd5cbD752233] = _totalSupply;
    emit Transfer(address(0), 0xbB15B38e4ef6aF154b89A2E57E03Cd5cbD752233, _totalSupply);
    }
The wallet ID is the public ID of your wallet in Metamask. Now we compile:
Next, we will deploy to the Sepolia test network:
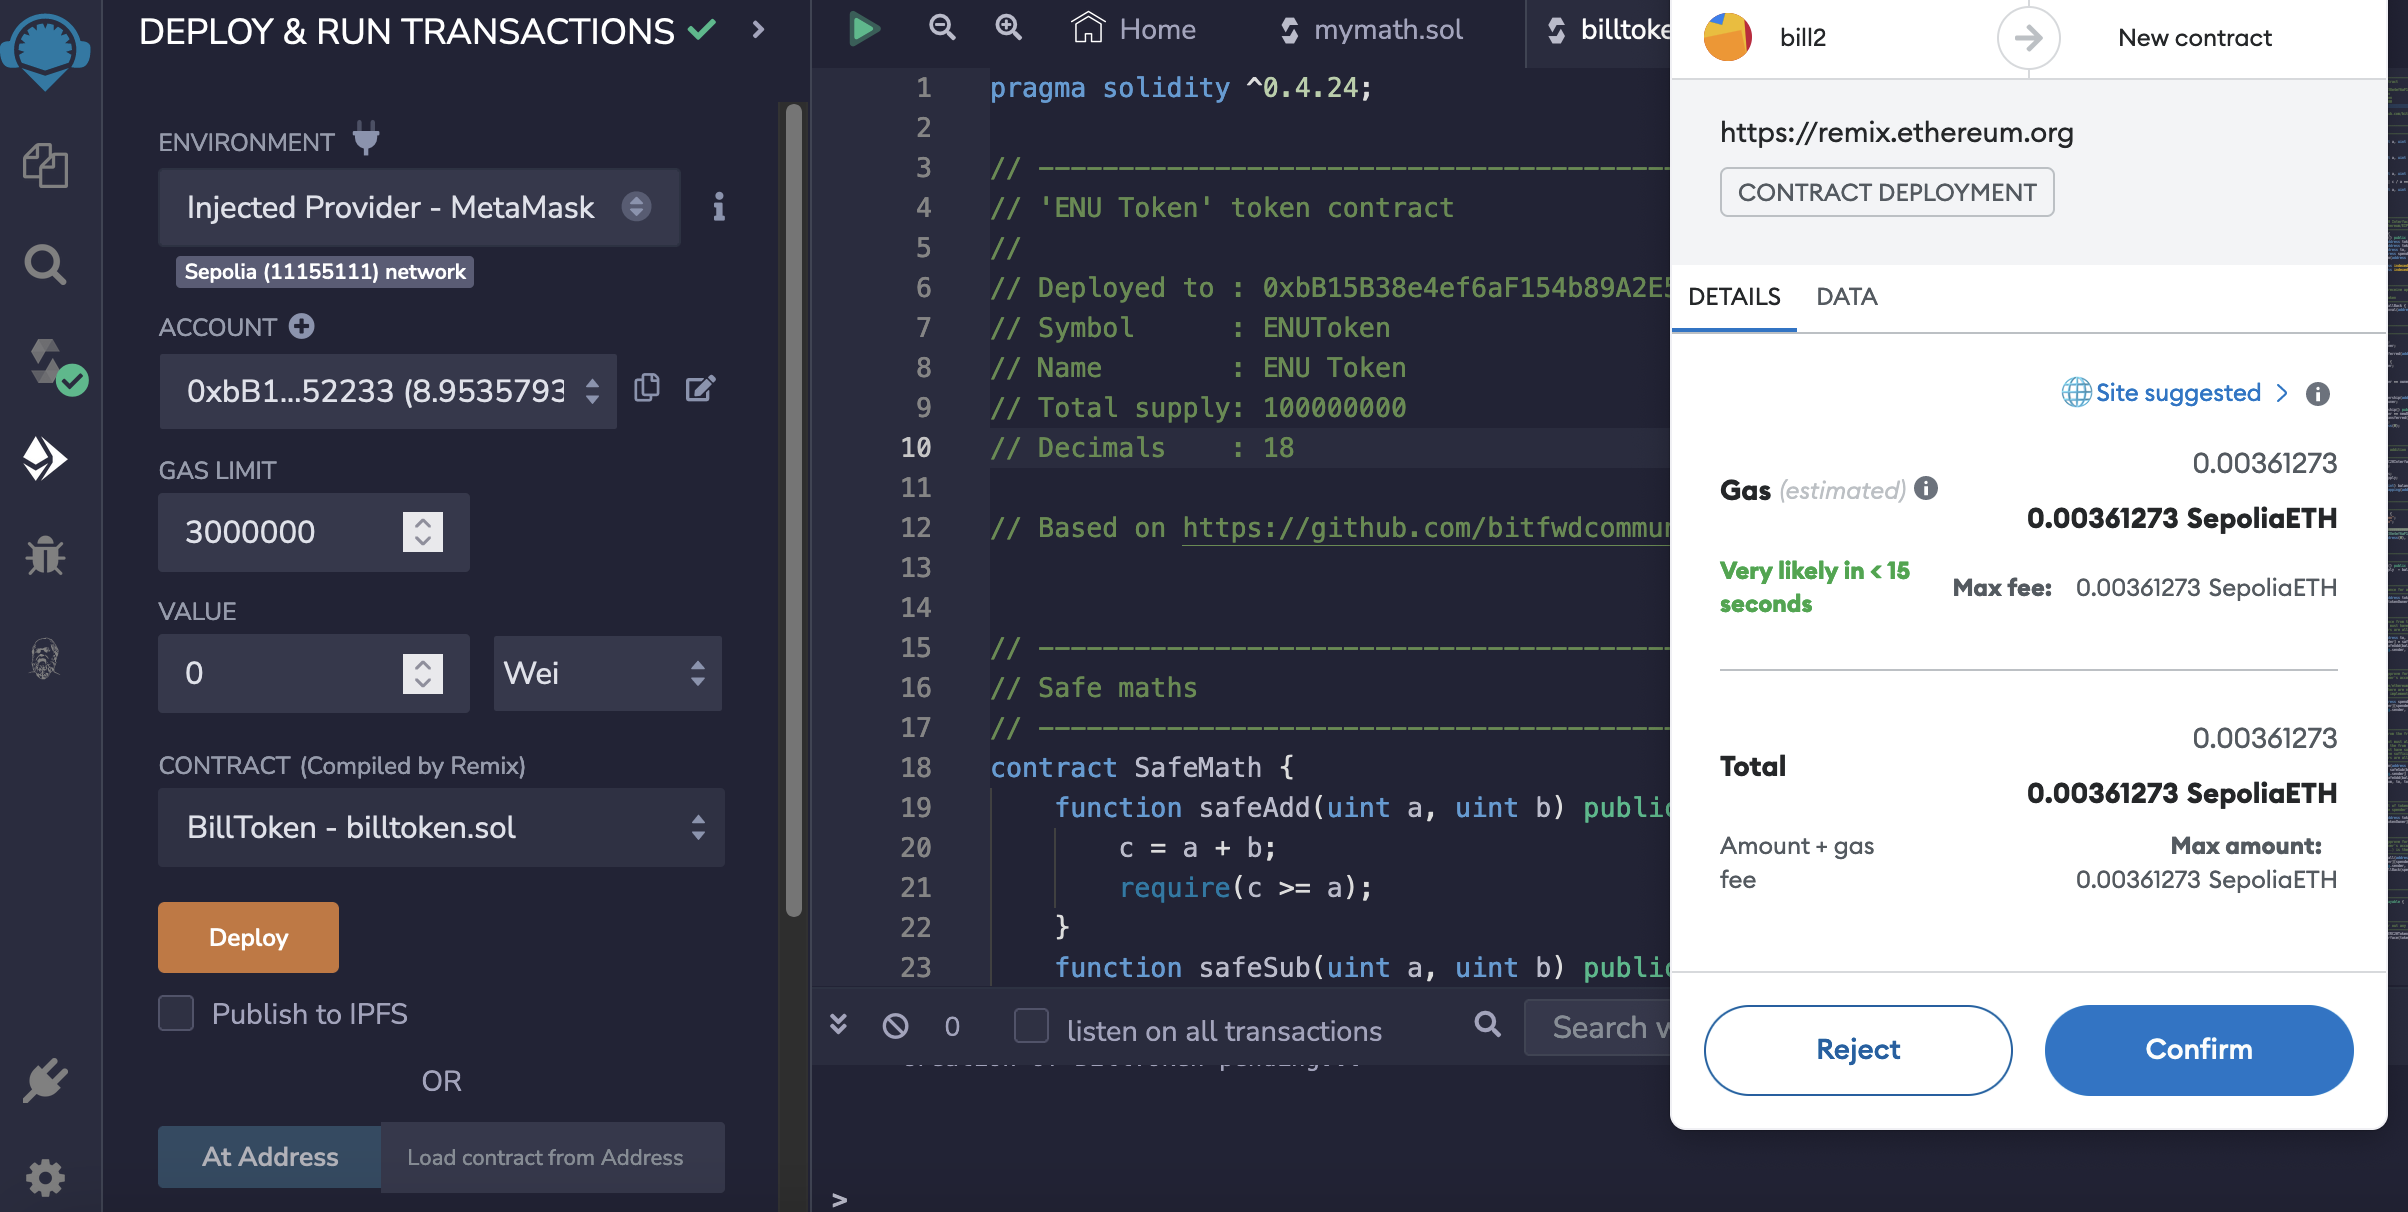
After this, our contract will be shown as being pending deployment:

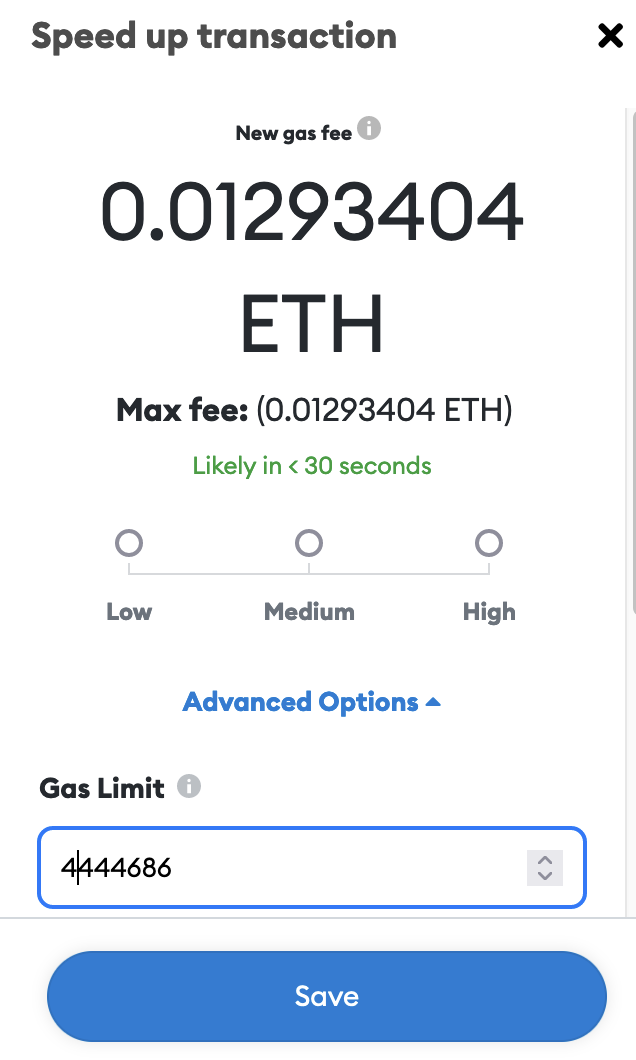
It will take 10–15 minutes to deploy, but it can be speeded up by increasing the gas limit:
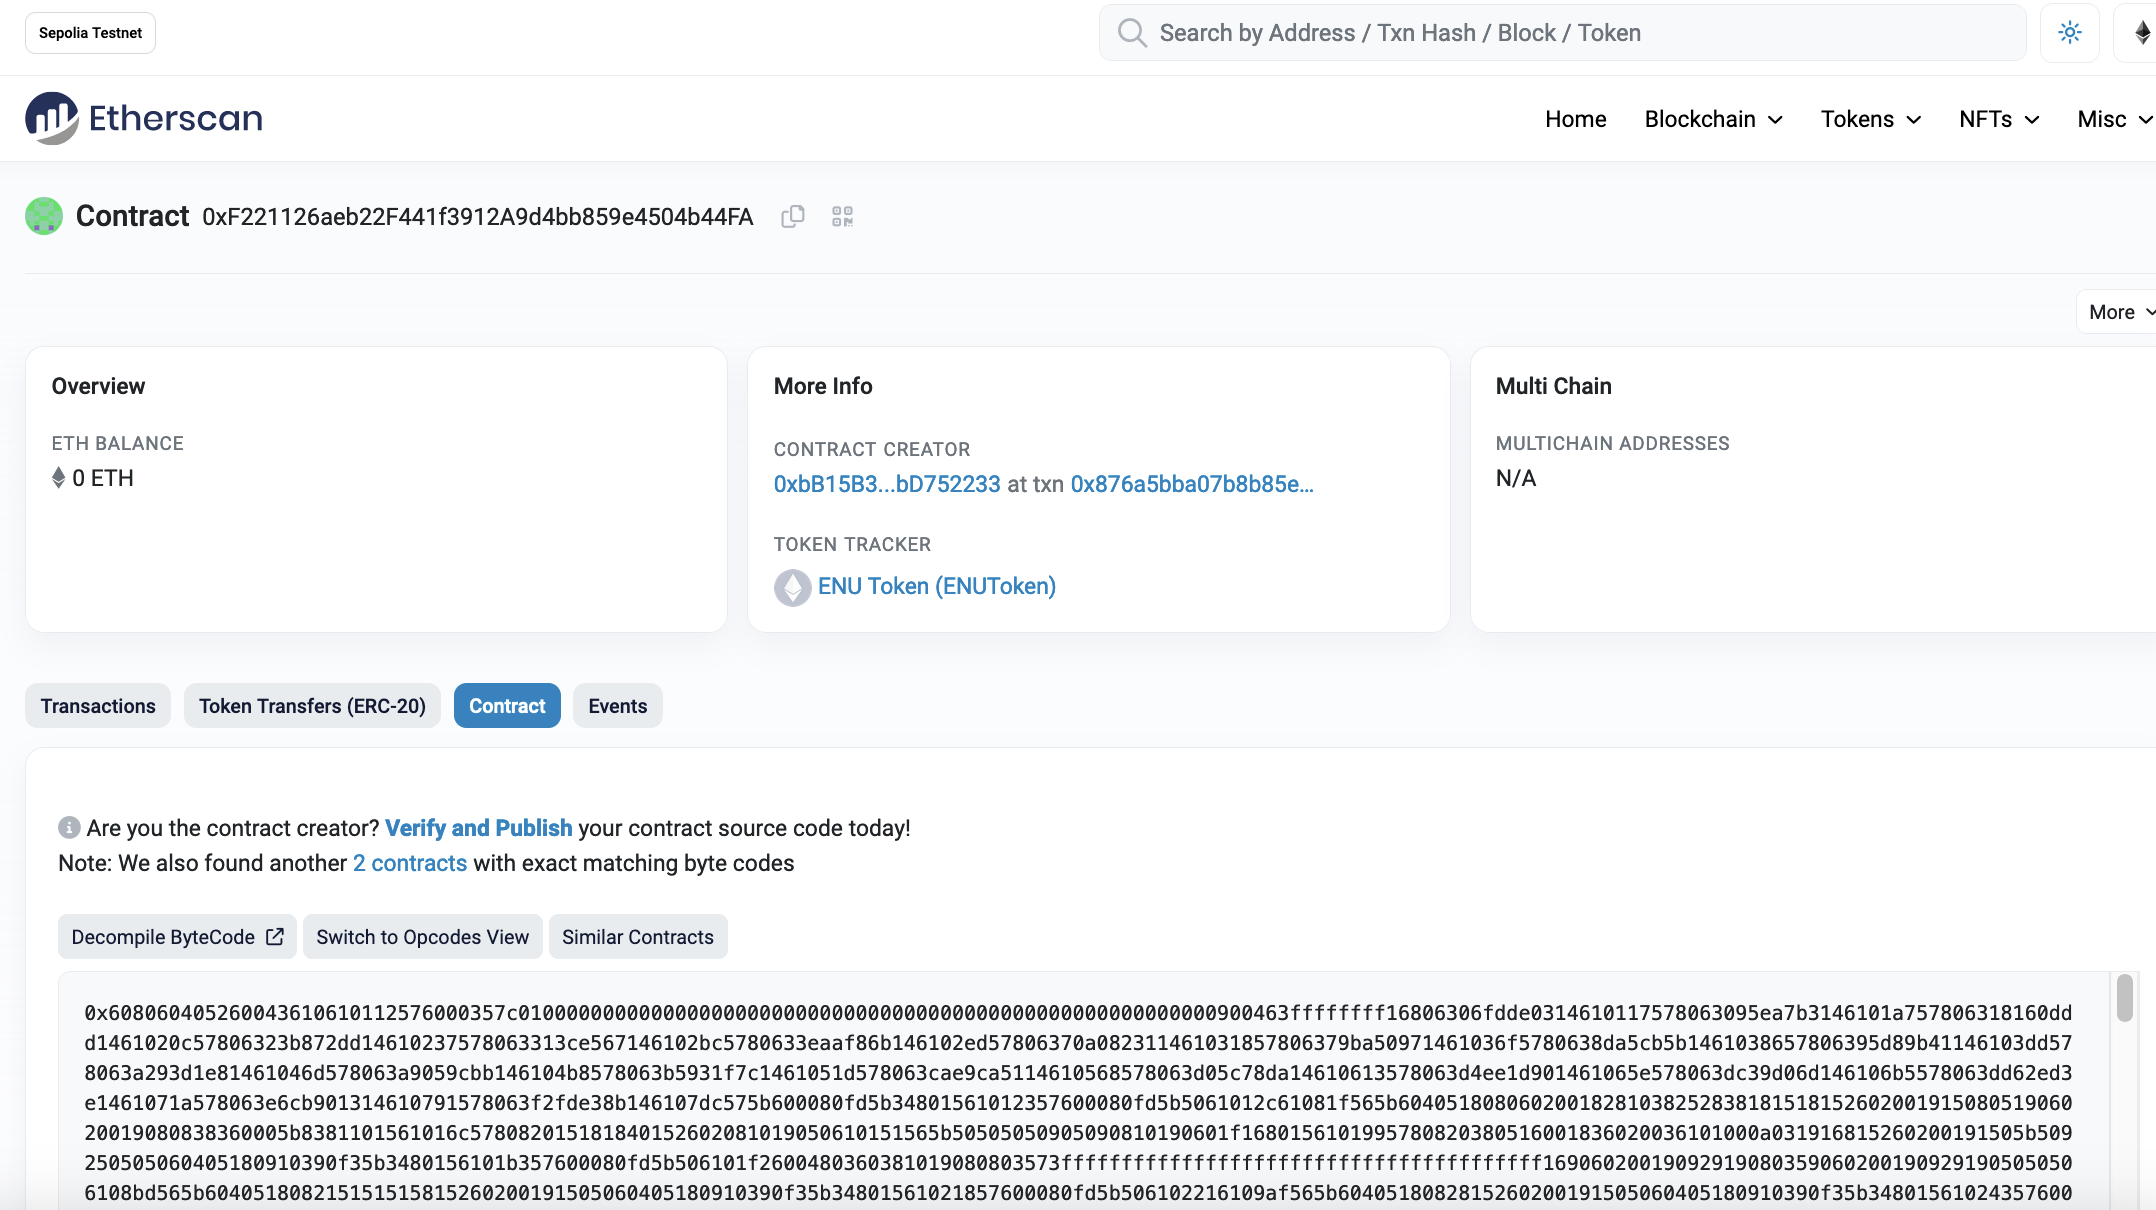
Once deployed, we can view the contract details:

And can then view the transaction for the contract here.

And then view the contact:

Next, we select the Contract tab:
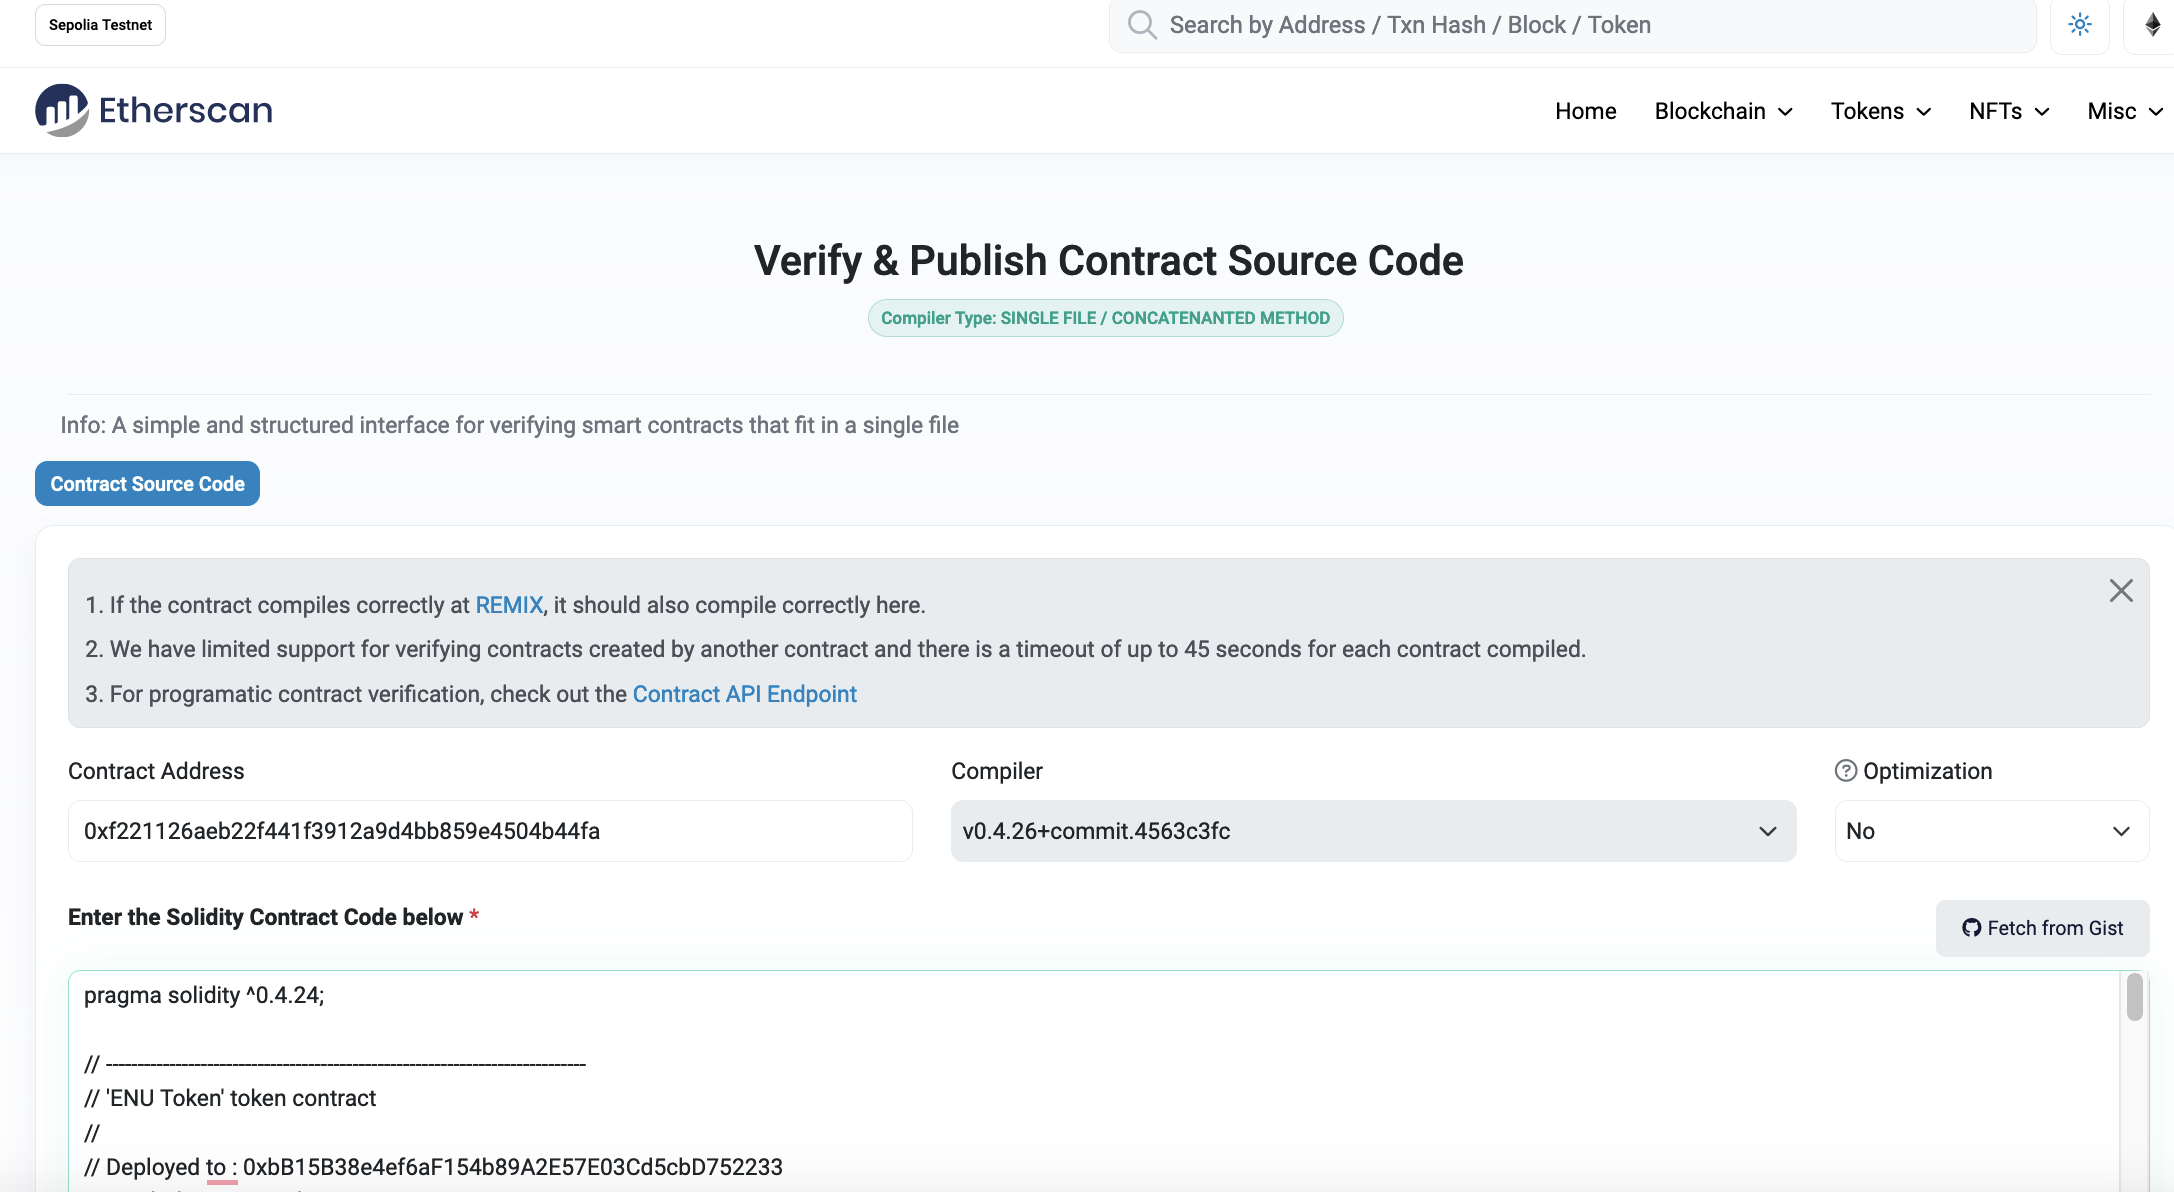
And then select "Verify and Publish" and enter the details of the compiler version (v0.4.26):
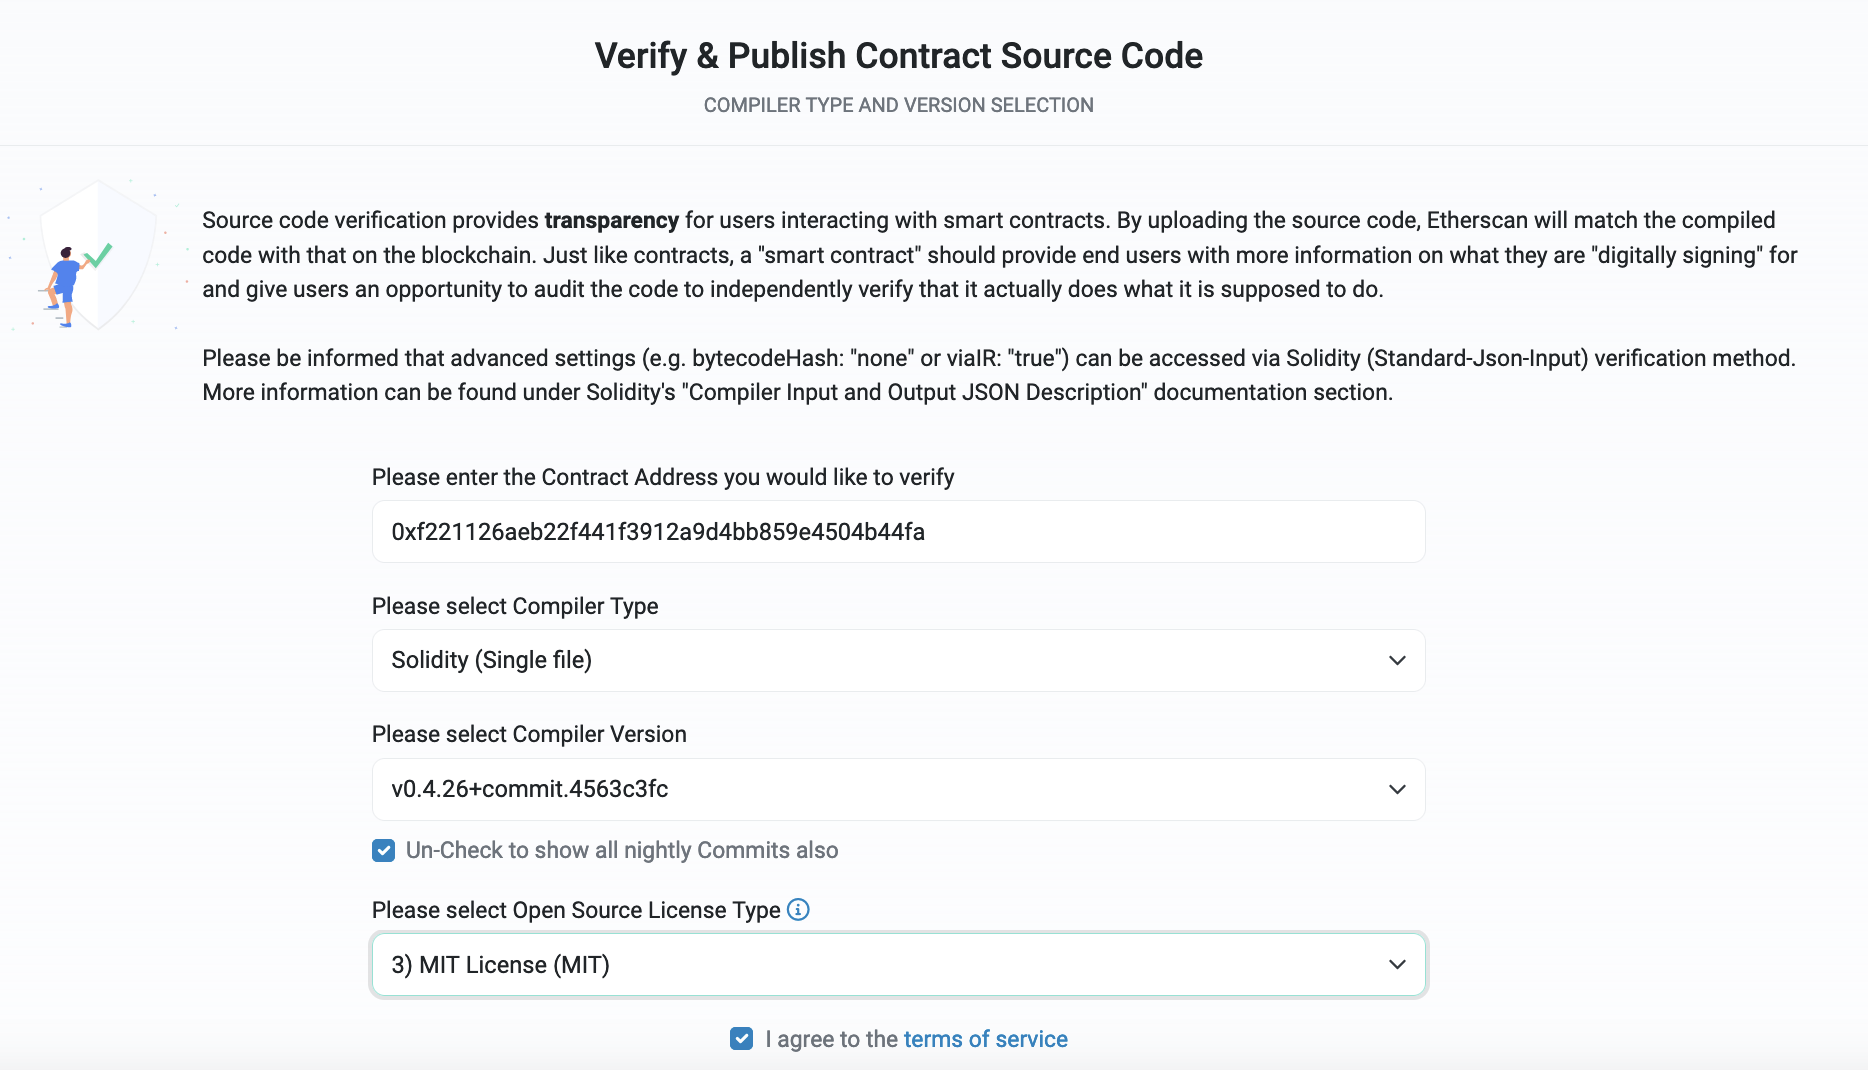
We then need to copy-and-paste the contract code into the Source Code text box:
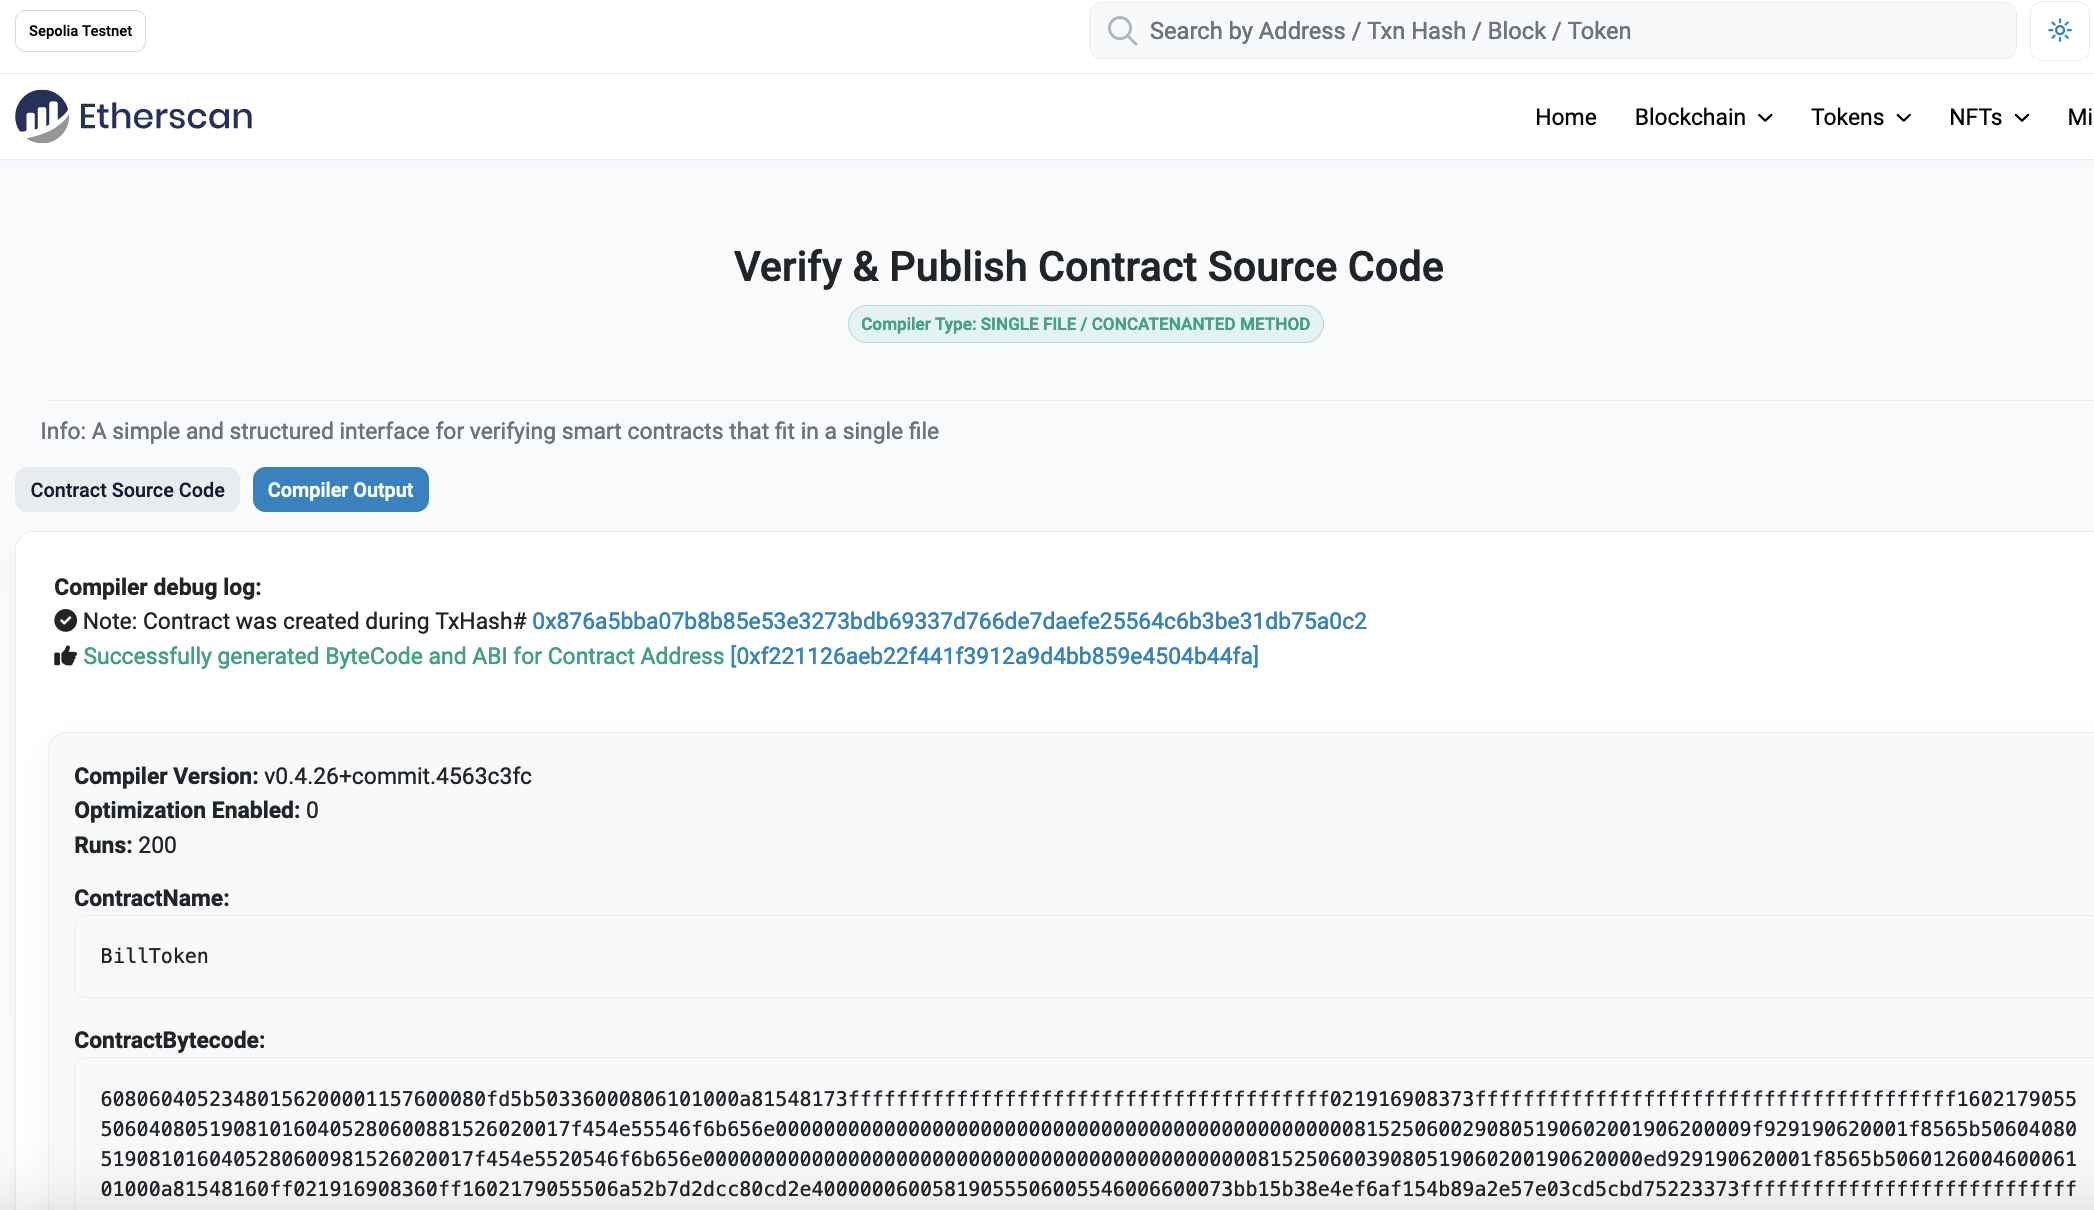
After less than 45 seconds, the contract will be approved here:
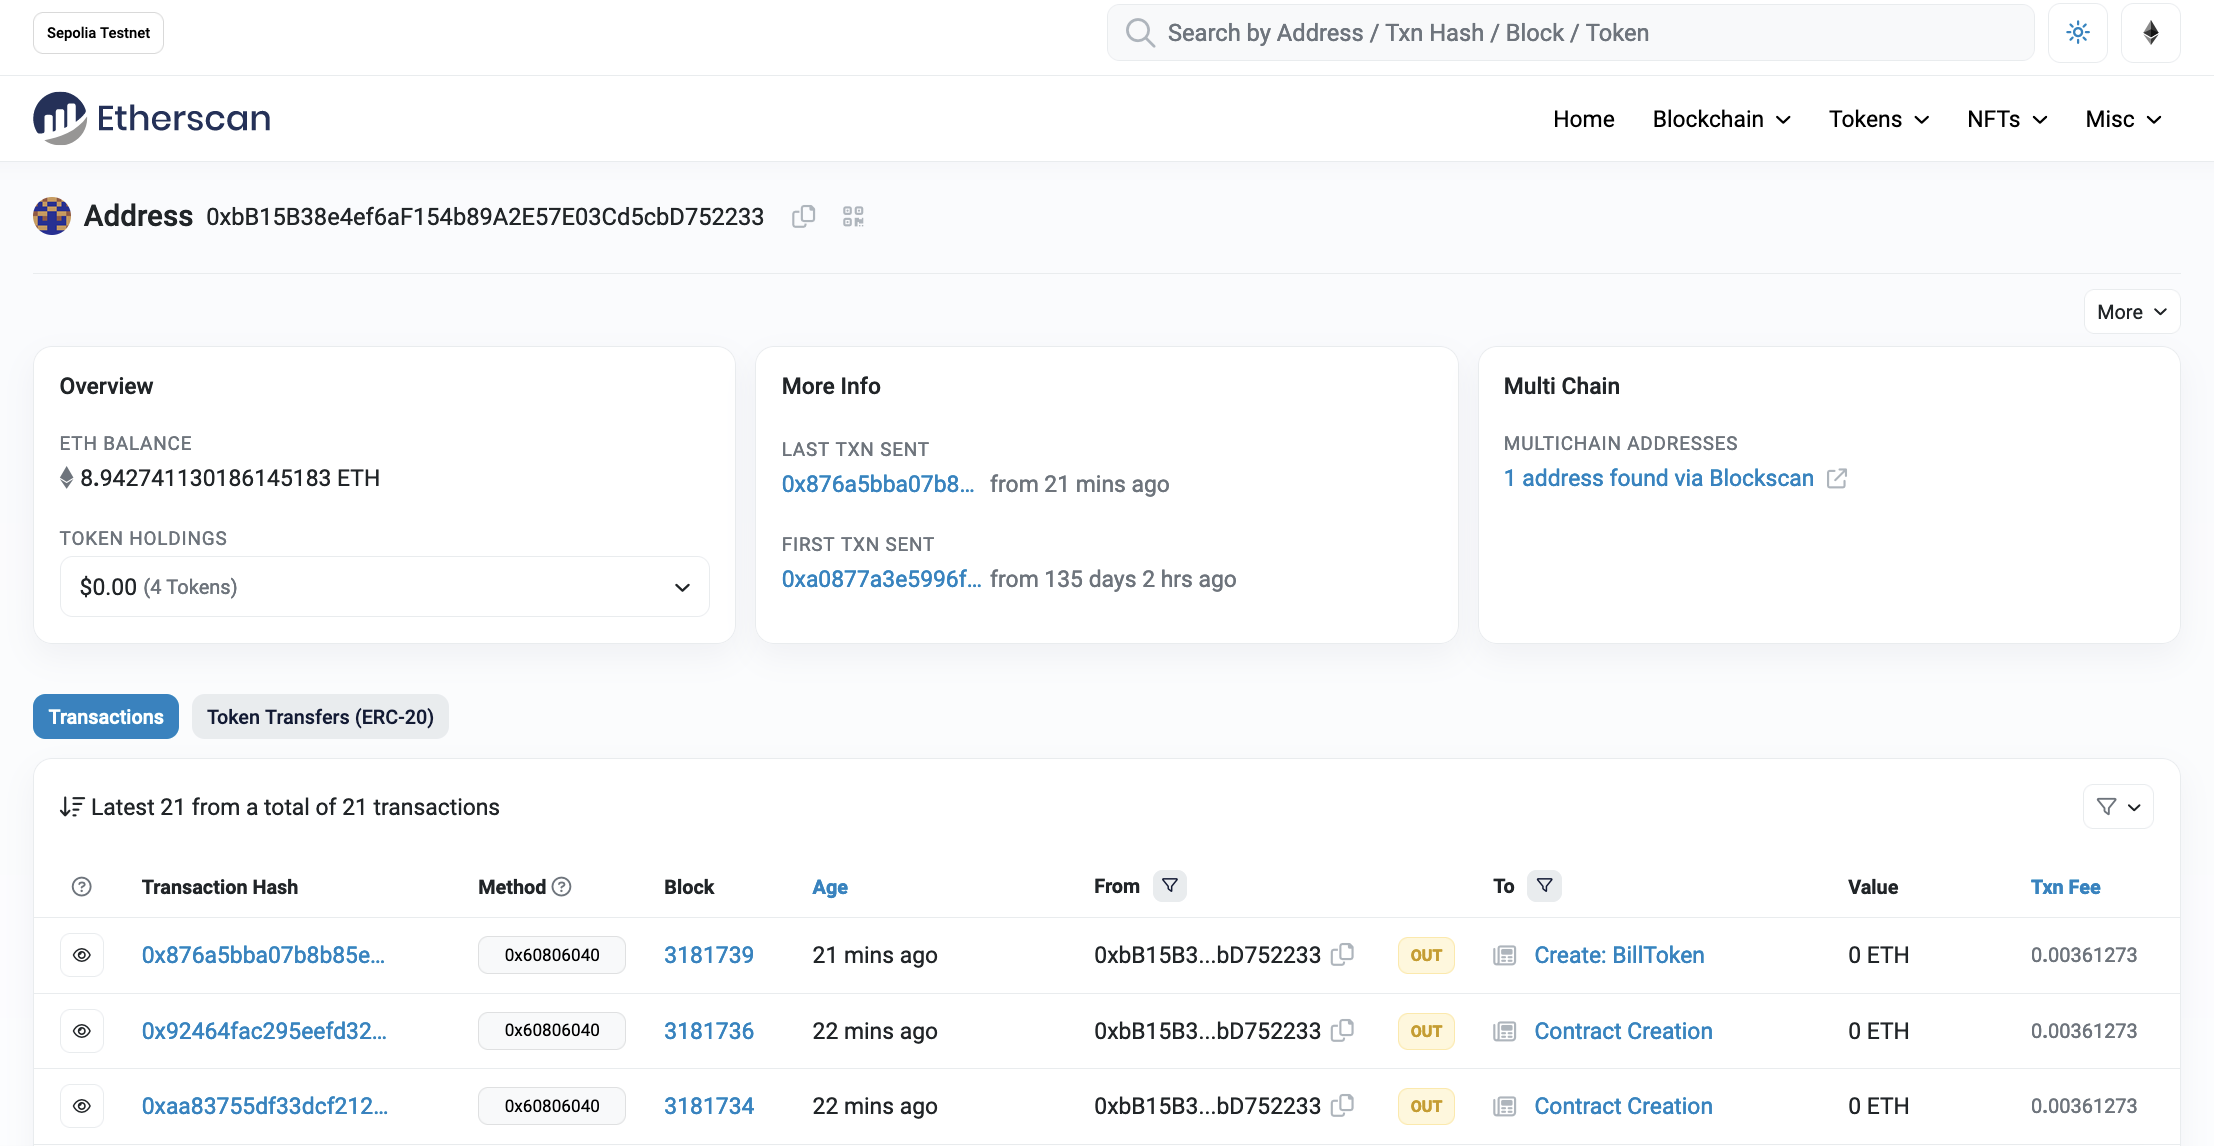
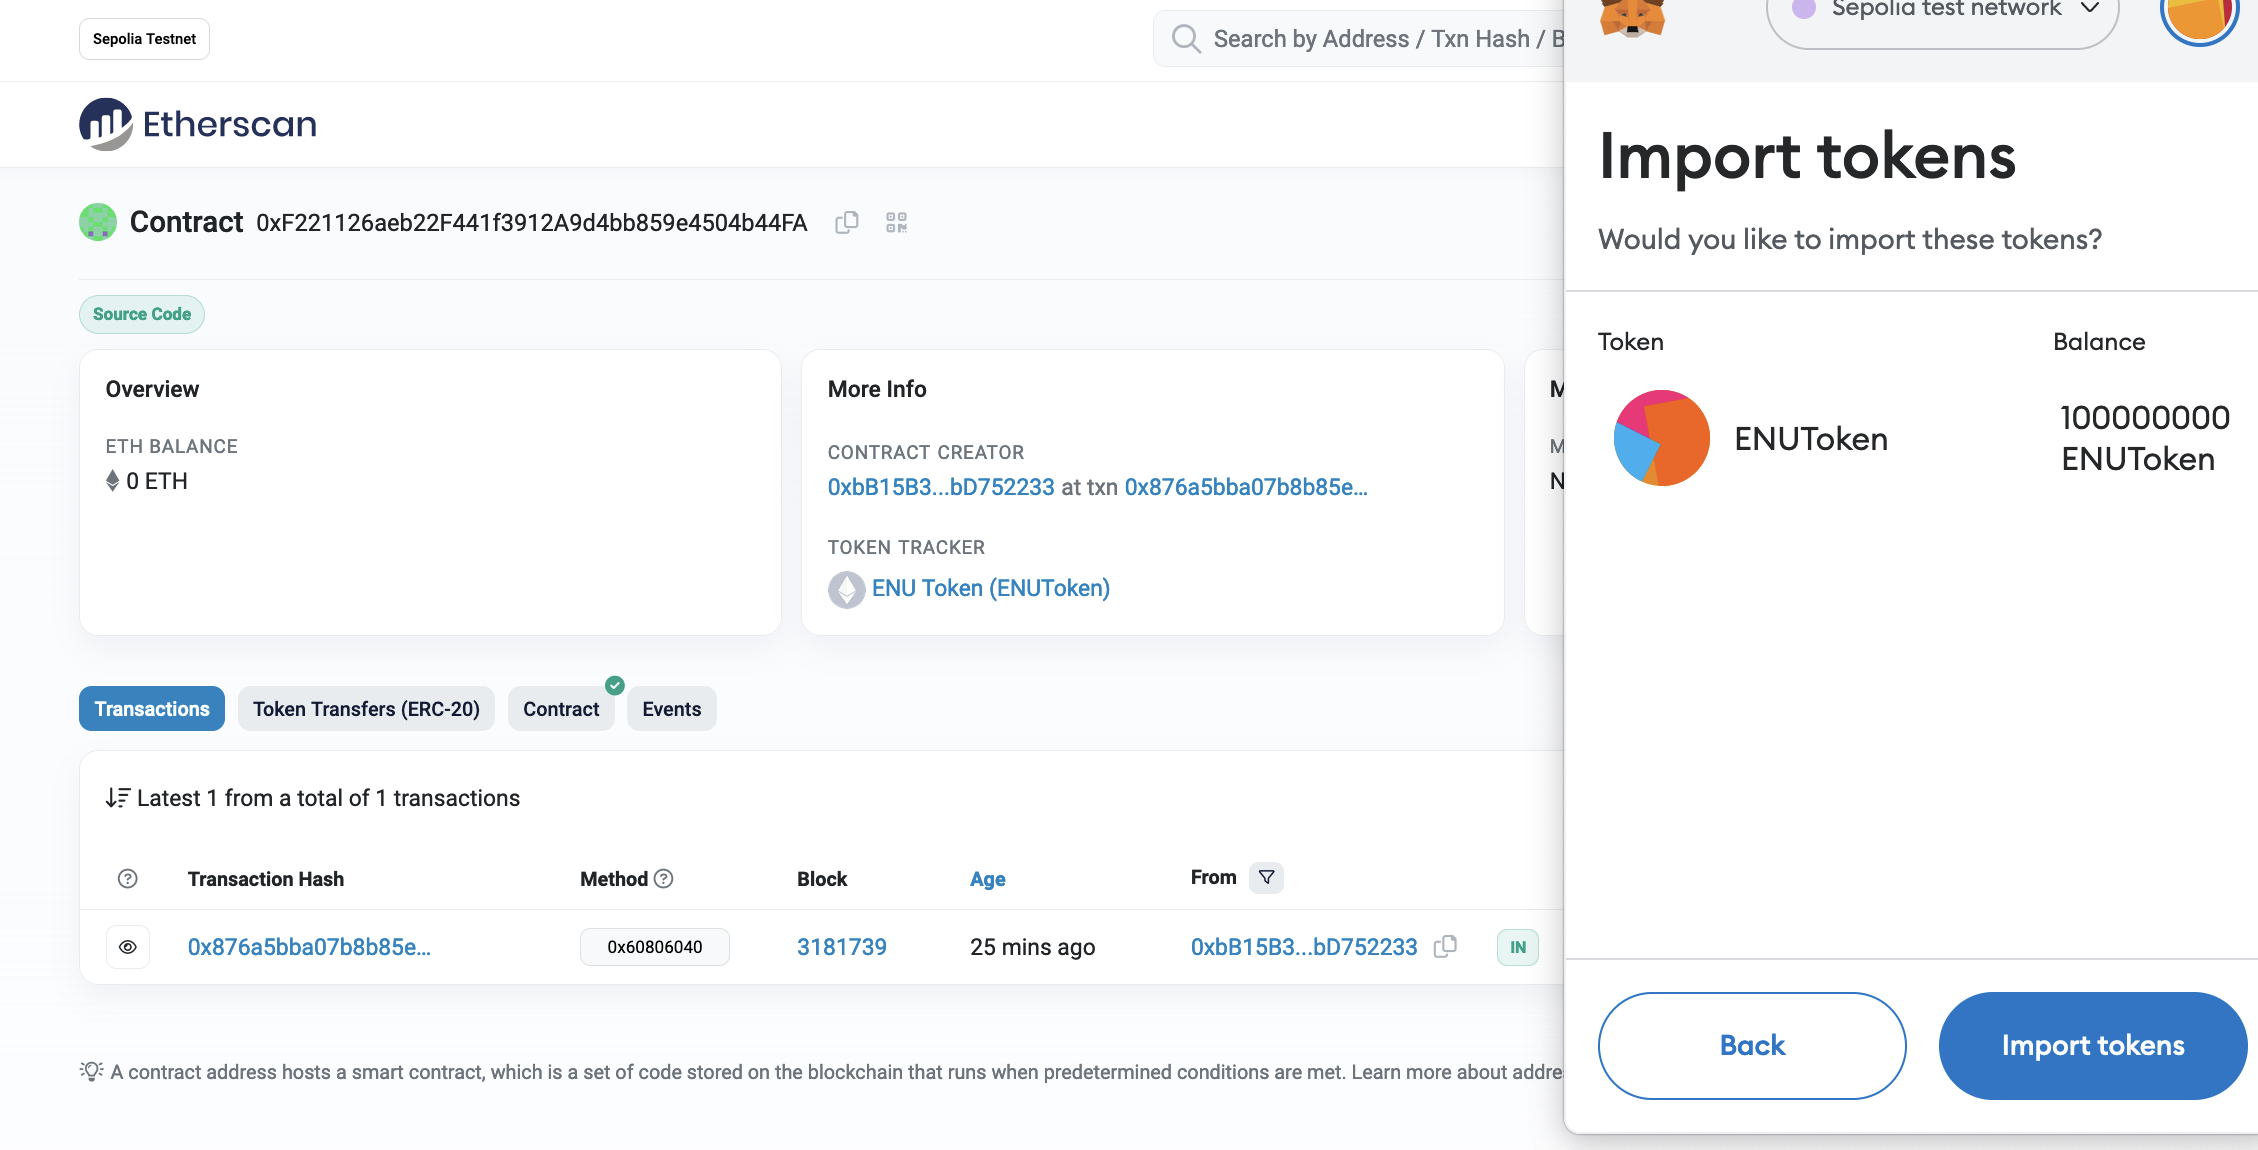
When the contact is run there is a constructor to transfer the tokens to the wallet we have defined (and who will be the owner of the token). We can now go back to the wallet which is specified, to see if the tokens have been transferred here:
Next, we can transfer the tokens into our wallet, by defining the contract address:
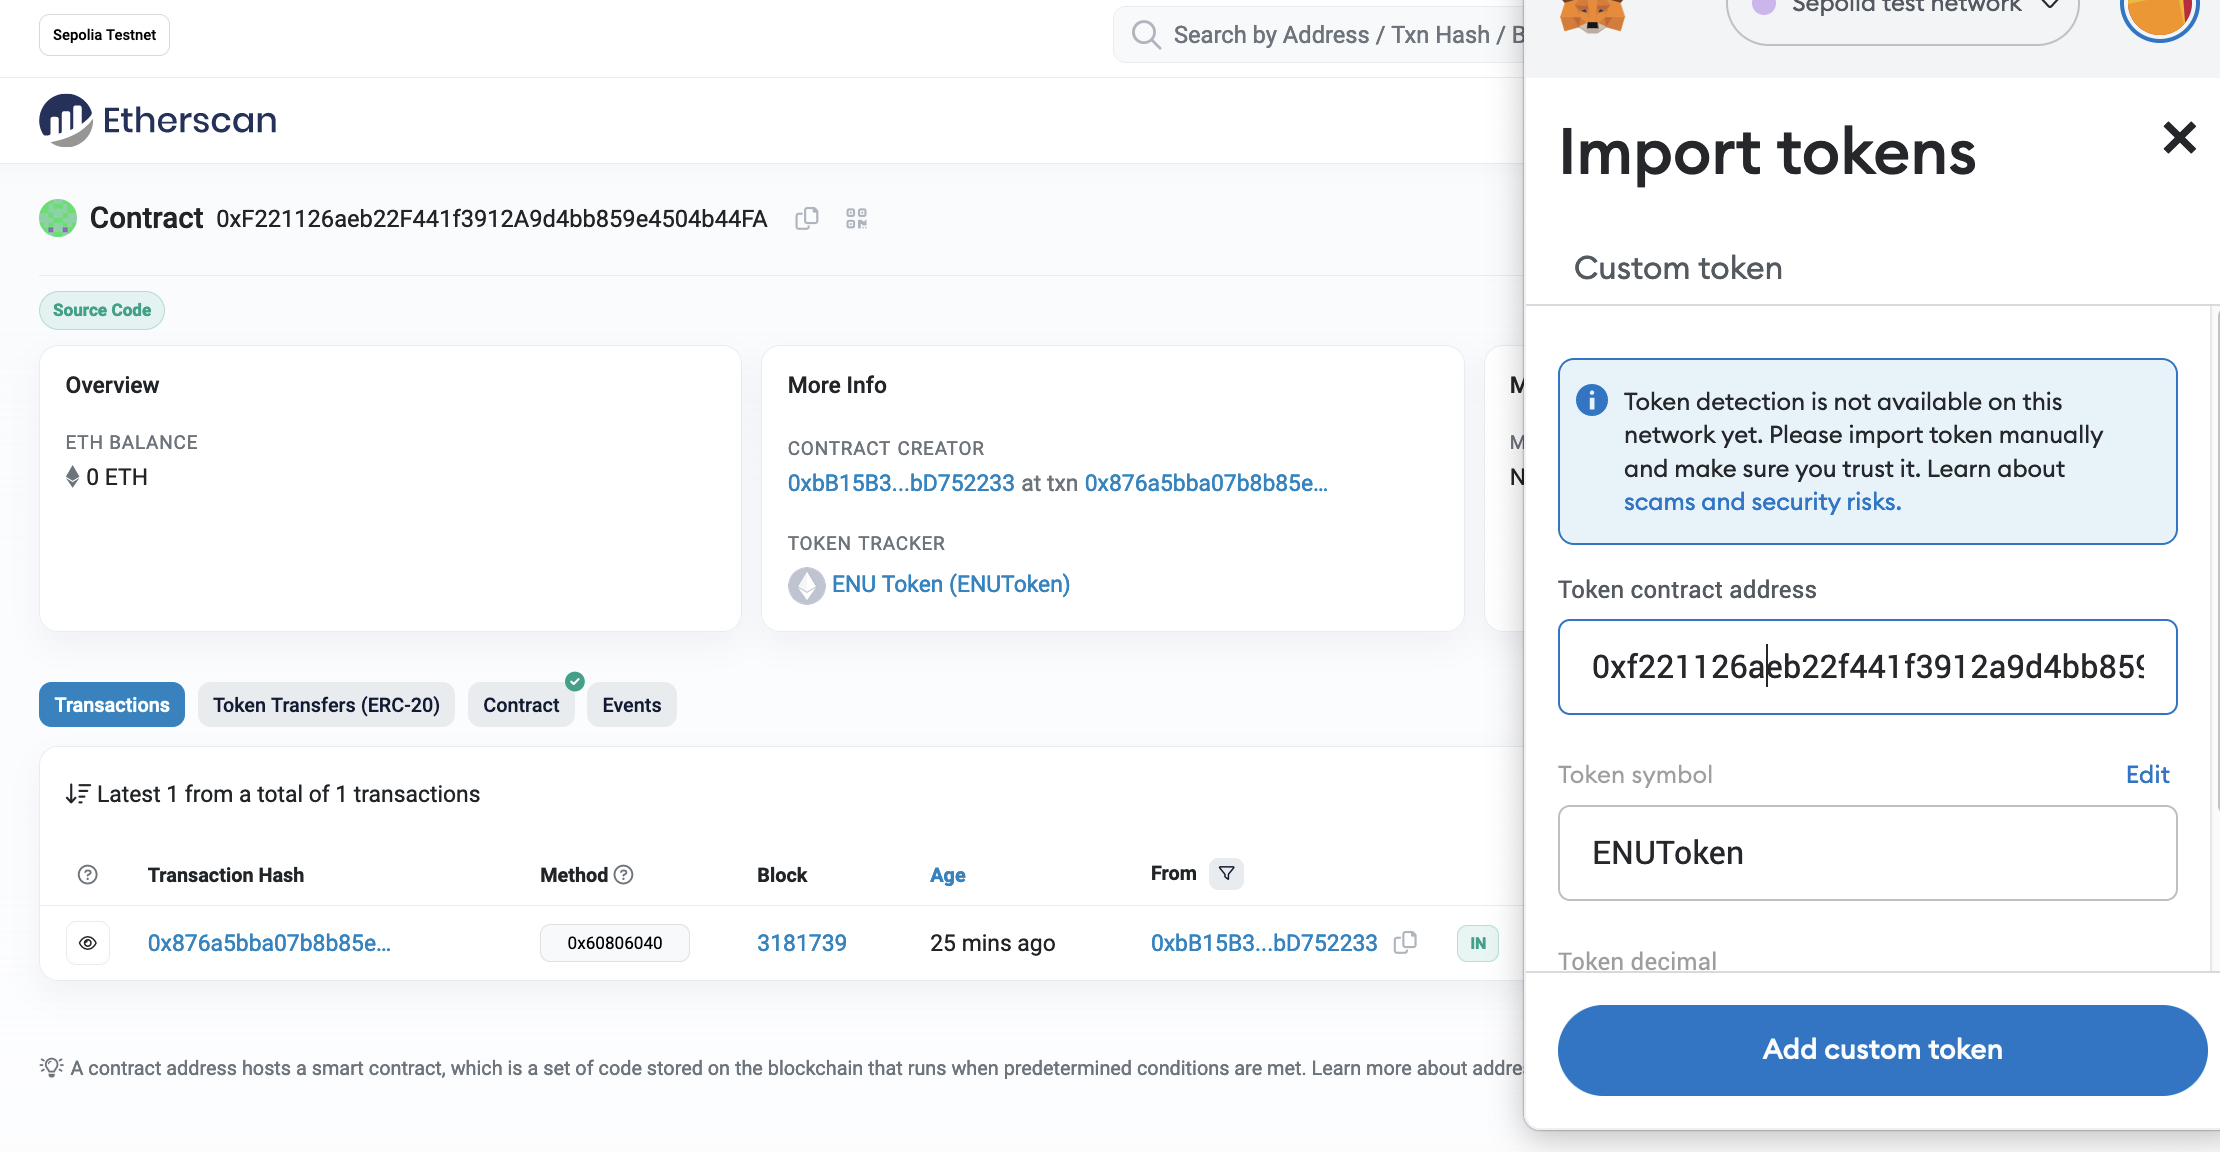
We will now have our new tokens in the wallet:
And with:
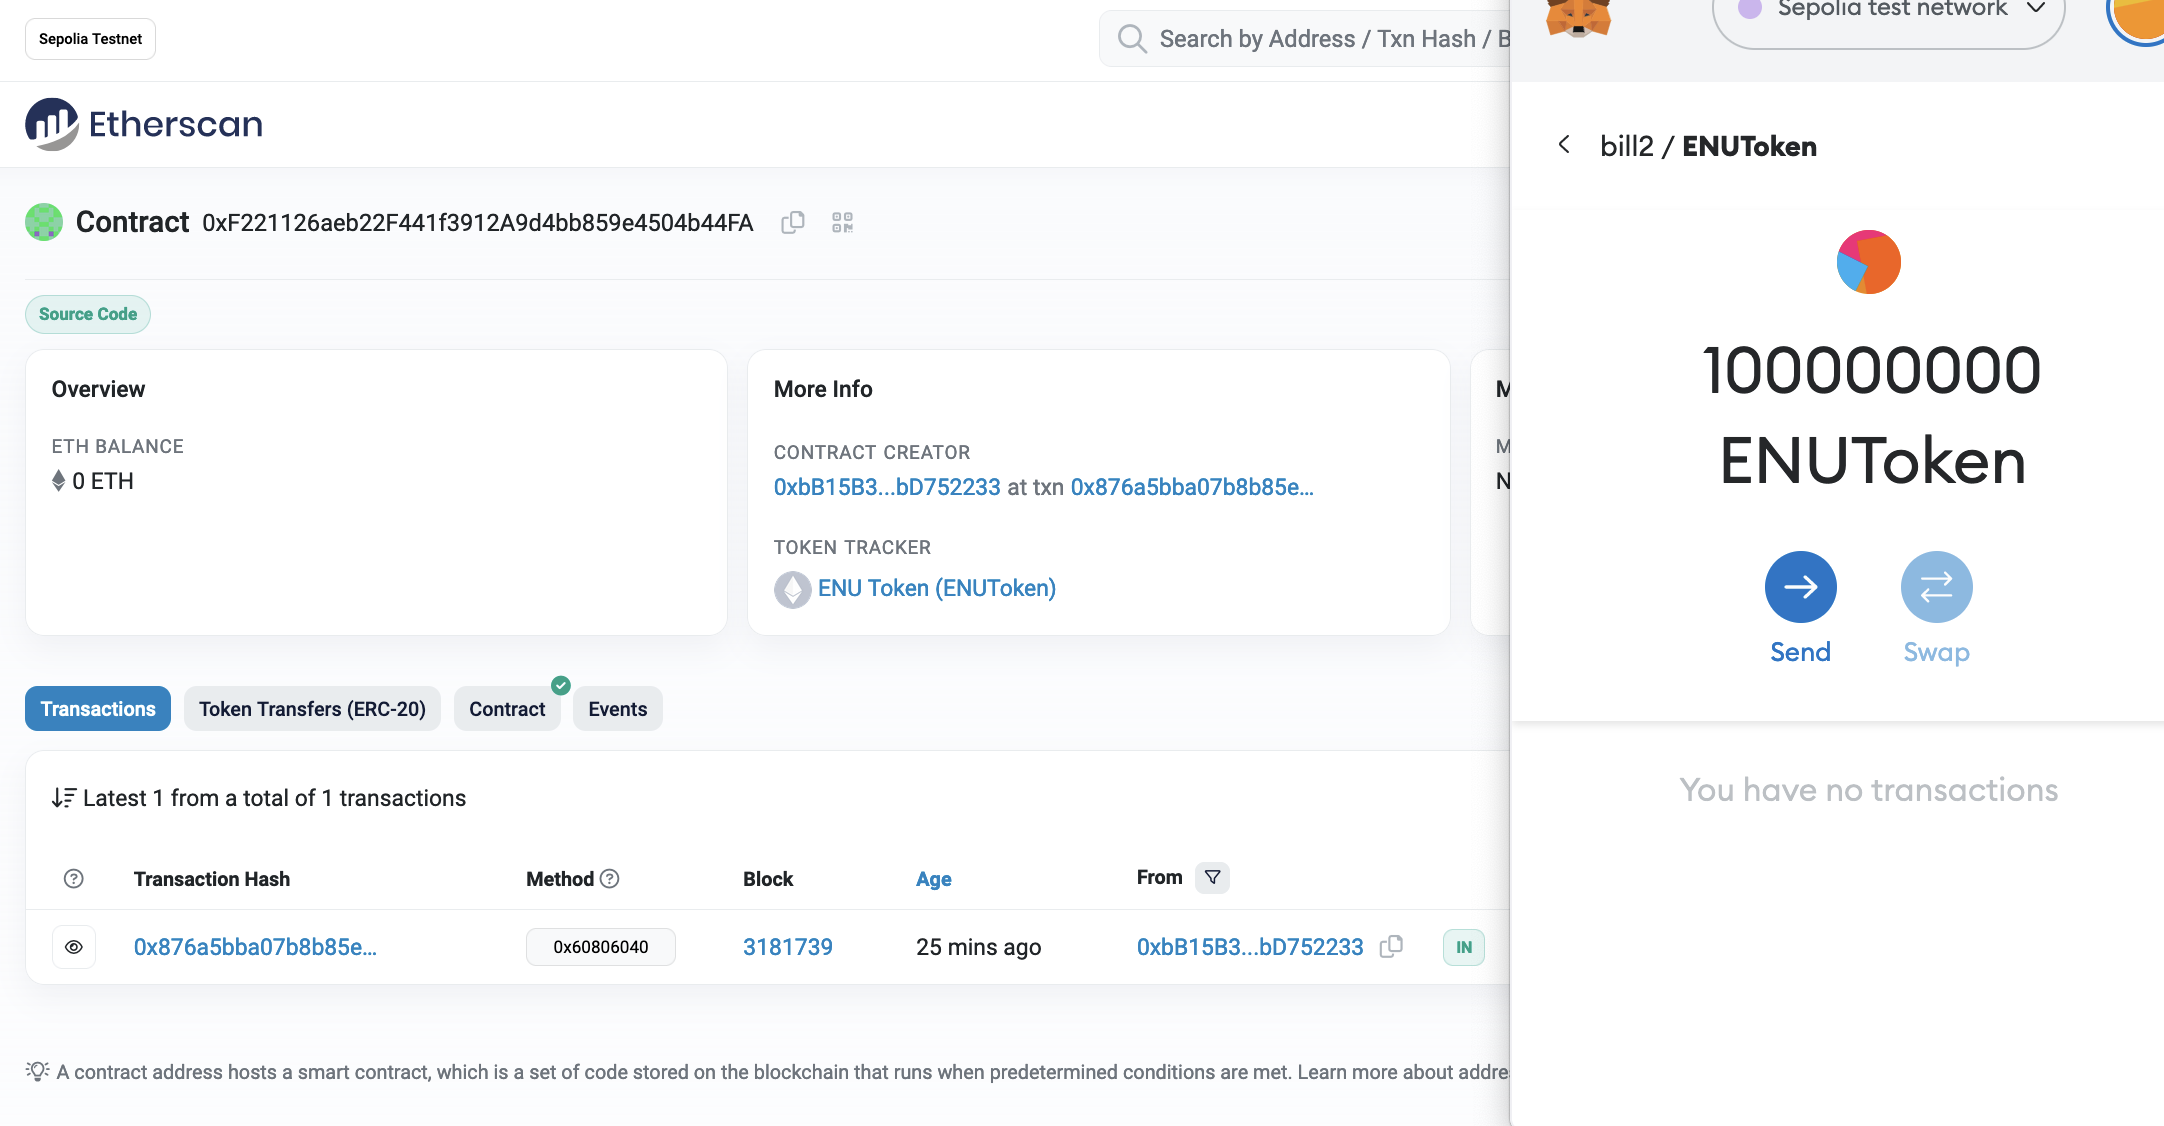
We can now transfer the cryptocurrency to another wallet:
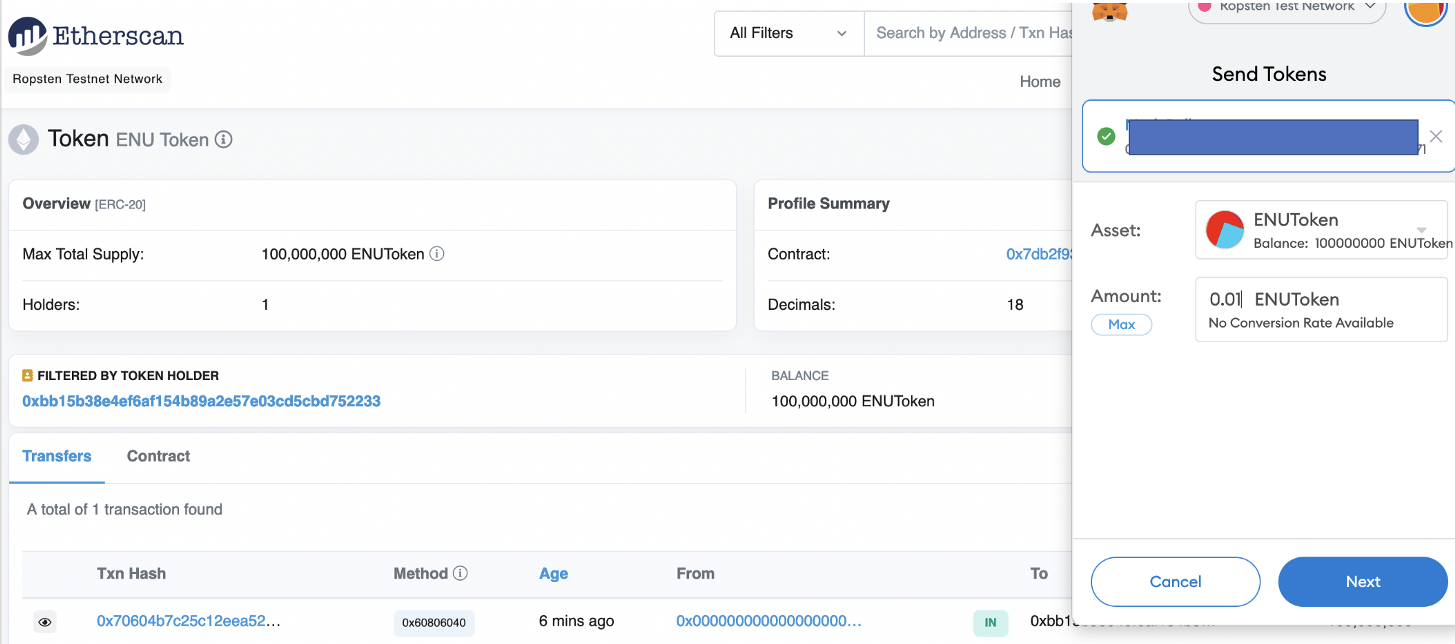
We can view the ENUToken:
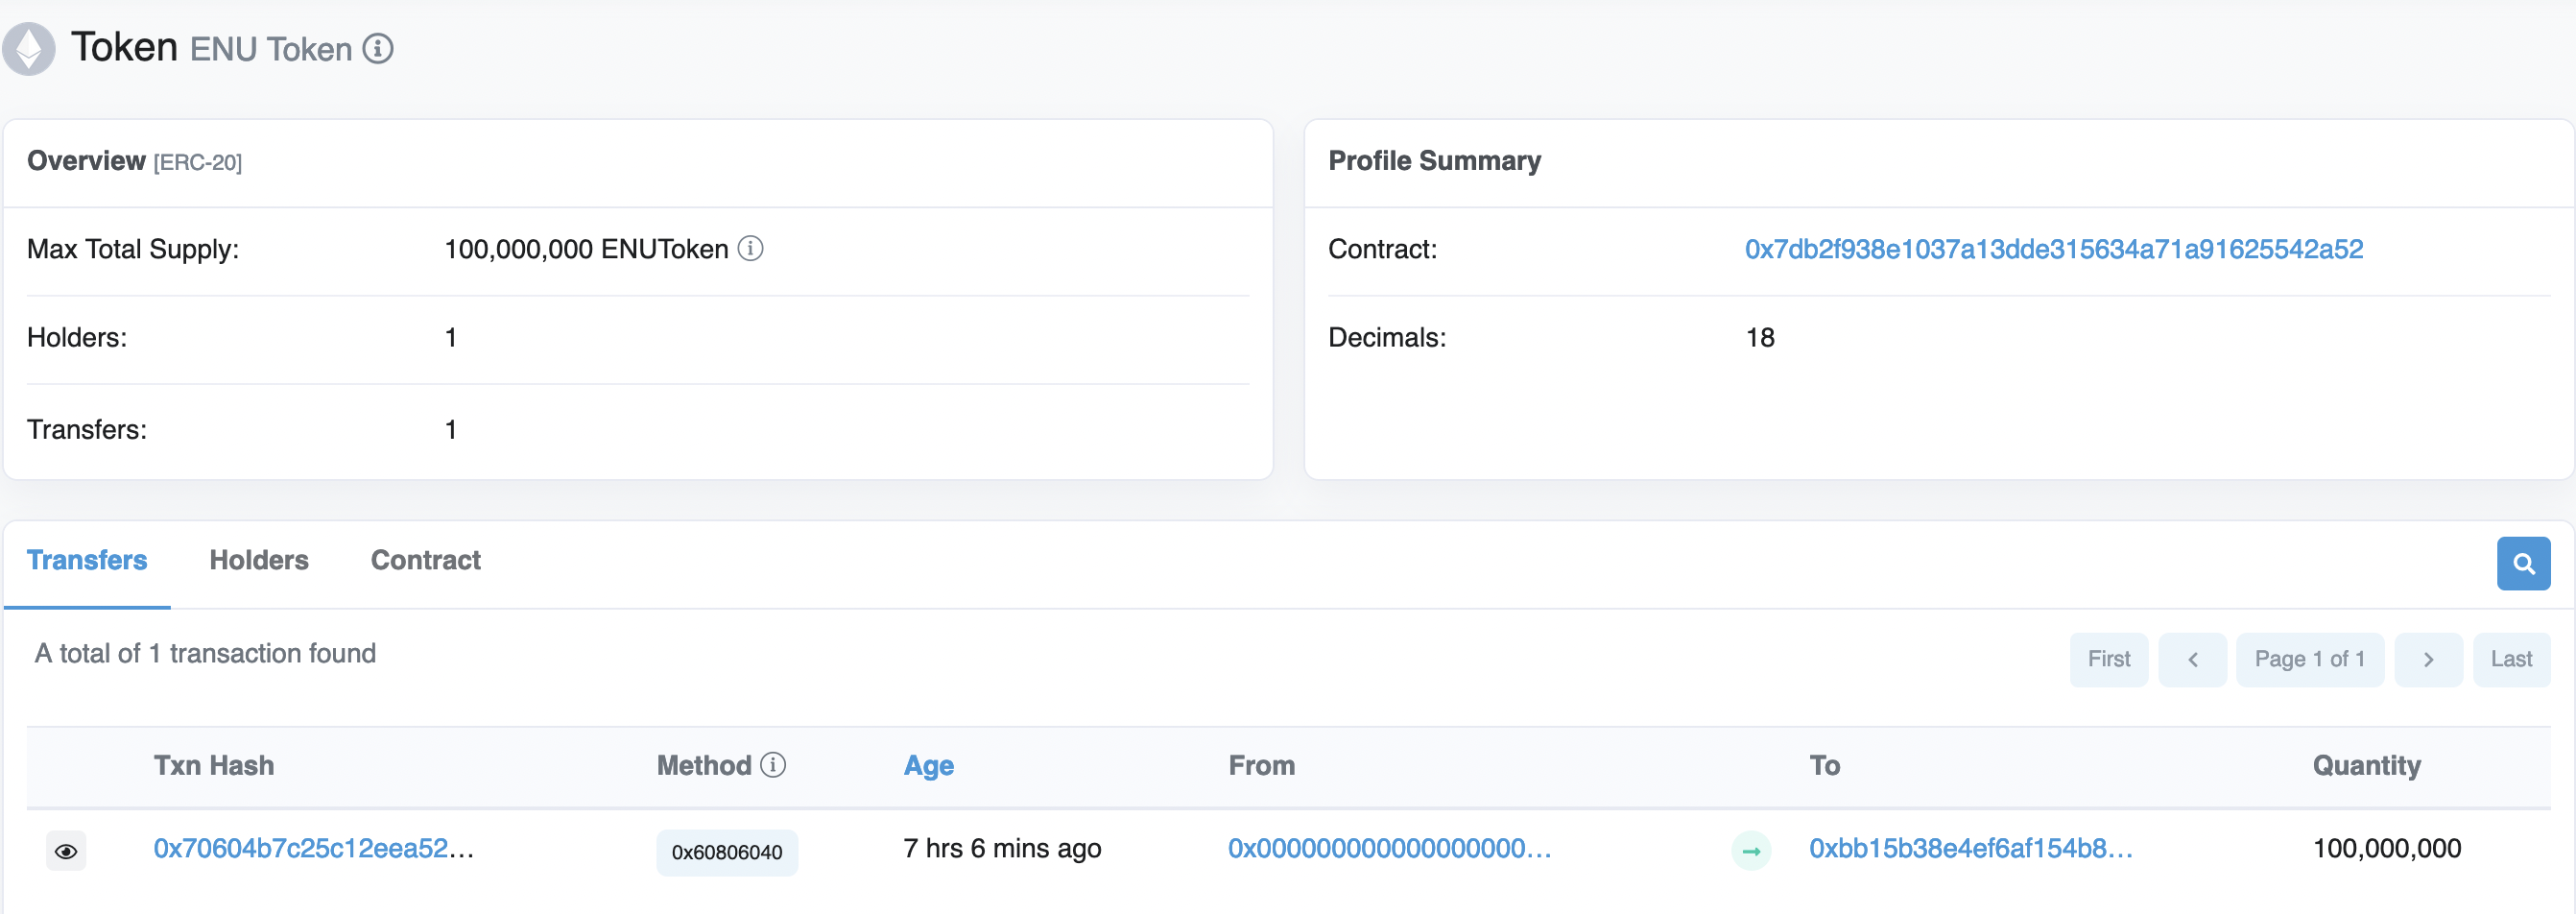
Now answer the following:
- Do you see the tokens in your wallet?
- Now send 0.1 of your token to someone else's wallet. If you want, you can send to your tutor's wallet. Bill's wallet is 0xbb15b38e4ef6af154b89a2e57e03cd5cbd752233
- Did they receive the token?
Saving the state
Smart contracts give us the opportunity to store data in a stateful way, and where we can add and delete data within the smart contact, and then view a current state. So let’s do a simple contact of adding cities to a string array. Overall it will cost us some gas to add and delete strings, but not to view the state. The contract we will use is:
pragma solidity ^0.4.18;

contract ExampleApp {

    string[]  myArray;

    function add(string x) public {
        myArray.push(x);

    }


    function del(string x) public {
        for (uint j = 0; j < myArray.length; j++) {
        if (keccak256(abi.encodePacked(myArray[j])) == keccak256(abi.encodePacked(x))) {

                delete myArray[j];
        }
        }

    }

    function show() public view returns (uint256, string) {
        string memory str;
        for (uint j = 0; j < myArray.length; j++) {
            str = string(abi.encodePacked(str, myArray[j]));

        }

        return(myArray.length,str);
    }

}
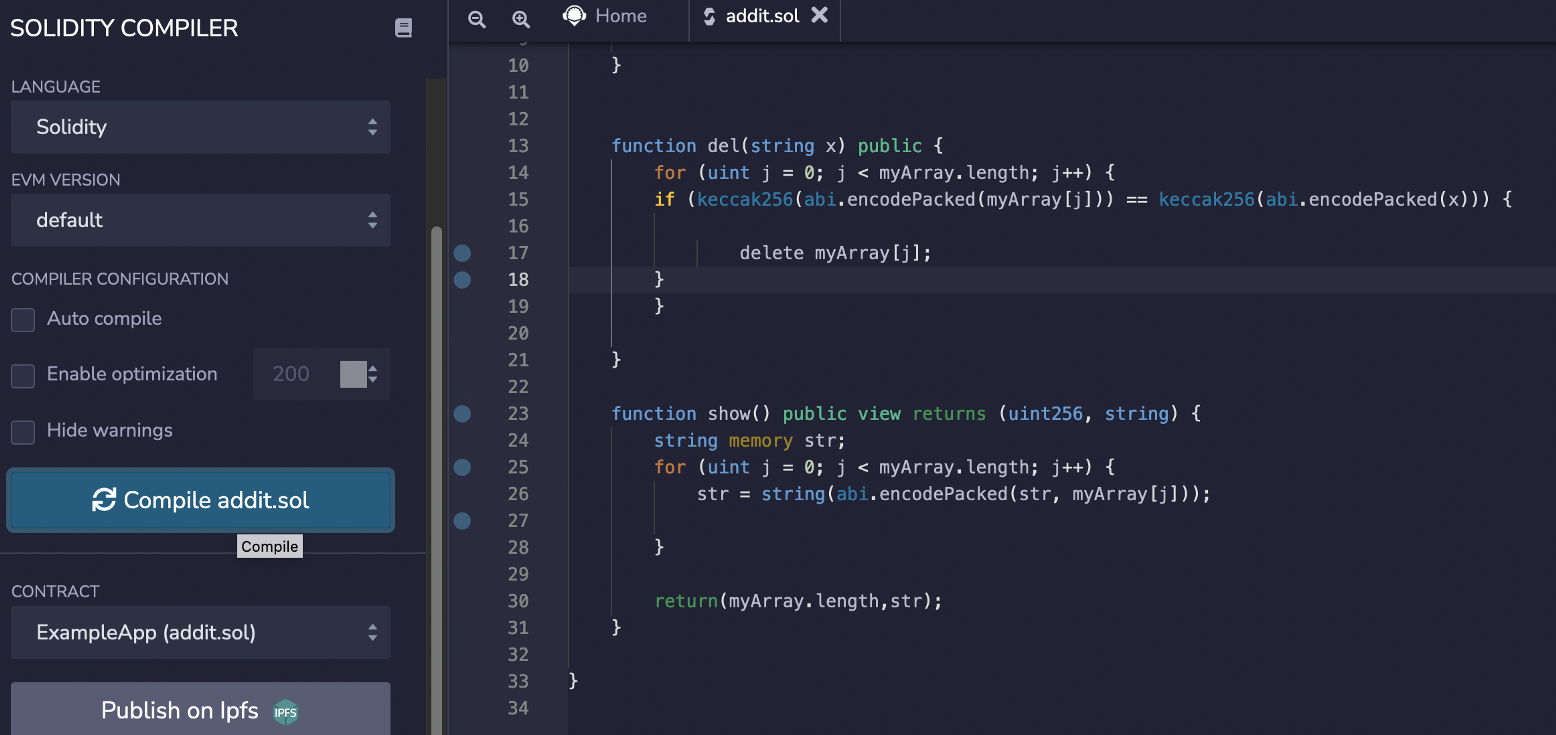
This has an add() method to add a new string to myArray, and a show() which will show the contents of myArray. The view element added to show() makes sure it is just a read function (and that we do not write to the function). We can then compile it in remix:
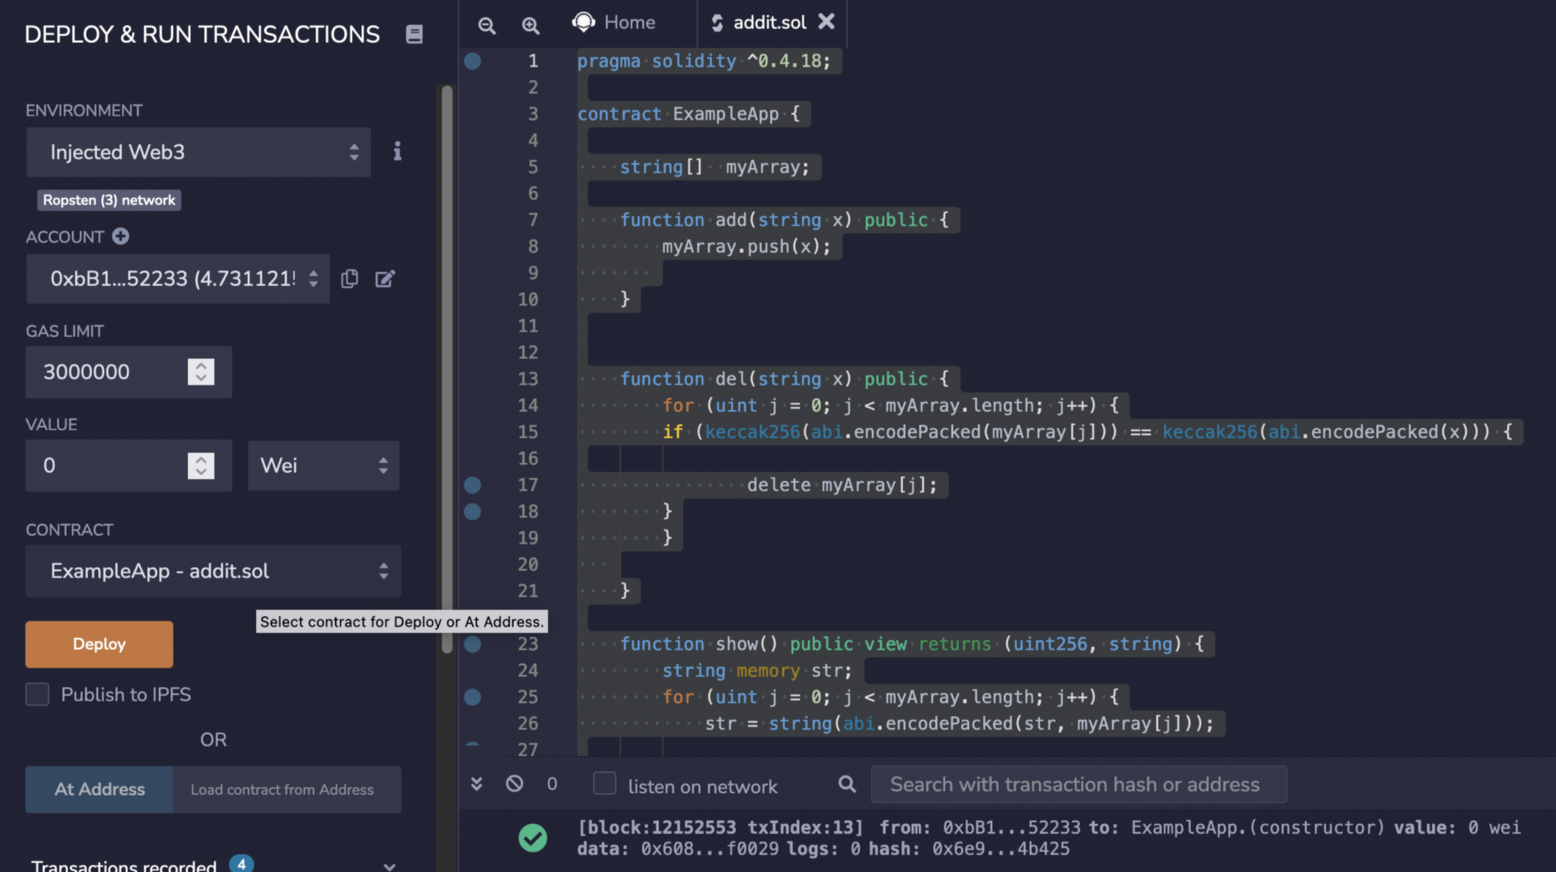
Now we can deploy:
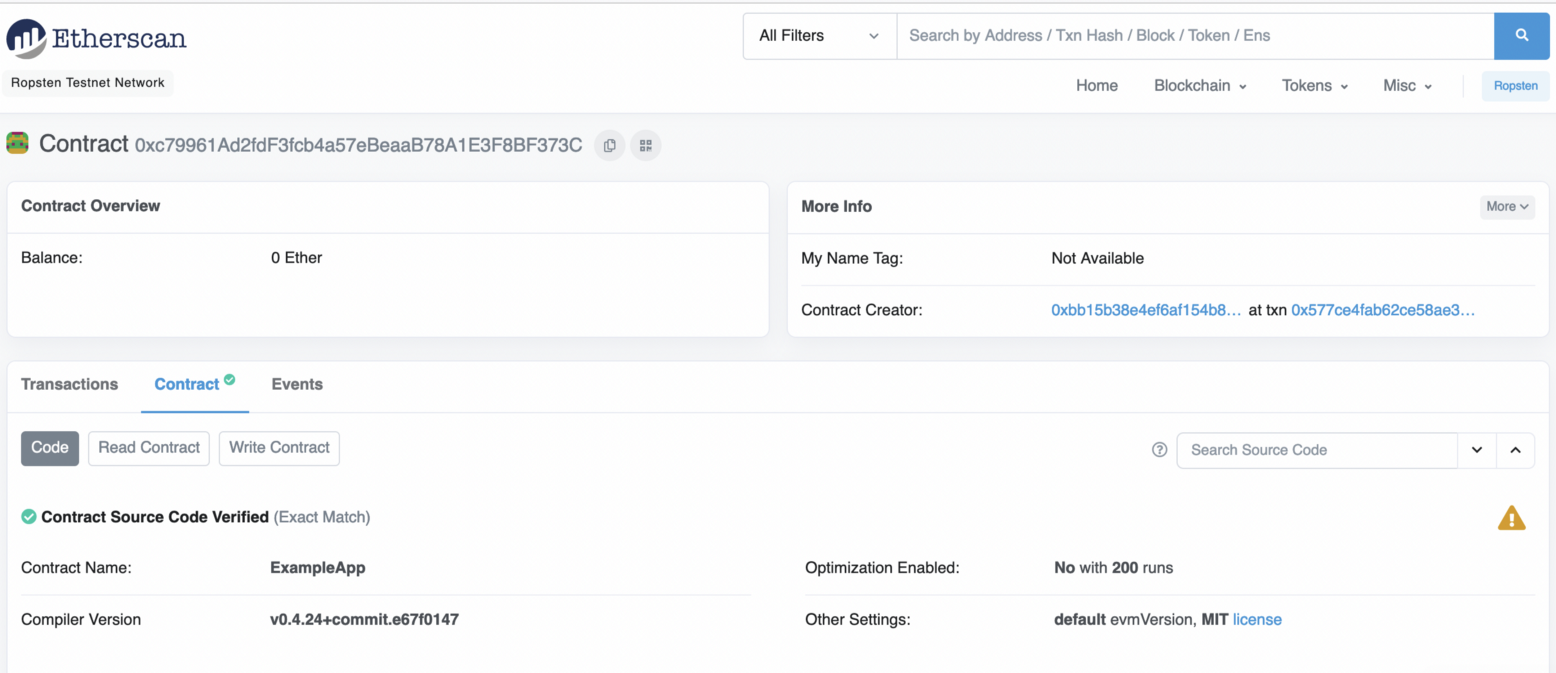
This creates a new contact here:
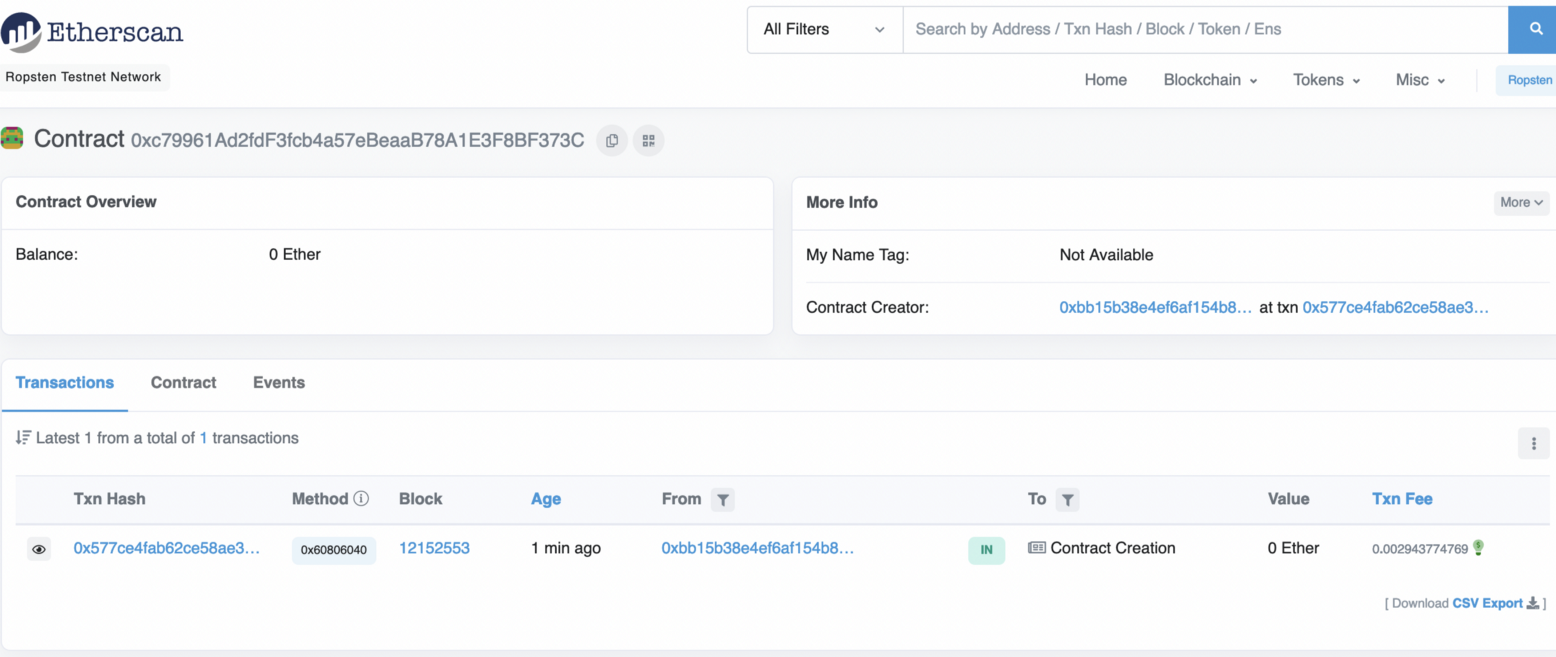
If we look at the contract we get:

Next we can Verify the contract:
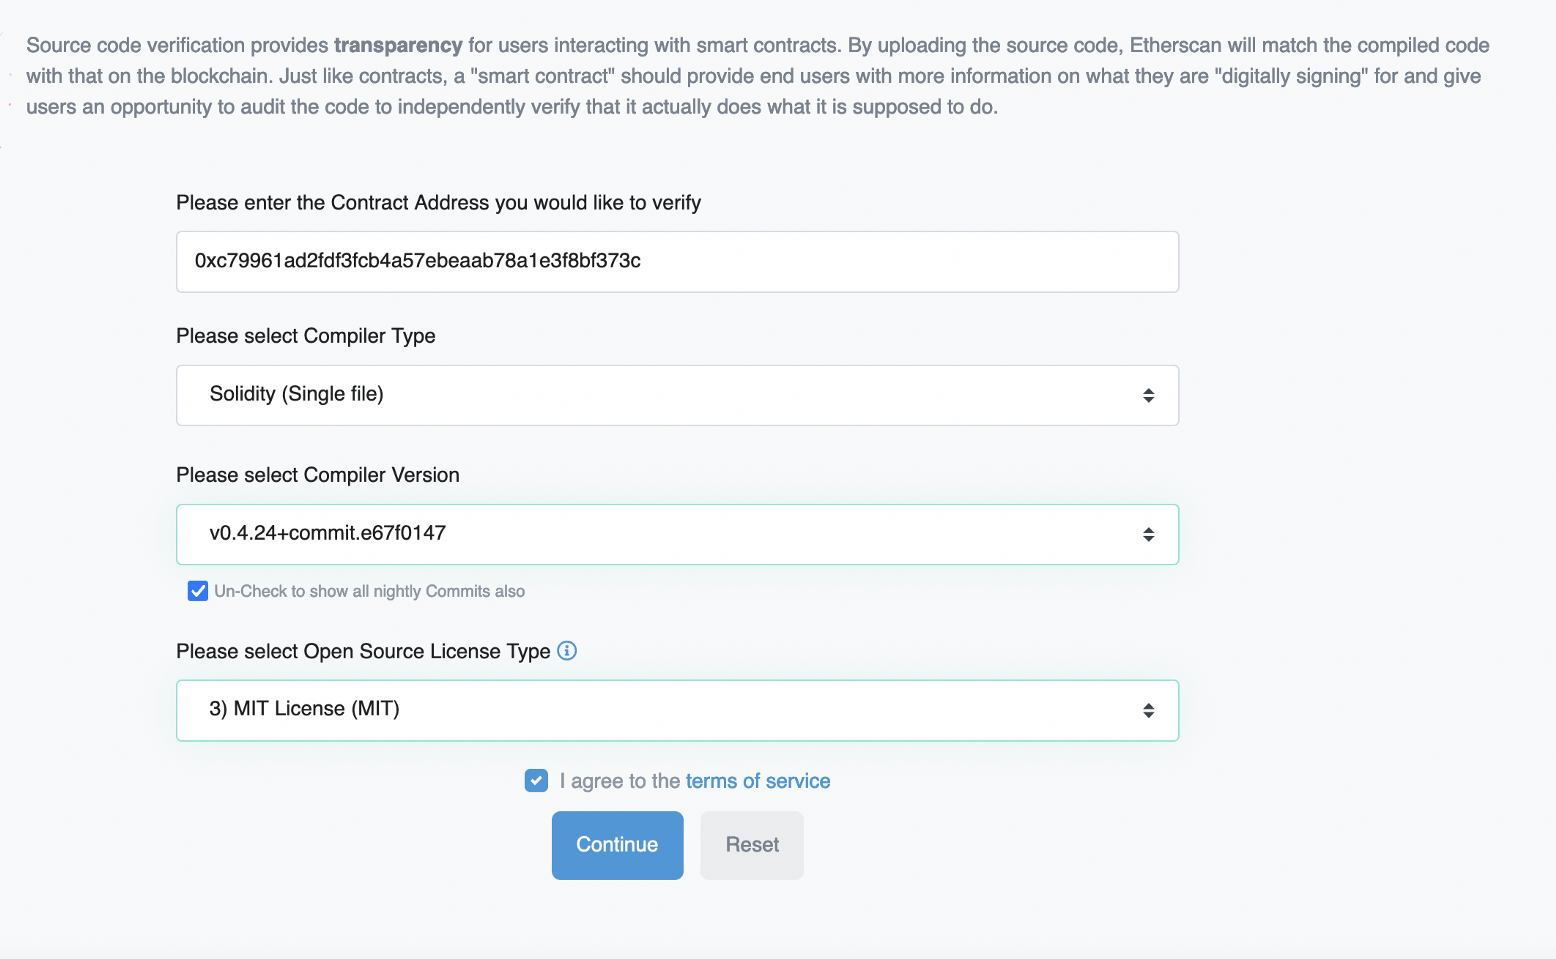
Note that the compiler we used is 0.4.24. We then add our code, and then the contact is validated:
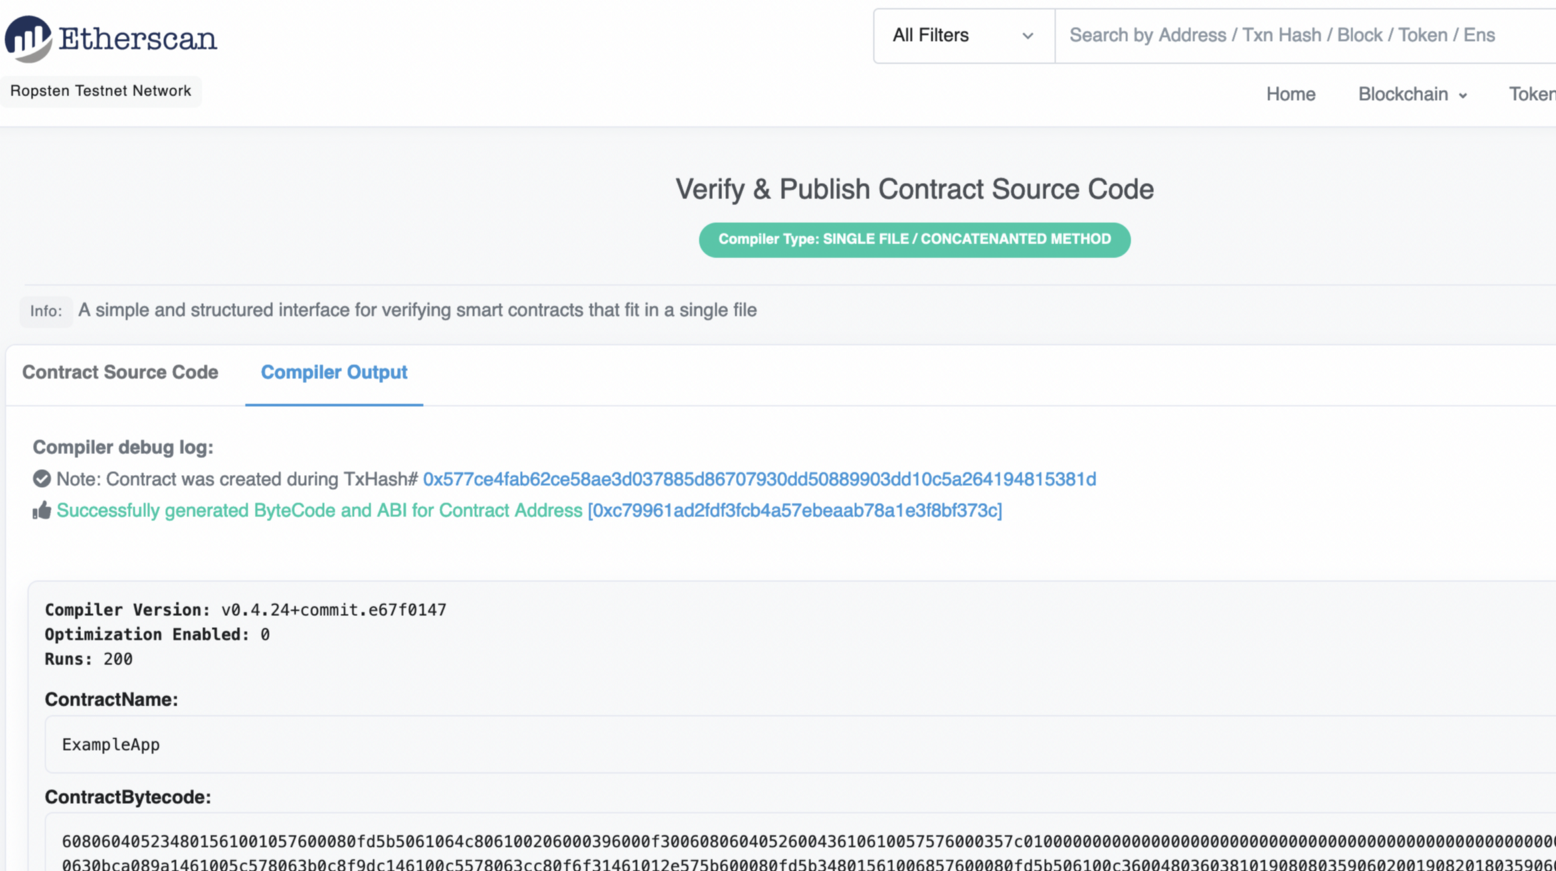
It is now complete here:
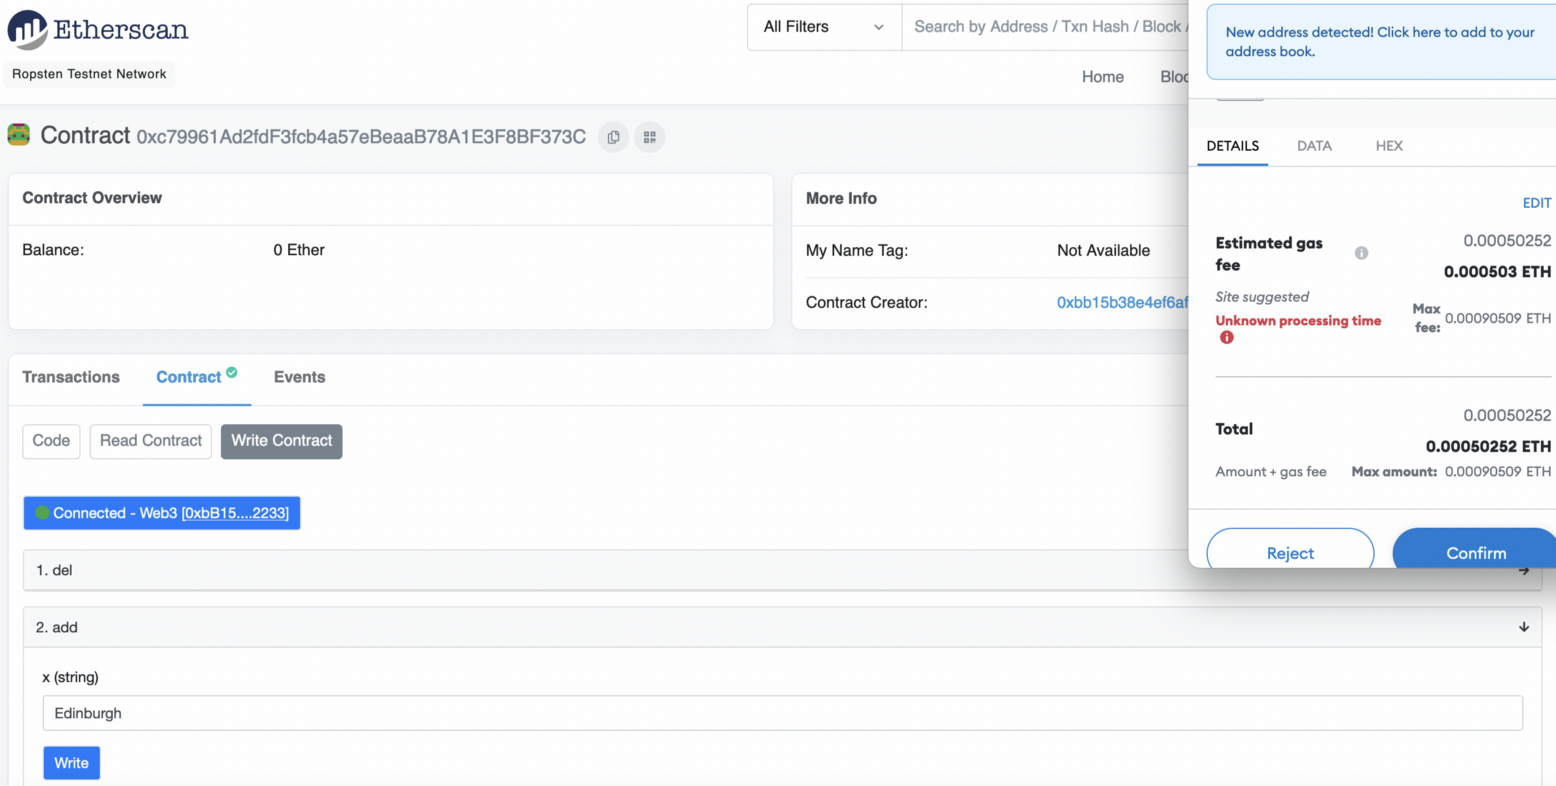
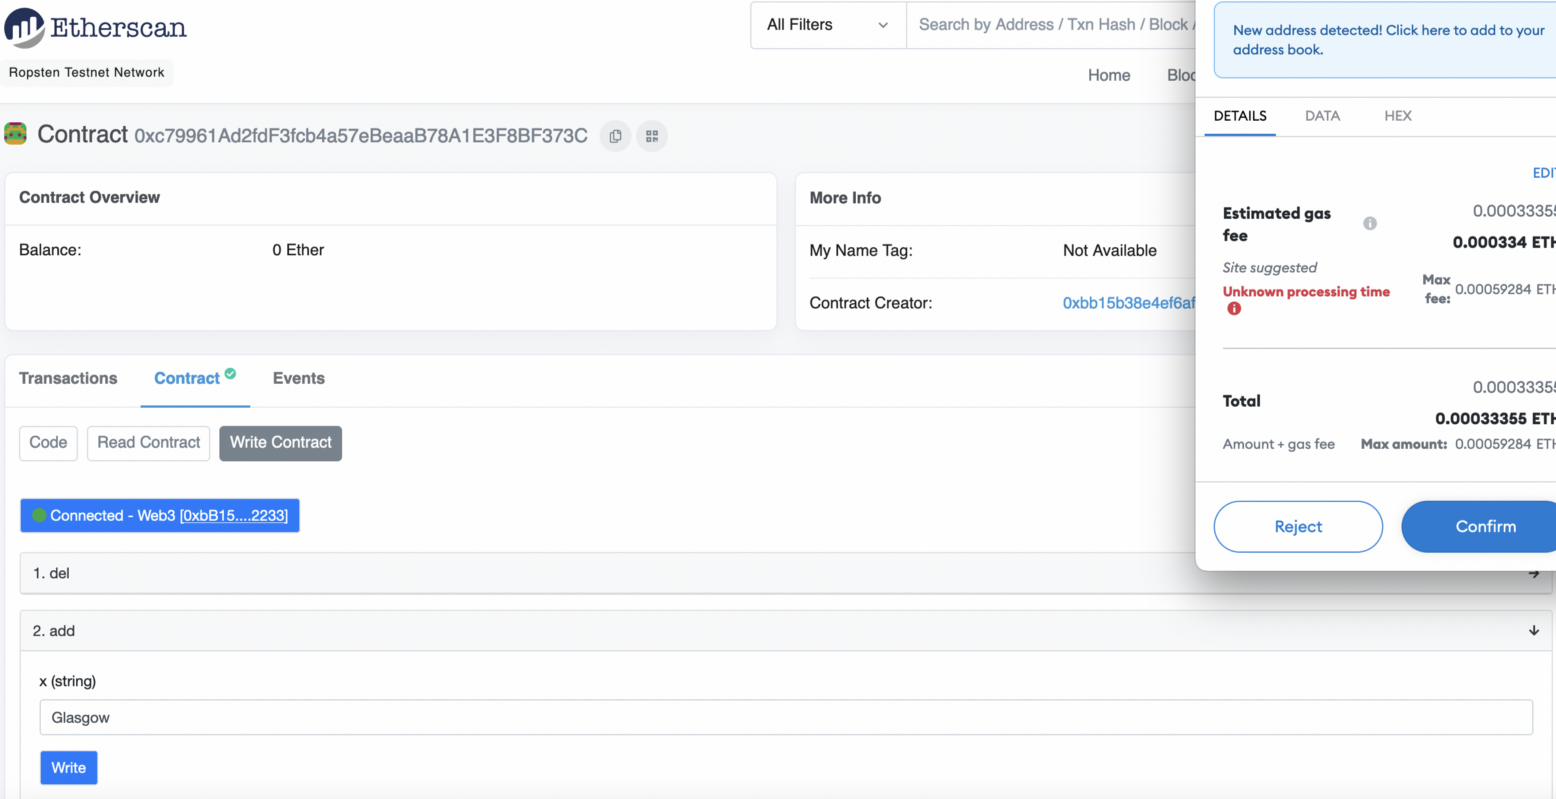
This will cost us some gas as we change the state of the smart contact:
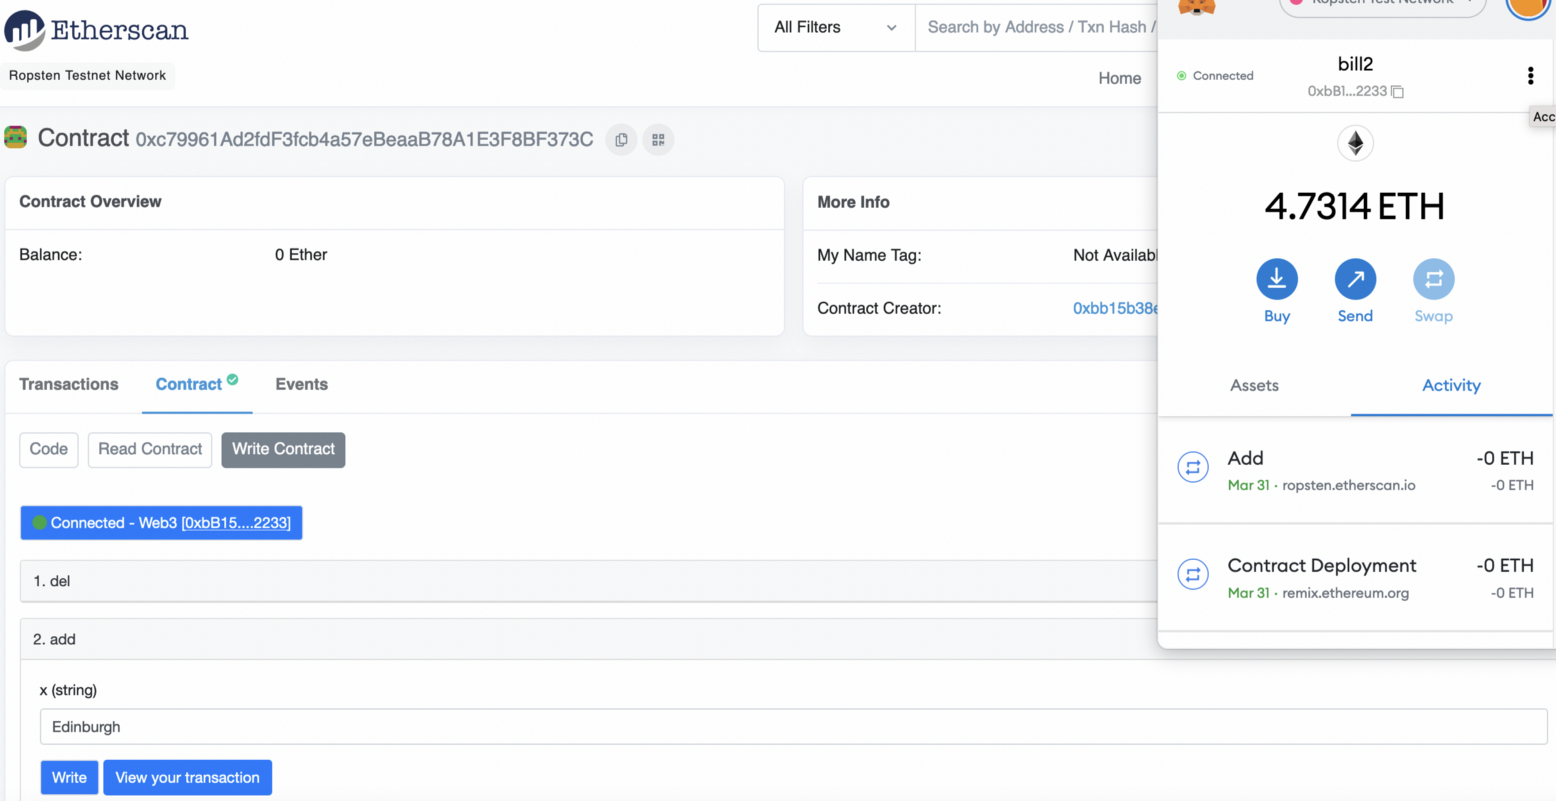
Once it has been mined, the smart contact will be updated:
We can then use the View() method to see the string:
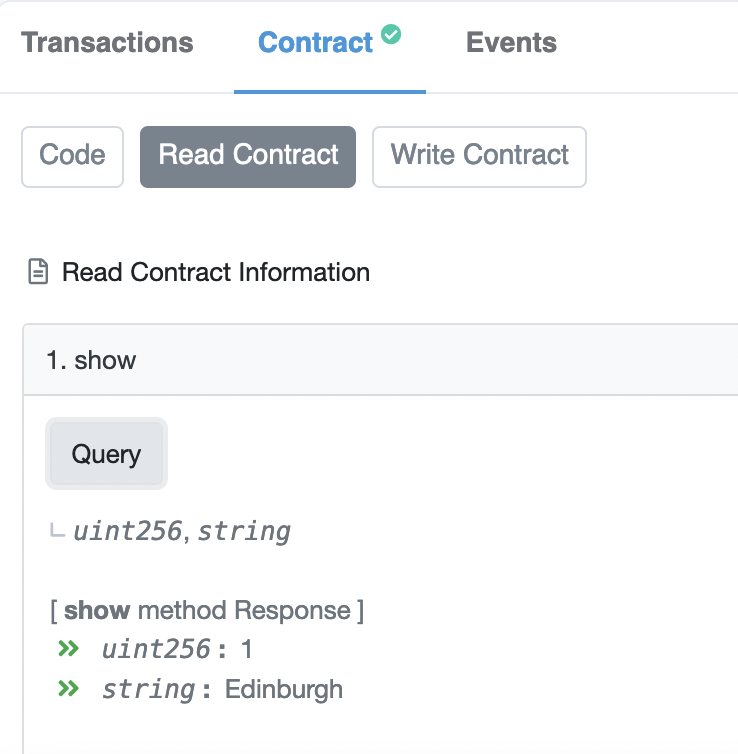
Now we add “Glasgow”:
And once it has been mined, we can go back and show the new state:

Complete the following:
- Setup your smart contact, and then add a few cities of the world, and prove that it works.
- Ask another person, or your tutor, to add a city to your smart contract, and prove that it works.
ERC-721 (Creating an NFT)
For normal crypto tokens (ERC-20) we use FT (Fungible Tokens) and where there is a finite number of these, and each of these is the same. For example, I could release one million ERC-20 tokens and then trade with them. They will all have the same value, and I cannot mint any more. With NFTs (ERC-721), we can mint any number of cryptography tokens, and each will have an owner. Each of these can have its own value, or be pinned to a physical asset or identity. For example, as a tutor, I could assign each of my students to an NFT, and where we link the NFT to the student. Overall, we create these with a smart contract, and where there is an "owner" of the creation of the tokens. It is this account that will create the tokens as required, and then allocate them to new owners.
A demo of this is here.
First, we start off with a smart contract:
pragma solidity ^0.8.0;

import "@openzeppelin/contracts/token/ERC721/extensions/ERC721URIStorage.sol";
import "@openzeppelin/contracts/utils/Counters.sol";

contract BillToken is ERC721URIStorage{
    using Counters for Counters.Counter;
    Counters.Counter private _tokenIds;
    mapping(string => uint8) hashes;

    constructor() ERC721("Bill Token", "BTK") {}

    function awardItem(address recipient, string memory hash, string memory metadata) public returns (uint256){
        require(hashes[hash] != 1);
        hashes[hash] = 1;
        _tokenIds.increment();
        uint256 newItemId = _tokenIds.current();
        _mint(recipient, newItemId);
        _setTokenURI(newItemId, metadata);

        return newItemId;
    }
}
This contract defines we are creating a "Bill Token", and where Open Zeppelin will integrate all the required methods that are required to interact with the token (such as creating it, viewing the ownership of tokens, and in allocating it to another owner). For this, we can use Remix (here) to create and compile the code:

We can then deploy our contract:

The awardItem function can be used to mint an NFT and allocate it to a given address. So, let’s say we are giving our NFTs for module marks in Applied Cryptography. First we create the metadata for the NFT as a JSON file, and add it to a URL:
                {
                "name": "Applied Crypto",
                "description": "Public Key Encryption",
                "image": "https://asecuritysite.com/public/bob.png",
                "grade": 87
                }
Let’s now allocate one new “Bill Token” to (0xbB15B38e4ef6aF154b89A2E57E03Cd5cbD752233)

Next we will create a second token:

Finally, we can view the contract:

Part B
B.1 Using blockchain.info:
Find the details of the genesis block here: And with
- Date created:
- Reward:
- Number of transactions:
- Size of block:
- Which account received the mining reward for the genesis block (last four digits):
- How many USD does the original miner have in the account they used for the first genesis record:
- When did the genesis block creator stop trading?
B.2 Using blockchain.info:
Determine the following here:
- Total bitcoins in circulation:
- Most recent hash block (last four hex digits):
- Block reward per block:
- Difficulty:
- Average time between blocks:
- Market capitalisation (USD):
- 24 hr price (USD):
- 24hr transactions (USD):
- Hash rate:
- Last successful miner:
- Maximum block size:
- Balance for 1GbVUSW5WJmRCpaCJ4hanUny77oDaWW4to:
B.3
Download and create the Python file defined on this page here:
import httplib2

resp, content = httplib2.Http().request("https://blockchain.info/q/latesthash")
print("Latest hash: ",content)

resp, content = httplib2.Http().request("https://blockchain.info/q/bcperblock")
print("Block reward per block: ",float(content))

resp, content = httplib2.Http().request("https://blockchain.info/q/getblockcount")
print("Longest block: ",content)

resp, content = httplib2.Http().request("https://blockchain.info/q/getdifficulty")
print("Difficulty: ",content)

resp, content = httplib2.Http().request("https://blockchain.info/q/probability")
print("Mining probability: ",content)

resp, content = httplib2.Http().request("https://blockchain.info/q/interval")
print("Average time between blocks (seconds): ",content.decode())

resp, content = httplib2.Http().request("https://blockchain.info/q/eta")
print("Time to next block (seconds): ",content.decode())

resp, content = httplib2.Http().request("https://blockchain.info/q/marketcap")
print("Market capitalisation (Million USD): ",float(content)/1000000)


resp, content = httplib2.Http().request("https://blockchain.info/q/24hrprice")
print("24hr price (USD): ",content.decode())

resp, content = httplib2.Http().request("https://blockchain.info/q/24hrtransactioncount")
print("24hr transactions: ",content.decode())

resp, content = httplib2.Http().request("https://blockchain.info/q/hashrate")
print("Hash rate: ",content.decode())

resp, content = httplib2.Http().request("https://blockchain.info/q/addressbalance/1GbVUSW5WJmRCpaCJ4hanUny77oDaWW4to?confirmations=1")
print("Account balance for 1Gb...4to (BTC): ",int(content)/100000000)

resp, content = httplib2.Http().request("https://blockchain.info/q/getreceivedbyaddress/1GbVUSW5WJmRCpaCJ4hanUny77oDaWW4to?confirmations=1")
print("Received for 1Gb...4to (BTC): ",int(content)/100000000)
Now run the Python file, and compare the results in L.1.2.
- Total bitcoins in circulation:
- Most recent hash block (last four hex digits):
- Block reward per block:
- Difficulty:
- Average time between blocks:
- Market capitalisation (USD):
- 24 hr price (USD):
- 24hr transactions (USD):
- Hash rate:
- Balance for 1GbVUSW5WJmRCpaCJ4hanUny77oDaWW4to:
Part C
C.1 Using blockchain.info, find the details of the genesis block:
Date created:
Reward:
Number of transactions:
Size of block:
Which account received the mining reward for the genesis block (last four digits):
How many USD does the original miner have in the account they used for the first genesis record:
When did the genesis block creator stop trading?
C.2 Using blockchain.info, determine the following:
Total bitcoins in circulation:
Most recent hash block (last four hex digits):
Block reward per block:
Difficulty:
Average time between blocks:
Market capitalisation (USD):
24 hr price (USD):
24hr transactions (USD):
Hash rate:
Last successful miner:
Maximum block size:
Balance for 1GbVUSW5WJmRCpaCJ4hanUny77oDaWW4to:
C.3 Download and created the Python file defined on this page:
https://asecuritysite.com/encryption/bit
Now run the Python file, and compare the results in L.1.2.
Total bitcoins in circulation:
Most recent hash block (last four hex digits):
Block reward per block:
Difficulty:
Average time between blocks:
Market capitalisation (USD):
24 hr price (USD):
24hr transactions (USD):
Hash rate:
Additional Tutorial
At the end of this lab, remember to stop your Blockchain (Control-C from the console that is running Geth), and shut down your VM. You may also want to use “rm -r mynapier” in order to delete your blockchain.
Using Geth
In this tutorial, we will run an Ethereum blockchain on your Ubuntu host:
Demo: https://www.youtube.com/watch?v=Gl3Suylr-7E
Outline: https://asecuritysite.com/subjects/chapter91
On your Ubuntu computer, install Geth:
sudo apt-get install software-properties-common
sudo add-apt-repository -y ppa:ethereum/Ethereum
sudu apt-get update
sudo apt-get install ethereum
We are going to create the blockchain in the mynapier folder. First create three new accounts:
napier@napier-virtual-machine:~$ sudo geth --datadir=mynapier account new
WARN [03-20|22:24:56.282] Sanitizing cache to Go's GC limits       provided=1024 updated=666
INFO [03-20|22:24:56.284] Maximum peer count                       ETH=25 LES=0 total=25
Passphrase:  Qwerty1
Address: {39a18a459b2475925e3014679707e4970a6a836d}
napier@napier-virtual-machine:~$ sudo geth --datadir=mynapier account new
WARN [03-20|22:25:12.291] Sanitizing cache to Go's GC limits       provided=1024 updated=666
INFO [03-20|22:25:12.293] Maximum peer count                       ETH=25 LES=0 total=25
Passphrase:  Qwerty1
Address: {3a5b61aeb069dc7df1b8f1b58e883118ea8bef3f}
napier@napier-virtual-machine:~$ sudo geth --datadir=mynapier account new
WARN [03-20|22:25:46.518] Sanitizing cache to Go's GC limits       provided=1024 updated=666
INFO [03-20|22:25:46.521] Maximum peer count                       ETH=25 LES=0 total=25
Passphrase: Qwerty1
Address: {a2cda8c68259cc314bd12b67873ce7380b3dc496}
Open custom.json, and copy and paste the following details for your genesis block, but replace the hex IDs with the three accounts that you have created:
{
    "config": {
        "chainId": 15,
        "homesteadBlock": 0,
        "eip150Block": 0,
        "eip155Block": 0
    },
    "difficulty": "1",
    "gasLimit": "0x5268"
    "alloc": {
        "39a18a459b2475925e3014679707e4970a6a836d": { "balance": "300000000000000" },
        "3a5b61aeb069dc7df1b8f1b58e883118ea8bef3f": { "balance": "400000000000000" },
        "a2cda8c68259cc314bd12b67873ce7380b3dc496": { "balance": "0x400000000000000000" }
    }
}
Next run geth and create the genesis block details:
napier@napier-virtual-machine:~$ sudo geth --nousb --datadir=mynapier init custom.json
WARN [03-20|20:53:53.824] Sanitizing cache to Go's GC limits       provided=1024 updated=666
INFO [03-20|20:53:53.832] Maximum peer count                       ETH=25 LES=0 total=25
INFO [03-20|20:53:53.834] Allocated cache and file handles         database=/home/napier/mynapier/geth/chaindata cache=16 handles=16
INFO [03-20|20:53:53.868] Writing custom genesis block
INFO [03-20|20:53:53.869] Persisted trie from memory database      nodes=4 size=580.00B time=289.527µs gcnodes=0 gcsize=0.00B gctime=0s livenodes=1 livesize=0.00B
INFO [03-20|20:53:53.870] Successfully wrote genesis state         database=chaindata                            hash=6061cd…6972ac
INFO [03-20|20:53:53.870] Allocated cache and file handles         database=/home/napier/mynapier/geth/lightchaindata cache=16 handles=16
INFO [03-20|20:53:53.915] Writing custom genesis block
INFO [03-20|20:53:53.916] Persisted trie from memory database      nodes=4 size=580.00B time=161.337µs gcnodes=0 gcsize=0.00B gctime=0s livenodes=1 livesize=0.00B
INFO [03-20|20:53:53.916] Successfully wrote genesis state         database=lightchaindata                            hash=6061cd…6972ac
We have now created wallets and the genesis block in the mynapier folder. Examine the mynapier folder.
What are the contents of this folder:
How are the keys stored:
Note: You may have to use “chmod 777 mynapier” to allow access to the folder.
Next we will start our blockchain:
napier@napier-virtual-machine:~$ geth --datadir=mynapier –-networkid=15
WARN [03-20|20:54:31.161] Sanitizing cache to Go's GC limits       provided=1024 updated=666
INFO [03-20|20:54:31.168] Maximum peer count                       ETH=25 LES=0 total=25
INFO [03-20|20:54:31.195] Starting peer-to-peer node               instance=Geth/v1.8.23-stable-c9427004/linux-amd64/go1.10.4
INFO [03-20|20:54:31.195] Allocated cache and file handles         database=/home/napier/mynapier/geth/chaindata cache=333 handles=524288
INFO [03-20|20:54:31.241] Initialised chain configuration          config="{ChainID: 15 Homestead: 0 DAO:  DAOSupport: false EIP150:  EIP155: 0 EIP158: 0 Byzantium:  Constantinople:   ConstantinopleFix:  Engine: unknown}"
INFO [03-20|20:54:31.241] Disk storage enabled for ethash caches   dir=/home/napier/mynapier/geth/ethash count=3
INFO [03-20|20:54:31.241] Disk storage enabled for ethash DAGs     dir=/home/napier/.ethash              count=2
INFO [03-20|20:54:31.242] Initialising Ethereum protocol           versions="[63 62]" network=1
INFO [03-20|20:54:31.497] Loaded most recent local header
Next open up another console, and we will connect to geth and create a new account:
napier@napier-virtual-machine:~$ sudo geth attach /home/napier/mynapier/geth.ipc
WARN [03-20|20:54:56.172] Sanitizing cache to Go's GC limits       provided=1024 updated=666
Welcome to the Geth JavaScript console!

instance: Geth/v1.8.23-stable-c9427004/linux-amd64/go1.10.4
coinbase: 0xa09243e009a8e6b7e13edaf876ebb138656d9b9d
at block: 0 (Thu, 01 Jan 1970 01:00:00 BST)
 datadir: /home/napier/mynapier
 modules: admin:1.0 debug:1.0 eth:1.0 ethash:1.0 miner:1.0 net:1.0 personal:1.0 rpc:1.0 txpool:1.0 web3:1.0

> personal.newAccount("Qwerty1")
" 0xd739a090f842be4f178c6727a68324d6c7608d71"
> web3.eth.accounts
["0x39a18a459b2475925e3014679707e4970a6a836d",
"0x3a5b61aeb069dc7df1b8f1b58e883118ea8bef3f”, ",
"0x617fc4cd56a938f28b02417088f587c1fb4e7ae4",
"0xd739a090f842be4f178c6727a68324d6c7608d71"]
We can see we now have four account (three created from the genesis block, and which have some cryptocurrency, and a new one). Take a note of your new account ID (just first four hex characters):
We can look at the initial balances in the accounts (use the hex values contained in the accounts). For the following, view of all the account balances (replace the hex IDs with the ones on your system):
> eth.getBalance("0xd739a090f842be4f178c6727a68324d6c7608d71")
0
> eth.getBalance("0x617fc4cd56a938f28b02417088f587c1fb4e7ae4")
30000000
What are the balances in each account:
Next unlock the account with the most Ether:
> personal.unlockAccount("0x617fc4cd56a938f28b02417088f587c1fb4e7ae4")
Unlock account 0xd739a090f842be4f178c6727a68324d6c7608d71
Passphrase: Qwerty1
true
Note you can also use:
personal.unlockAccount("0x617fc4cd56a938f28b02417088f587c1fb4e7ae4","Qwerty1")
Next we can transfer some cryptocurrency from one account to another. For this, transfer Ether from the account with most funds into your newly created account, and then view the transaction:
> eth.sendTransaction({from: '0x617fc4cd5602417088f587c1fb4e7ae4a938f28b', to:' 0xd739a090f842be4f178c6727a68324d6c7608d71,value:1000})
"0x7b37132db152ab7382eb3e580195c1f1b961fee3e1ffbc64bf7a033336b9e2af"
> eth.getTransaction('0x7b37132db152ab7382eb3e580195c1f1b961fee3e1ffbc64bf7a033336b9e2af')
{
  blockHash: "0x0000000000000000000000000000000000000000000000000000000000000000",
  blockNumber: null,
  from: "0x617fc4cd56a938f28b02417088f587c1fb4e7ae4",
  gas: 90000,
  gasPrice: 1000000000,
  hash: "0x7b37132db152ab7382eb3e580195c1f1b961fee3e1ffbc64bf7a033336b9e2af",
  input: "0x",
  nonce: 0,
  r: "0xc9c1cece4aff8143c09be07dfcff600f657bb561e5d8034dbec692ec5554894e",
  s: "0x721f63984441c4eea870383ed8784d3475f32b740e84ad07ba0e795d5d2aead5",
  to: "0xd4499406c13f0c8601927cfaecb325c5ae2cac6a",
  transactionIndex: 0,
  v: "0x41",
  value: 1000
}

> eth.getBalance("0x617fc4cd5602417088f587c1fb4e7ae4a938f28b ")
288230376151711744
> eth.getBalance("0xd739a090f842be4f178c6727a68324d6c7608d71")
0
This is because the miners have not started yet. We can now start the miner and view the balances:
> miner.start()
null
> eth.getBalance("0x617fc4cd5602417088f587c1fb4e7ae4a938f28b")
288230376151711744
> eth.getBalance("0xd739a090f842be4f178c6727a68324d6c7608d71")
0
We can transfer again:
> eth.sendTransaction({from: 0x617fc4cd5602417088f587c1fb4e7ae4a938f28b, to: '0xce1373ddfa2232dc9ca82d98420be7a2e11962b5',value:1000000000})
"0x2e25093e25cbf511c2892cb38b45a5c9f6f9b2785774cd5830cf5bd978839165"
> eth.getBalance("0xce1373ddfa2232dc9ca82d98420be7a2e11962b5")
0
> eth.getBalance("0x617fc4cd5602417088f587c1fb4e7ae4a938f28b")
288230376151711744
The mining process adds some credits to the initial account:
> eth.getBalance("0x617fc4cd5602417088f587c1fb4e7ae4a938f28b")
5288230376151711744

> eth.getBalance("0xce1373ddfa2232dc9ca82d98420be7a2e11962b5")
0
After the mining process we see:
> eth.getBalance("0xce1373ddfa2232dc9ca82d98420be7a2e11962b5")
200000
If we look at the blockchain we see there are two blocks have been created:
> eth.blockNumber
2
What are the balances in the accounts:
What are the balances on the accounts?
How many blocks have been mined?
D Creating a contract
Now let’s create a contract. First open up:
and paste the following code:
pragma solidity >0.4.0;
contract test2{
   uint a;
   constructor () public {
       a = 1;
   }
   function val() public returns(uint){
       return a;
   }
}
contract test3 is test2{
    uint b = a++;
    function show() public returns(uint){
        return b;
    }
}
We can compile the code (use the 0.5.0 compiler) and then click on Details, and get the Web3Deploy version (by clicking on Bytecode):
A sample is:
var test2Contract = web3.eth.contract([{"constant":false,"inputs":[],"name":"val","outputs":[{"name":"","type":"uint256"}],"payable":false,"stateMutability":"nonpayable","type":"function"},{"inputs":[],"payable":false,"stateMutability":"nonpayable","type":"constructor"}]);
var test2 = test2Contract.new(
   {
     from: web3.eth.accounts[0],
     data: '0x60606040523415600e57600080fd5b6001600081905550609f806100246000396000f300606060405260043610603f576000357c0100000000000000000000000000000000000000000000000000000000900463ffffffff1680633c6bb436146044575b600080fd5b3415604e57600080fd5b6054606a565b6040518082815260200191505060405180910390f35b600080549050905600a165627a7a7230582062175dc4e9fcfe956cc06a92ee74103af0feae371ddeb5bb46c65f3f74140a0f0029',
     gas: '4700000'
   }, function (e, contract){
    console.log(e, contract);
    if (typeof contract.address !== 'undefined') {
         console.log('Contract mined! address: ' + contract.address + ' transactionHash: ' + contract.transactionHash);
    }
 })
Now we copy from Web Deploy and place in a JavaScript file (sayhello.js), and then load it onto our blockchain:
> loadScript(‘sayhello2.js’)
and next define the account to run the script (replace with one of your IDs):
> web3.eth.defaultAccount = '0x821eacc2a570c1aeb9b5aa64b5b915d4c1e1f3ee'
We can now start our miners:
> miner.start()
null
> null [object Object]
Contract mined! address: 0x8d487f4a719b5a1cf47c61cc83e757b8d269f877 transactionH
ash: 0xf4bb0fa6ddc1d9e1921a55d576d68acf5b715d00cd89cc7268ece3653c50de50
null [object Object]
Contract mined! address: 0xf3872dc9ced78283ad3a511e970891807dd38590 transactionH
ash: 0xab90aa5169f4ebfcbc139874208cabb29416feb3f12c296c93466d7d8090f805
null [object Object]
Contract mined! address: 0x7a74b5da4168f0a06a752301a3711c8991acaf88 transactionH
ash: 0x6ce2a63c59d124d5ecd4681a368243ba7de8aeacc735d41583f834789cba0b16
Finally we can view:
> test2
{
  abi: [{
      constant: false,
      inputs: [],
      name: "val",
      outputs: [{...}],
      payable: false,
      type: "function"
  }, {
      inputs: [],
      payable: false,
      type: "constructor"
  }],
  address: "0x7a74b5da4168f0a06a752301a3711c8991acaf88",
  transactionHash: "0x6ce2a63c59d124d5ecd4681a368243ba7de8aeacc735d41583f834789c
ba0b16",
  allEvents: function(),
  val: function()
}
> test3
{
  abi: [{
      constant: false,
      inputs: [],
      name: "val",
      outputs: [{...}],
      payable: false,
      type: "function"
  }, {
      constant: false,
      inputs: [],
      name: "show",
      outputs: [{...}],
      payable: false,
      type: "function"
  }],
  address: "0xbd570c2f87b8af945146177377276901fd82b12d",
  transactionHash: "0xc028384b4d8ea0e283c9cd3a6a747ab3efff859bb591d55f710ca20b09
665808",
  allEvents: function(),
  show: function(),
  val: function()
}
And then test:
> test2.val()
"1"
> test3.val()
"2"
E A bit of maths
Now we will create a contract to do a bit of maths. Let's say we want to calculate the square root of a value:
pragma solidity >0.4.0;

contract mymath {
   function sqrt(uint x) public view returns (uint y) {
    uint z = (x + 1) / 2;
    y = x;
    while (z < y) {
        y = z;
        z = (x / z + z) / 2;
    }
}
}
When we create the JavaScript for the compiled version, and we load and run we get:
> personal.unlockAccount('0xc7552f45deb093cafb47286a0bc9415845ca3735','Qwerty')
true
> loadScript('mycontract.js')
null [object Object]
true
Contract mined! address: 0xc706a04b759a32dbec85702dd3864584e737aa77 transactionH
ash: 0xece670dcb578a78dec4d2338755ecade084a517310daacf37fd46fe336341563
null [object Object]
Contract mined! address: 0xfafb5f4d0db2c545592ac9134292162b03088295 transactionH
ash: 0x46204af57db69df078e1ae637b50fa76d8415ee1c1e3bd7e1c2990f328dc85ce
null [object Object]
Contract mined! address: 0x83e0bbb8abe2f0976fde9cf5db05333de067b0df transactionH
ash: 0xabea9606989bcc1bf93513213d298c84d47c7e8e1b397eaf536ebffb793d9304

> test_sol_mymath.sqrt(9)
3
> test_sol_mymath.sqrt(12)
3
> test_sol_mymath.sqrt(81)
9
Now, we will install the Solidity compiler on your Ubuntu host:
sudo add-apt-repository ppa:ethereum/ethereum
sudo apt-get install solc
Create your Solidity program on Ubuntu (1.sol), and then compile it to a binary format:
napier@napier-virtual-machine:~$ solc --bin 1.sol
1.sol:4:4: Warning: Function state mutability can be restricted to pure
   function sqrt(uint x) public view returns (uint y) {
   ^ (Relevant source part starts here and spans across multiple lines).

======= 1.sol:mymath =======
Binary:
608060405234801561001057600080fd5b5060de8061001f6000396000f3fe6080604052348015600f57600080fd5b506004361060285760003560e01c8063677342ce14602d575b600080fd5b605660048036036020811015604157600080fd5b8101908080359060200190929190505050606c565b6040518082815260200191505060405180910390f35b600080600260018401811515607d57fe5b0490508291505b8181101560ac578091506002818285811515609b57fe5b040181151560a557fe5b0490506084565b5091905056fea165627a7a723058207aa8e5d6d41b8fd664f343f3f2bb080b89ab85d06bd9ded50b8eb65a747362dd0029
What can you observe from the code produced? How could you deploy this?
Now compile with the ABI option. What information does the output give?
How does this relate to the code your previously created from the Web site?
Commands
sudo apt-get install software-properties-common
sudo add-apt-repository -y ppa:ethereum/ethereum
sudo apt-get install ethereum

sudo geth --datadir=mynapier init custom.json
sudo geth --datadir=mynapier account new
sudo geth --datadir=mynapier –-networkid=15

sudo geth --datadir=mynapier account new
personal.newAccount("Qwerty1")
web3.eth.accounts
personal.unlockAccount("0x39a18a459b2475925e3014679707e4970a6a836d", “Qwerty1”)
seth.sendTransaction({from: "0x39a18a459b2475925e3014679707e4970a6a836d ", to: "0xa2cda8c68259cc314bd12b67873ce7380b3dc496",value:1000000})
eth.getBalance("0x39a18a459b2475925e3014679707e4970a6a836d")
eth.getBalance("0xa2cda8c68259cc314bd12b67873ce7380b3dc496")
eth.blockNumber
web3.eth.defaultAccount = '0x821eacc2a570c1aeb9b5aa64b5b915d4c1e1f3ee'
loadScript('mycontract.js')

sudo add-apt-repository ppa:ethereum/ethereum
sudo apt-get install solc

solc --bin 1.sol